Gear for Climbing Kilimanjaro | Clothing

Planning my hike of Mount Kilimanjaro and the subsequent safari (check out my visit to Serengeti) in Tanzania was not an easy task.  From every angle, it felt daunting.  How to train, what clothing I would need, what items I needed to bring, what constraints we had with bag weight, and on and on.  It is not easy to sift through all the considerations on the gear for climbing Kilimanjaro, especially the clothing.  Some good work is required!

Research is key in planning your gear for climbing Kilimanjaro

Good research was key and I figured that would be the case from the get-go.  That research took many forms.  Talking to people who have hiked Kili.  Reading blogs or websites about hiking it.  Talking to the great folks at REI. And working through the list and advice given to me by the trek organizer (Trekking for Kids) – which was outstanding.  In the end, I still had many decisions to make on what felt could be important things to add to my packing list for hiking Kilimanjaro and the subsequent safari.  Fortunately, I was well armed with information and advice.

This post is geared to those contemplating climbing Mount Kilimanjaro. Or perhaps those just interested in reading about what people wear when they climb Kilimanjaro!  In any case, reaching Kilimanjaro’s peak, Uhuru Peak, is an adventure that requires both cold and hot weather gear. This is so because the mountain has just about every climate zone possible in its 19,340 ft.

I will attempt, as an amateur, to share over a couple of posts what made it to my packing list and how it helped.  This post will focus on clothing (I share in a separate post the key non-clothing items to bring – and why!).  If you are reading this and planning a similar trek, please feel free to leave any questions as comments and I will reply and try to help.  In addition, should you have other suggested items or even better suggestions than mine, please share!  There are more ways to skin a cat than one!

Some details about my gear recommendations

Before I move on to my recommendations for the clothing packing list, a few key items to note:

  • I went on safari after the hike concluded (I highly recommend this!  You are ALREADY there!) so I also include in my packing list things needed for the safari which is mostly regular stuff but just for warm weather.
  • Kili has multiple climate zones ranging from hot to extreme cold – this requires understanding how much of what to bring and your own preferences.
  • I am not laying out all the options possible, especially in clothing, as this post would be five times long and no one would read it, but will share what all the advice led me to choose – happy to answer any questions you may have.
  • I did write about my 7 top items to take on this hike.  It was a high-level view of the question and written before I went on the trip (whereas this one was written with the first-hand knowledge of having completed the trip).  This post will get into more details.
Kilimanjaro, planning, gear, packing, climb, hiking, trekking, Tanzania, mountaineering

Pin it and dream of Kili!

Clothing – Lower Body

Let’s take it from the bottom of the body upwards.

  • Hiking boots – Get good hiking boots AND do your practice hikes using them so you break them in well.  Otherwise you may suffer more during the hike, including dreadful blisters.  Some folks opted for shoes that were more like hiking shoes.  However, I prefer the safety of the ankle support since I am bound to get sloppy when tired.  Sloppiness raises the risk of twisting my ankle and ruining the rest of the hike.  The following are a couple of boots that read well from the product descriptions.  Mine were REI waterproof hiking boots from a long-time ago so no image at Amazon for them.  Study these and their features, and keep in mind that waterproof and comfort reign supreme in terms of choosing boots. Regardless of where you purchase them, make sure you know whether you can try them out and return them if you, once you have tried them out, decide they are not for you.  That’s a great way to be sure to have the right footwear.  Your footwear will be your key ally those days of being on your feet.  (The two shown here represent two different price points to contrast the options.)

Sample 1Merrell Men’s Moab 2 Mid Waterproof Hiking Boot

Sample 2Columbia Men’s North Plains Ii Waterproof Mid Hiking Boot

  • Gaiters – These items help keep mud and scree from doing a number on you by getting into your footwear and becoming a major nuisance.  You will need gaiters during the summit night climb for sure and, more than likely, on the first day if it has rained recently (it had not when we got started, so I did not need them that day).  You do not really need knee-high ones in my opinion; something to cover the possible gap between the bottom of your pants and the top of your boots is sufficient for the one or two times you will use them.  I would say not the most critical of the items but nice to have.
  • Socks – The socks needed for the hike and the ones needed for the safari were of very different kinds.  For the latter, you may not need to be told what to get (anything that helps keep the foot dry is always better than plain cotton but you won’t die if you wear cotton ones; just be more sweaty).  But for the hike, I highly recommend you use a liner to wick moisture away from your feet and then woolen socks over them.  Wetness is a contributing factor (not the main one perhaps) to blisters.  For summit night or other colder days, you will be well advised to have a pair of VERY thick woolen socks.  I was still a little cold in my feet even with the sturdiest of these on summit night – the part of it that I had any awareness…  I understand that our summit night was not the coldest night possible by a bit so, if it can be colder and I was cold with very thick woolen socks, I hate to know how bad it can feel on my feet!
  • Pants
    • A rainproof outer shell was a must to avoid getting soaked if it rained.  However, this outer layer does not need to keep you warm (I used under-layers to handle the cold).  The outer shell is about rain and, also, wind.  I got a hard shell (you can get a soft shell instead if you want).  A key feature I found most helpful are the side long zippers (ankle to hip) that enable you to very quickly put them on (as in, when rain starts all of a sudden…) – a breeze!  Bottom line on these:  windproof and waterproof.
    • When I was not using the outer shell (which was most of the time), I just used my hiking pants as the exterior layer.  I would highly recommend zip-off (convertible) hiking pants for quick adaptability:  if it gets too hot during the day, you don’t have the “do-I-want-to-go-through-the-hassle-of-taking-off-my-boots-to-change-into-shorts?”-type of dilemma…  But it also saved packing both long pants and shorts 🙂  Read through all the details of these and others you may find (all sorts of price points!).  The convertible hiking pants shown don’t need to be anything fancy:  comfortable and with the amount of pockets you feel you want in the right places (and with buttons, Velcro or zippers on them per your preferences).  Basic worked fine for me!


Sample Hiking PantsColumbia Boy’s Silver Ridge III Convertible Pants
Sample Outer ShellMarmot Men’s PreCip Full Zip Pant Shell

  • Base layer for the legs – Base layers (long leggings) made from merino wool (the best) are important to stay warm.  This layer, given the material, will also keep odors from building up.  This characteristic makes them re-usable for more than one day. Added benefit:  cut down on what needs to be carried on the flights to/from Africa and by the porters.  You can use polypropylene for this layer but I heard merino wool just performs better.  On summit day, you may need two layers of base layer.  I wore two under the hiking pants and then the hard shell on the outside.  Before the trip, I was consistently told that silk is about the best material to help retain warmth next to the skin.  I was surprised when I heard that.  I just happened to have this pair of silk leggings but, once on Tanzania, our lead guide told me to use the two merino layers I had instead of the silk pair and one merino pair.  It worked well enough for me on summit night!
  • Shorts for safari – I wore shorts during the safari (the zip-off hiking pants and an extra pair) but I also did wear my full hiking pants to better protect me from the sun (and bugs, I suppose).  Of course, shorts will also be things you wear in the evening or when exploring towns.

Clothing – Upper Body

  • Base layer– The upper body layering approach is much like the lower body’s.  I used base layers for the colder days – again merino wool.  (Usually one, but two on summit night!)  For lower altitudes, a regular long sleeve CoolMax type of shirt.  As I went up and things got colder, a wool “close-to-the-skin” layer under the CoolMax worked well.  Wool is ideal for skin-contact as it wicks moisture from your skin preventing many things (one of them: smells!).  I show one example below but there are tons from many brands that fit the needs – and varying budgets 😉  Bottom line: no cotton!

Sampletasc Performance Men’s Elevation Ultrafine Soft Merino Lightweight Long Sleeve Shirt

  • Mid layer – I got a merino wool mid-layer to have for the evenings at camps lower than base camp. On summit night, this layer would separate the skin-hugging base layers and the outer layers I will mention next. Tasc‘s Elevation line (of which I show a base layer item above) also has a 1/4 zip hoodie jacket that also combines merino wool with their signature bamboo fiber which may be a great item.  I didn’t have one with a hoodie so I had to wear the regular ski hat if I was cold enough at camp at night. By the way, I am a fan of Tasc‘s regular bamboo fabric t-shirts so I am curious how this one would work.  The Icebreaker item I show below, has the power of one of the best-known and valued brands in terms of quality of merino wool. Normally that means a higher price point.  But this one seems quite reasonable.  Search around when you click through below as they have other versions of the same type of item with some range in price point.  The SmartWool brand, in my short years of serious hiking, has proven to be a good and reliable one.  So theirs is worth reading more about when selecting a mid layer top.  Be wary of items that will themselves as having wool.  A few years ago I clicked on one and it was mostly polyester and only 11% wool.  Always read the product details!!  Note:  An alternative could be a fleece jacket.  There are pros and cons to wool vs. fleece.  One of the main difference is how each performs in keeping you warm when wet (wool is better) and how quickly they dry (fleece is better).  Since I knew I would have the right layers to keep rain off me, then wool was a no-brainer for me.

Sample Mid Layer 1Icebreaker Merino Descender Long Sleeve 1/2 Zip
Sample Mid Layer 2Smartwool Men’s NTS Mid 250 Full Zip T

    • Outer layers –  On the trek, I had an outer hard shell for rain and wind.  I also carried a synthetic down jacket which was great because it was very compact when packed.  I used the latter in the evenings while at camp on cold nights, And, of course, on summit night.  My outer shell was an Arcteryx jacket very much like the one below. Arcteryx is not a cheap brand (I hunted the jacket until I found it on a great sale!) but reading through the item I show below will give you an idea of the features to look for.  Best I can tell, this one is pretty similar from top to bottom to the one I had (except mine was orange).  To keep in mind for summit night:  I used two merino wool base layers, the merino wool light jacket, the hard shell (for wind, not rain), and the synthetic down jacket – which I was not wearing at the beginning of the ascent but which I wore during breaks and once it got too cold even while moving.  It important to plan these well because summit night will be COLD.

Sample Outer ShellArcteryx Alpha SL Jacket

  • Shirts for safari – I had quick-dry short sleeve shirts that also had side vents – very comfortable in warm weather and preventing odors from building up…
  • Head- and neck- gear –  I used different items to cover my head from the cold and from the sun – both very important.  A typical sun hat to protect against the sun (with a rim) was a very good idea.  A skull cap was one of the items I used in cold weather.  In very windy or in rainy conditions, the hood from the hard shell helped a good deal.  I also had a buff which I used when the skull cap seemed like a little much.  In fact, the buff served many purposes, like loosely hanging around my neck to avoid burning up when in the sun.  I also used it to cover my mouth and nose when it got dusty on the trail or in the safari.  Finally, I brought a balaclava for summit night.  It would offer lots of protection with only a small space open to look out.  I could also just use it around my neck (would keep it warmer than the buff would).  So quite a few options!
  • Outer gloves –  You are going to want some extreme gloves! The gloves should be waterproof because you don’t want gloves getting wet where it is cold.  And some good heavy duty insulation (e.g., PrimaLoft). You will still need liners underneath (you would think an extreme glove would be enough…).  My fingertips were still a little cold on summit night even with the liners.  But that eventually passed as I entered “the zone” (read how summit night unfolded)  You also need to decide on the type: mitt or separate-fingers. For that outer layer of gloves, I chose mitt. Plus:  less “surface” exposed to the outside, so keeps more warmth around your fingers. Minus: Lower usability of your fingers since they cannot move independently.  However, the rationale for mitts was that most of the time, I would be holding hiking poles in my hands during the ascent.  For that, the mitt grip worked. Once I wanted to reach for tissues or take a photo, yes, I would have to take the mitts off but that was not a big deal. Even fingered style gloves may have been too thick for some of these motions.
  • Liners – I only used the extreme gloves summit night but the liners I used a lot on the days and evenings prior to summit night.  Maybe bring two pairs of liners of different thicknesses, or one pair of liners and one pair of lighter gloves.  The Grabber hand warmer thingies that generate some heat can be helpful though they do not always seem to generate the same level of heat at high altitude.  Nevertheless, any heat helps so you may want to bring some.

Clothing – sleep time

OK, do I really think you need help with this?  No and yes.  No, because sleep wear is such a personal comfort thing.  But yes because part of it is slightly counter-intuitive.

When you are sleeping in the super-cold weather sleeping bag at night at the higher altitudes and on colder nights, the less you wear, THE BETTER.  No, no, nothing kinky about that statement.  Simply the interior of the super-cold weather sleeping bag will make you feel your own body heat warming you as it leaves your body.  So the more clothing you wear, the less your body heat will work with the sleeping bag to keep you warm.

Other than that, keep the jackets, pants, etc. close to the sleeping bag.  Because when you wake up in the middle of the night to relieve yourself (and, trust me, you WILL if you are taking Diamox), you will need to put those on because you will not be able to go outside in your “sleepwear”!

ilivetotravel Shira Camp with Mt. Kilimanjaro Olympus camera

A happy if tired hiker by his tent and the roof of Africa!  Wearing the merino wool mid layer and the synthetic down jacket.

Can I help you any more with planning your packing list?

So, this is the run-down of the clothing items I’d include in any packing list for a hike of Kilimanjaro.  The items shared here are the things I obtained and used on the hike (and on the subsequent safari).  I have to say my planning paid off.  These items served me very well.  Others may have different additional suggestions on what to add to the list of things to bring to hike Kili.  I hope they will share those here!

Finally, I hope if you were not considering hiking Kili or were uncertain, check out my other posts on the topic (see below) and know that it is fairly attainable with good training and preparation!

Disclosure:  I am not being paid or in any way compensated by the brands whose wares I discuss in this post.  While I would love to sample their products and review them, that is not the case in this post.  I just want to show good samples of the types of items I’d consider.

Save this pin to your board!

What to wear Kilimanjaro, clothing Kilimanjaro climb, packing list Kilimanjaro, hiking


Other related posts that you may want to check out!


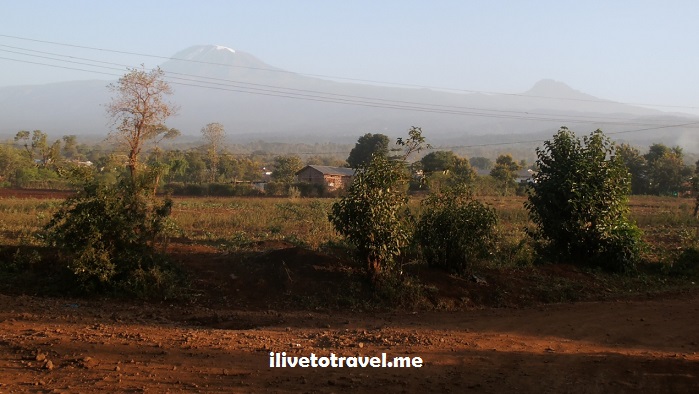
How Hard Is It to Climb Kilimanjaro?

A few years ago I climbed Mount Kilimanjaro, the roof of Africa by virtue of being the tallest mountain thereI have written about how I prepared, what I wore for the climb, and how each day was from day 1 to reaching Uhuru Peak (Kili’s summit) to coming down the mountain.  However, one of the things I have not written about directly is one of the questions I commonly get asked:  “how hard is it to climb Kilimanjaro?”

I get the question directly but I also it in a different way:  when people look at me like I did an almost impossible feat.  I get that it is not something most people do hence why it is a feat of a kind. But to me there are crazier and/or harder things (it is all relative, isn’t it??).  So I wanted to share a little of my perspective on how hard it is to climb Kili.

Kili, Kilimanjaro, Moshi, Tanzania, trekking, hiking, climbing, adventure, Africa, outdoors, photo, travel

The first time I saw Kili outside of the Honey Badger Lodge – such an amazing mountain!

Kili, Kilimanjaro, what to pack, Tanzania, trekking, hiking, climbing, adventure, Africa, outdoors, photo, travel

A photo shared in my earlier post showing what I took with me (for the climb and subsequent safari)

A bucket list item that never was:  Kilimanjaro

I never planned or thought of climbing Kilimanjaro.  It had never occurred to me even as a fleeting thought.  Nowhere in the radar.  I had barely heard or read of people who had done it.  Nor was I a big hiker to begin with (I had never slept in a tent until my first night on Kili!).  My first multi-day hike ever had been the year before I climbed Kili when I hiked four days in the Transylvanian Alps in Romania with Trekking for Kids (TFK).  This all changed one night at a fundraiser for TFK a few months later.

At this event, folks started egging me on to join them in a few months later on the climb Kilimanjaro with TFK.  I considered the whole idea preposterous. I felt tremendously ill-suited for something so physically demanding.  “Climbing Kilimanjaro is too hard,” I thought.  While I exercise regularly and consider myself to be generally fit, I was not running half marathons (had done it once a dozen years before) nor doing bootcamps a few days a week nor anything of the like.

Climbing Kilimanjaro was for the super athletes of the world.  I was far from being that though I knew I was in slightly better shape than the average person.  But, a lot of cajoling, elbowing, and a couple (or 4) glasses of wine later, I succumbed to friendly group pressure and banter.  I said yes.  In a way, I was feeling excited that I would attempt something so ‘crazy’ and out of my comfort zone (always a good thing to do every now and then).

The next morning I woke up and incredulously remembered the prior night’s events.  I was asking myself why I had agreed to undertake this ludicrous effort instead of politely saying I’d think about it.  Well, I am not one to disappoint so I decided I was going to give it a shot after all.  I decided that not because I thought that I had what it took.  In fact, I thought it would take a LOT of training time I did not have.  Training at altitude I also did not have easy access to.  And requiring plenty more hiking experience at altitude or not that I did not possess…

Kili, Kilimanjaro, Moshi, Tanzania, trekking, hiking, climbing, adventure, Africa, outdoors, photo, travel

Ready to start the climb – clean, well-prepared, and eager!

Getting ready for climbing Kilimanjaro

A million questions started swirling in my head once I accepted I was indeed going to stick to this.  SO many question!  How do I best prepare?  What do I need to bring with me?  What do I need to wear to deal with the cold?  Can I do anything to improve my chances at the doing well under exertion?  Can I do anything to help me be ready for the high altitude?  What did I need to know in terms of my personal safety?  How much was it going to cost me when it was all said and done?  And on and on.

I was fortunate to have been doing the expedition to Kili with an outfit like TFK.  They provided a good bit of info to help us prepare ourselves, and gladly answered all my questions as I researched things and acquired the things I needed.  I even remember being at REI looking at stuff.  I called TFK’s Director of Operations, an all-around hiking guru.  And started asking many questions to understand the options, look at items, see if the items’ features were really needed, and all that sort of good stuff.  It was not easy but having access to expert knowledge helped make these key decisions, Especially when spending is required and one has to be careful what one spends the hard-earned money on!!

I won’t repeat here all the things I decided to do in terms of preparation or to pack in terms of the best clothing options and non-clothing items to bring; I will provide links to those posts below.  But now I will address here the “how hard” question…

So how hard is it to climb Kilimanjaro then?

Hiking to the summit of a 19,340 foot mountain is not something to be undertaken lightly.  OK, perhaps if you are a superstar athlete or have the right genes you can… but most of us do not fit that category.  Actually, I take that back:  even being a superstar athlete does not guarantee you will make it to the top of the mountain or even to the rim of the volcano (Stella Point for our route up).

Physical conditioning is only part of what is needed to make it to Uhuru Peak, the summit.  It will most CERTAINLY help you tons. I experienced difficulties after the intimidating Barranco Wall and, of course, summit night for not being in the best possible shape.  However, the other key factor affecting your chances of success is, well, simply how your body deals with the high altitude and lower oxygen levels.

The good news: you can do a couple of things that help a tad.  Nevertheless, you have to have an OK fitness level.   You WILL be exerting your body through a few hours a day of walking and gradual climbs, mixed with some steeper climbs at certain points!

Kili, Kilimanjaro, Lava Tower, Tanzania, trekking, hiking, climbing, adventure, Africa, outdoors, photo, travel

Leaving the Lava Tower looks harder than it was (Day 3)

Training at altitude would help but, from what I understand, the body’s adjustment to altitude dissipates within a few days/a week so that may not be logistically possible for most (if money and time were no object, of course, one would train at high altitude in another continent for a week or two and head straight to climb Kili without wasting days in between – not a likely approach for most).  I did not do any high altitude / long climbs as part of my training due to many constraints but certainly they can only help so if you are able to do some of that in the weeks before, then your fitness level will be better.

Kili, Kilimanjaro,Barafu Camp, Machame Route, Tanzania, trekking, hiking, climbing, adventure, Africa, outdoors, photo, travel

Heading to Barafu Camp from where we would launch to the summit (Day 5)

Part of my training as I share elsewhere was walking on a treadmill on a high incline with a backpack loaded with twice the weight I would carry on the mountain.  It was an odd sight at the gym for sure but it helped physically if not just mentally…  That and the fact that I am in general good shape through routine exercise were in my favor but I still struggled summit night (who doesn’t?) and after the Barranco Wall.

Kili, Kilimanjaro, Barranco Wall, Tanzania, trekking, hiking, climbing, adventure, Africa, outdoors, photo, travel

Climbing along (not up) the Barranco Wall had its challenging spots (me in orange!) (Day 4)

Kili, Kilimanjaro, Barranco Wall, Tanzania, trekking, hiking, climbing, adventure, Africa, outdoors, photo, travel

A little while after the Barranco Wall (OK, an hour or so), we got hit by a little rain

Kilimanjaro was far from easy (each day I would end completely drained and able to move but barely). But I feel it is a reasonable, attainable goal for people with a fair degree of training/fitness.  And with the drive to push themselves beyond what they think they can do.  Yet, with all that, it will still all depend on how the high altitude hits each particular individual.  And that reaction cannot be predicted.

I have to say that MOST CERTAINLY going with a great organization (in my case, a non-profit like Trekking for Kids) and having a one-of-a-kind extremely seasoned lead guide as we had (Luis Benitez – read about him here) were key success factors in helping ME complete the journey from planning to trekking to summitting.  And making it down in one piece!

What was the hardest part about climbing Kilimanjaro?

It is a hard question to answer.  We are all so different.  My answer may not be yours.  Things I can think of include:

  • the cold, especially at summit night,
  • the longing for a nice glass o’ wine or a beer (OK, I threw that in for comic relief),
  • the badly needing to get up to pee in the middle of the night (if taking Diamox – or not),
  • the constant packing and unpacking, inflating and deflating,
  • the not showering,
  • the bathroom situation at camp and on the trail,
  • the rocks to climb requiring longer legs than I have,
  • the having a sick tent-mate and wondering for days if you will catch it and not be able to summit,
  • etc.

(NOTE:  Observe that food is not on this list of possible “hard” things.  I ate great stuff thanks to our great porters and crew!)

But, frankly, all these things are overcomeable.  For instance, while I used wipies every day to sort of clean up after a day of hiking, I had no such thing for the hair.  Yet not even ONCE on the mountain did I think that it had been days since I had washed my hair last.  Those who know me will know how incredible THAT sounds.

Kilimanjaro:  Hard climb but special

That’s what makes going up Kili something special.

YES, it is hard in many ways. Indeed, physically, no matter how well trained you are (with those rare exceptions).  But the hardest part is the mental part.  When you wonder if you really can make it all the way.  And when you wonder whether you want to – on one of those rare moments when you are too tired to think straight.

The hardest part is keeping going, putting one foot in front of the other when you think you can step no more.  But you can.  And you will.  Pole, pole.  Slowly, slowly – our internal Swahili chant.  And you will be so amazed when it is all done that you actually did it.  That you had it in you.  I never knew I did.  But I did.  And I found out through this amazing experience…  I am eternally grateful for those folks at that fundraiser who egged me on. Because the sense of achievement and the self-discovery was truly a gift received – or earned, actually 🙂

And this is the face of happiness at 19,340 ft above sea level at the summit, with my family close to me.

Kili, Kilimanjaro, Uhuru Peal,, Tanzania, trekking, hiking, climbing, adventure, Africa, outdoors, photo, travel

At Uhuru Peak, the summit of Mt. Kilimanjaro!!  (with the short-lived too-reflective sign; it’s gone now)

————————————————————————————————–

Some key links to other posts I have written here based on my experience of climbing Mount Kilimanjaro:

Gear for Climbing Mount Kilimanjaro Clothing

Preparing to Hike Kili: More than Training and Gear

Top 14 Items to Bring on a Climb of Kilimanjaro

And if you want to read a day-by-day walkthrough of what it is to summit Mt. Kilimanjaro, start with Day 1.

And if you just like hiking in general, check out some of my posts about hiking in different places around the world!

Hiking in the state of Georgia: Blood Mountain

Hiking in the Transylvanian Alps in Romania

Trekking the W Circuit in Patagonia

Doing the Camino de Santiago in Spain

A Hike around Fitz Roy in Argentina

how hard climb kilimanjaro, kilimanjaro training, can i climb kilimanjaro

Would love to hear from you about places you hope to hike or favorites past hikes – always good to get ideas from others for future hikes!!

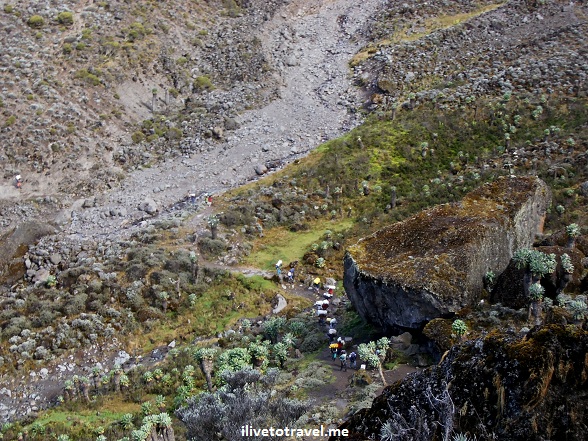
Barranco Wall – A Great Challenge | Kilimanjaro Day 4

The Barranco Wall is one of the most dreaded – if not feared- segments of the climb of Mount Kilimanjaro on the Machame Route.  People often ask how hard is it to do the Barranco Wall.  I was blissfully oblivious to the question before I went on this adventure.  Blessed ignorance!  While I had researched my trek and prepared for it, I had mostly focused on the training, clothing, gear, and altitude sickness more than on the intricacies of the climb or route itself.

Looking back, I am glad I did not know about the Barranco Wall before I met it that morning…  How hard was it to climb the Barranco Wall?  Was it like wall climbing or walking along a steep edge?  How wide was the path along the Barranco Wall?  How high was the Barranco Wall?  What would I feel?  I am sure the questions would have been endless.  And, if you are reading this, perhaps you are asking yourself those questions and seeking answers.  I will get to my answers to those questions, but let me take a step back in the narrative here…

Starting day 4 on the Machame route

There is a morning routine to camp life in Mount Kilimanjaro – at least I concocted one all of my own.  This routine started with getting my “person” ready (dressing, brushing teeth, etc..).  Then it moved to those activities that were about packing up (rolling up the pad, etc.).  And the routine ended with getting ready to go (putting on the layers, filling water bottle, etc.).

While I was a little more leisurely about the first set of tasks (I woke up early enough), I usually felt rushed on the latter.  I worried every day that I would slow down the group’s departure.  Sure enough, I was often the last or second to last person to be ready.  Not really sure why, I got up early enough!  But I didn’t get voted off the mountain so I guess it was all A-OK!

Day 4 on the Machame Route up Kilimanjaro began like every other day:  get out of the zipped-up sleeping bag, figure out where the full pee bottle was to not accidentally crush it, find the camp shoes, put on some warm clothes, have some water, take any of the daily meds required, etc.  I executed the full morning routine as if nothing special was about to happen…

 Hiker, Trekker in front of Mt. Kilimanjaro, Tanzania wearing Arcteryx

Once the morning routine was completed, this trekker looks like a pro!

Meet the Barranco Wall:  A mental and physical wall? 

But on day 4 I did wake up with something else on my mind beyond my routine:  the Barranco Wall.  I had on purpose not read every detail about the Machame Route before I left for the trip as I mentioned earlier because I figured leaving some element of surprise would be good.  I did not want to be anticipating what came next but, instead, enjoy each moment in the present (and not dread the next moment…).

Then, the night before we went on the Barranco Wall, I was told about this well-known feature of the trail we were taking.  I was not sure what what was shared really meant but I had seen the wall on our way in from a distance and I got a little worried about what it would take to get through it for this amateur.  Clearly it was going to be a narrow path with the wall on one side and the “fast” way down on the other…  I tried to not think about it because there was no sense in over-processing it.  But I was hoping it was not wall climbing with a cliff’s edge right by my feet…

It should be called the Barranco Wait, not the Barranco Wall

Of all the things to have worried about, wall climbing was not it.  No mental or physical wall there (that does not mean there were not a couple of tricky moments!).  The real “wall” was the wait to cross the Barranco Wall!  See, normally trails are wide enough to walk two people side-by-side which allows for letting porters pass you without you having to stop or get out of the way.  We appreciated porters because they make the trek possible for the hikers (more on the porters here).  So we always let them pass if we were walking side by side at any point.

However, the trail on the Barranco Wall narrowed to single file for most of it.  The wall did require some times pulling yourself over rocks but always with the trail on either side of it (that is, never floating over empty space below).  So porters would be trapped waiting for hikers to work their way through these points.

Our group stayed off to the side right before the Barranco Wall started to let as many porters pass but it became rather tedious as we ended up sort of waiting for like a good 30 minutes or so.  Other than that the wall should take an hour or two depending on your fitness level and the traffic ahead.

The Barranco Wall on the Machame Route climbing Mt Kilimanjaro

Long line of climbers and porters entering the Barranco Wall. Me?  In the waiting room to enter the Wall, I suppose!

The Barranco Wall on the Machame Route climbing Mt Kilimanjaro

Barranco Wall, here we come! OK, in 2 minutes. No, in 10. No in 20…

Finally, the wall

Wondering what lay ahead of me in the trail for this day, I was quite eager to initiate the hike (instead of pondering what lay ahead).  I sensed others around me were ready to go for whatever reasons of their own.

We finally got started and I found the wall was actually quite doable.  Yes, the trail narrowed at certain points to widths not comfortable for everyone but this actually did not bother me – but I still made sure I was closer to the wall than to the trail’s edge 🙂  The Barranco Wall is between 200-300 m high and, while not trivial, it didn’t hit me as scary from an altitude standpoint though people are very different when it comes to altitudes and ledges so keep that in mind.

Climbing on the Barranco Wall in Kilimanjaro

At the beginning of the Barranco Wall, finally! (Photo courtesy of K. Shuman)

Given we had to go very slowly, I had the time to look back at the direction of the Barranco Camp and the entrance to the Barranco Wall…  And the ever-important photos…

View towards Barranco Camp from the Barranco Wall

Camp was in the direction of the green-roofed hut on the top left. Note that trail of trekkers and porters.

Entrance to the Barranco Wall on the Machame Route

Closeup towards the almost-dry stream we had to cross to enter the Barranco Wall’s “waiting room”

In the end, there were a couple of “tight” spots.  One was a little jump, where help was necessary and useful (from a physical and mental block standpoint).  It was better to have one’s hands free along the path to be able to hold on to things.  So the hiking poles helped me most by being packed away versus in my hands.  The physical exertion was a non-issue for me along the wall and I was glad for that – but there was more ahead, post wall…  The Barranco Wall, for someone not afraid of heights, was not a hard thing to do.  I suspect it is a different story for someone afraid of heights.

The trail after the Barranco Wall:  a trail of doubt for me

With the wall behind us, I felt relief that now we were going to be back on a more “normal” trail – I had this!  Well, we were not quite back to one of those normal trails.  The trail after the Barranco Wall required climbing over a lot of rocks (without a cliff around) and the exertion of climbing over large rocks actually left me quite winded.  I could see myself lagging the group a bit more with every passing section of the trail and I was not happy.  Frustration and doubt started to creep in…

Our Trekking for Kids lead reassured me that the extra exertion of the legs would definitely have this impact (picture, if you will, the difference between walking uphill vs. walking up the same incline using stairs:  it is harder on the latter).  Still I was disappointed,  I wondered if my fitness level was not up to par (I should have hiked more…)  and – furthermore- what did this presage about summit night??

Our lead hiking guide, checking in on me at the next break, told me that an accelerated heart rate is also caused by altitude and may not be necessarily a statement about my fitness level.  I appreciated the support of the TFK lead and our lead guide.  It helped me muster enough strength to get me past this stage of the trail – but just barely…

Onwards and upward on Kilimanjaro!

Mercifully, after that stage, the trail become more the normal up and down hills so I was OK on those.  Occasional rocks along the way were further apart from each other so the issue did not re-surface.  I once again believed I could do this!  My first moment of doubt since entering the mountain had lasted maybe less than an hour.  But, mentally, it had been huge.  So this is what people mean when they say climbing Kili is both a physical AND a mental challenge…

Along the way, the weather was seemingly taking a turn for the worse.  So, we made a quick stop to put on our rain gear but it really did not rain much or for long at all – whew!  While it would not have been terrible, it is just not fun…

Rain hits while climbing Mt. Kilimanjaro in Tanzania

Hikers walking into the cloud…

We arrived at the Karanga Camp (13,800 ft; 4,200 m) after a 4 mile (7 km) hike that took us around 5 hours.  We were very pleased that it was another nice camp on a sloping hillside with great views.  The tents were on a little bit of a slope. But after one slightly uncomfortable night on Day 2, I learned the trick to make the sleeping bag as horizontal as possible.  Just put stuff under the sleeping pad to even it out – simple solution!

Karanga Camp at Kilimanjaro's Machame Route

Yet another beautiful camp! (Photo courtesy of K. Shuman)

Getting the best sleep in Kilimanjaro – sleeping pad

It is worth explaining that we used sleeping pads under the sleeping bags for two reasons:

  1. Further insulate you from the cold ground, and
  2. A little more comfort in sleep with the extra padding.

For me, though, it was more about the comfort question as my zero-rated sleeping bag did a great job with the temperature.

My sleeping pad was an inflatable one (but not self-inflatable).  I had not brought a pump with me to avoid the extra weight (the pump and then all the batteries).  Given the altitude and diminished oxygen levels, I was worried this would be an issue.  But it actually was no trouble at all.  I just inflated the pad sometime before dinner so it was ready for bedtime.  Plus it helped me practice my pressure breathing – good exercise for my lungs at altitude!

Folding the sleeping pad in the morning after deflating it to slip back into its tight packing sleeve was actually THE worst moment of my morning routine…  EVERY.  SINGLE.  DAY.  I should have traded sterilizing someone’s water every morning for folding up and packing my sleeping pad…

It’s all in the views…

Like many moments on this climb, neat views delight when they appear.  After the Barranco Wall waiting room, the post-wall stage which slowed me down and brought doubt, and the slight rain we experienced, it was the nice views that really motivated me to continue with every day and every step.  Such motivation was, for me, this view on Day 4…

Mt. Kilimanjaro's summit beckons climbers

The summit beckons!  We are closer!

Back to Day 3

… or on to Day 5!!

————————————————————————————————————————————————–

Pin this image of the Barranco Wall to your board – you will make it OK through it – even if you have to wait!

how hard Barranco Wall, climbing Kilimanjaro

—————————————————————————————————————————————————

Other posts about my Mount Kilimanjaro trek experience:

–  Preparing for the hike is more than training and gear

–  Clothing required for climbing Mount Kilimanjaro

–  The Machame Route:  our way up

–  7 things you will not see me without as I climb Kili

–  Day 1 of the hike:  and away we go!

–  Day 2 of the hike

–  Interview with fellow Kili climber and Ultimate Global Explorer Len Stanmore

How to Do a Safari in the Serengeti

I have been fortunate many times in life.  With the Serengeti National Park in Tanzania, I have been fortunate twice.  I have done a safari in the Serengeti twice!  Both visits were different.  For example, how I got to be in Tanzania to begin with.  Or, which side of the park I entered through.  And the like, I figured I could share some insights into how to do a safari in the Serengeti and enjoy this unique ecosystem where nature does roam free.  Some of the best Africa, this unfamiliar place to most of us, has to offer.

Safari in the Serengeti National Park twice!

Back in 2007, I went to Tanzania for the first time visiting projects my employer supported in Stone Town (Zanzibar) and the Mwanza region while also visiting our main office in Dar es Salaam, Tanzania’s largest city (but not its capital which is inland Dodoma).

During my stay in Mwanza, I had a day off. I thought to myself:  if I never get to return to Tanzania, what would I do with that day?  Well, the answer was easy:  visit the nearby Serengeti, approaching it from its western side, to do a mini safari.  Though a day is not enough, when that’s all you have, you take advantage of the opportunity.  Experience a safari in the Serengeti:  sample a place so unique and present in our imagination from movies and the like!

tanzania, mwanza, serengeti, Lake Victoria, Speke Bay, lodge, Africa, adventure, outdoors, safari

The tiny Mwanza airport

A chance to do another safari in the Serengeti comes up

Fast forward to late 2012 and I was convinced, sold, pressured, <fill in the word here> to climb Mount Kilimanjaro.  Never on my list of things to do, I was surprised I agreed to do it.  Wine had something to do with it but also the great people with whom I would go on this adventure.

Once on board, the opportunity arose to do a four day safari through the Lake Manyara National Park, the Ngorongoro Conservation Area and the Serengeti after the climb.  I knew I had barely scratched the surface on my brief visit in 2007.  In addition, I had not gotten to Ngorongoro in 2007 because it takes a day of its own and it was outside the Serengeti on the OPPOSITE side from where I was coming and going back to (Mwanza).

My visits were very different in duration, in how they were guided, and in how I got to and departed from the park.  These visits provided me a view of the options for someone contemplating doing safari in the Serengeti with potentially different itineraries.

Flying to Tanzania

First, one has to get to Africa to do a safari in Africa and, for the Serengeti, more specifically Tanzania (though you could come from Kenya).  For a North American departure, a good way to go is via Amsterdam which has a direct flight from Schiphol, Amsterdam’s world class and efficient airport, to Kilimanjaro International Airport (JRO) which is the closest major airport to the mountain (though certainly not right by it!).  Or, you can fly into Dar es Salaam and then take a domestic flight to get you close to either side of the Serengeti:  its western entrance by Lake Victoria, or its eastern entrance towards Mount Kilimanjaro.  Flying in and out of Kilimanjaro certainly gives the most efficient routing so you more time time doing the safari, not getting to it.

Doing the Serengeti from Mwanza, or the western entrance

Getting to the Serengeti from Mwanza

One option on getting to the Serengeti is to enter it from its western side.  You would do this if you were coming, say, from Rwanda or were to get to Mwanza (Tanzania) on the shores of Lake Victoria.  On my first trip to Tanzania in 2007, this is how I visited the Serengeti, as I mentioned.  From Mwanza, it would take 3 hours or so to get to the Serengeti’s western entrance, the Ndabaka Gate.  Fair warning:  the road in was rather rough from this entrance.

Staying near the Serengeti on the Mwanza side

Since you really want to be at the park as early in the morning as possible, I stayed as close to the park’s entrance as possible.  They reserved a lake-shore bungalow at the Speke Bay Lodge (15 km from the park and 125 km from Mwanza) on Speke Bay (part of Lake Victoria) so I could get going really early – optimal time for seeing the wildlife at the park.

tanzania, mwanza, serengeti, Lake Victoria, Speke Bay, lodge, Africa, adventure, outdoors, safari

My bungalow at the Skepe Bay Lodge – outside

tanzania, mwanza, serengeti, Lake Victoria, Speke Bay, lodge, Africa, adventure, outdoors, safari

My bungalow at the Skepe Bay Lodge – inside

tanzania, mwanza, serengeti, Lake Victoria, Speke Bay, lodge, Africa, adventure, outdoors, safari

The shores of Speke Bay

tanzania, mwanza, serengeti, Lake Victoria, Speke Bay, lodge, Africa, adventure, outdoors, safari

The shores of Speke Bay

Exploring the Serengeti from the western entrance

I hired a driver from my organization to drive me in and out of the park.  He was thrilled at the opportunity as he would make extra money.  For the cost of his hourly wages multiplied by the hours spent taking me there/back plus a rather generous tip, I got to sample the Serengeti.  He was savvy enough to not get lost, handle the very rough roads, and show me a good bit.  However, he was not a regular safari driver who has more of knowledge and instinct for finding the action.  This was not ideal but beggars can’t be choosers, can they?  No complaints here.  I felt very fortunate to just get to experience something of this marvel of Creation.

Once in the park, he took me to the impressive Seronera Lodge so I could have lunch.  After concluding the “safari”, I went all the way back to Mwanza which made for a long day.  Needless to say, I recommend more than one day in the park.  Of course, I’d recommend staying in the park  though it can be expensive.  This would allow for taking advantage of the early hours of light.  An early start would almost guarantee one sees all that one hopes to see when doing a safari in the Serengeti.

Here a few images from that trip (film, not digital camera!).

tanzania, mwanza, serengeti, Lake Victoria, wildlife, Africa, adventure, outdoors, safari

Some of the wildlife…

tanzania, mwanza, serengeti, Lake Victoria, monkey, Africa, adventure, outdoors, safari

Anyone need a ride?

tanzania, mwanza, serengeti, Lake Victoria, zebra, Africa, adventure, outdoors, safari

Love this zebra picture!

Doing the Serengeti from Arusha / Kilimanjaro

Getting to the Serengeti from Arusha

The most common way to visit the Serengeti is to approach it from Arusha.  Arusha is proximate to the Kilimanjaro airport, as mentioned earlier.  More or less, it takes about four hours to get from Arusha to the Ngorongoro Conservation Area by car or bus.  The visit to the Ngorongoro can take a whole day so I would not recommend going back and forth from Arusha.

Ngorongoro, Serengeti, safari, Tanzania, explore, adventure, Africa, travel, photos

On the road in the Ngorongoro Crater

Staying near the Serengeti on the eastern side

We stayed at hotel outside the Ngorongoro called Highview Hotel in Karatu (the vistas from the hotel reminded me of the hills of Tuscany!) which made it perfect because, the day after visiting the Ngorongoro, we launched from there into the Serengeti.  We then spent two full days in the Serengeti staying in the park at a nice tented camp (we had a bathroom in the large tent as well as two separate beds!) that allowed us to get a very early start the second day.

Ngorongoro, Serengeti, safari, Tanzania, explore, adventure, Africa, travel, photos, tented camp

My tented camp “tent” – nice!

Exploring the Serengeti from its eastern entrance

On this safari, we did go on a guided safari which definitely helped make the most of this great experience.  We were a group of twelve or so; we split into two vehicles.  One vehicle would be leaving at the crack of dawn and the other sometime after dawn.  I stuck with the group that slept a little more 🙂

We were taking a gamble…  Would we miss the best wildlife action, a lion kill, by sleeping “late” until 6 AM?  Actually a lion kill really meant a lioness or two hunting down some wildebeest.  Well, thankfully, we did not sacrifice the opportunity to see how the hunt takes place.  The hunt was more interesting to me than the actual kill.

The vehicles we rode in sat a small group and the top would open, as most of the vehicles you see during safari.  This way one could stand to look out without the glass of the windows obstructing a clear view out.  Also, who wants to sit for hours on end on uneven dirt roads??  One can be in the open surrounded by who knows what lurking animals.  Aside from it being a little dusty at times, it is the perfect way to be as out there.  Tip:  For the dust, bring a bandanna to serve as a mask in case you need it.

Ngorongoro, wilidlife, Serengeti, safari, Tanzania, explore, adventure, Africa, travel, photos, zebra

Second visit, an.other zebra shot..

Ngorongoro, wilidlife, Serengeti, safari, Tanzania, explore, adventure, Africa, travel, photos, hippo

Hippos enjoying the water

We named ourselves the type B group (vs. the other group, which we lovingly labeled the type A group).  We had been given lunch boxes prepared by our camp to be our lunch on the go, but the type B group (my group) drove past the Seronera Lodge (yes, the one I had had lunch at six years before!) and we asked the driver to stop there.  Once inside, we decided lunch boxes were for the type As and we proceeded to go to the restaurant for the lunch buffet… yes, no shame here – we enjoyed the ‘luxury.’

Anyway, that may not be how everyone wants to do on a safari in the Serengeti.  But it felt SO good to sit down, eat a real meal, sip on a glass of wine or a beer and look out the window at nature.  In the end, it is YOUR safari, YOUR journey so do it however it pleases you.  However you feel you got to unwind, however it helps you to not over-exert yourself.  No shame!  Do it!

Ngorongoro, Serengeti, safari, Tanzania, explore, adventure, Africa, travel, photos, Seronera Lodge, pool

Pool at the Seronera Lodge – with a great view of the plains

In this visit, we witnesses an almost lion kill in the Ngorongoro (we saw the lion patiently monitoring things with three lionesses not far probably doing the hard work).  And then we got the full experience when we got to observe a lioness hunt and kill of some wildebeest in the Serengeti National Park itself.  An incredible sight – it was amazing to witness the patience and finesse of the lioness, and also the cleverness of the wildebeests too (OK, all but one’s…).

Ngorongoro, Serengeti, safari, Tanzania, explore, adventure, Africa, travel, photos, lion, wildlife

Patiently waiting for the menu to walk by…

Ngorongoro, Serengeti, wildlife, safari, Tanzania, explore, adventure, Africa, travel, photos, lion kill

This is not going to end up well for someone…

Africa never ceases to amaze me.  The vistas, the wildlife and the people, so amazing.  The stuff we see on TV and that is so foreign to our daily experience (at least for those of us urbanites).  Though I wish coverage of Africa were better rounded than it is.  It seems me only hear about it when it is bad news, or something.

It is a beautiful place.  A far destination for some of us that is well worth the effort and the leap.  I leave you with these two images of the sunsets I experienced during the last safari in the Serengeti.  Perhaps these images will help convey a little of the beauty of the continent.  Have a good safari!

Ngorongoro, Serengeti, safari, Tanzania, explore, adventure, Africa, travel, photos, sunset, clouds

Amazing sunset on its way while we safari

Ngorongoro, Serengeti, safari, Tanzania, explore, adventure, Africa, travel, photos, sunset, clouds

Amazing sunset from the restaurant at our tented camp


Pin these images to your travel board!

how to go to Ngorongoro, how to go to Serengeti, how to visit Serengeti, how to do safari, Tanzania, explore, adventure, Africa, travel, photos, sunset, cloudsNgorongoro, wilidlife, Serengeti, safari, Tanzania, explore, adventure, Africa, travel, photos, sunset, elephant

P.S. – I received no free anything, or discount, or special treatment by any of the providers mentioned in this post.  I mention them because they were part of my experience and, if I had not been pleased with them, I would not mention them at all…

Top 14 Items for a Kilimanjaro Packing List

I assume that, if you are on this post you must be thinking of your Mount Kilimanjaro packing list.  Well, you came to the right spot!  How to prepare for climbing Kilimanjaro is a crucial step in your planning efforts. 

Via this blog, I share my preparation and packing tips for what to bring on this amazing endeavor (in this post and others; see bottom of post for more inclusive posts).  As I was helped with my planning, I’d like to help others.  In a separate post I cover clothing.  In this post I cover my 14 top items to bring to Kili.  Hopefully, my list and accompanying explanations will be helpful!

A Kilimanjaro packing list is no small thing!

gear, Kilimanjaro, clothing, Olympus, hiking, climbing, Kilimanjaro Packing List

Climbing Kilimanjaro is quite the experience – an achievable one for most people with some training and mental readiness for the effort.  But climbing to the “roof of Africa” is also an operational endeavor!  Lots of planning for the clothing and other items that are needed. This while balancing needs, cost, and weight.  The following picture sort of gives you a visual of the amount of stuff that my Kilimanjaro packing list included.

I have written in another post about what to bring as far as clothing if you are climbing Mt. Kilimanjaro.  That post can help you build the clothing part of your Kilimanjaro packing list.  In no particular order and without further ado, here are the top 14 non-clothing items that were most helpful for me in my hike.

My top 14 items for your Kilimanjaro packing list

1.  Sleeping bag

Get a good one.  One that keeps you warm.  Remember that some of them work best when you wear the least amount of clothing.  I know.  It seems counter-intuitive.  But it is true.  Zero (Fahrenheit) -rated is recommended.  If not, get a liner with extra warmth.  But the best is just a good sleeping bag as the liner would be just one-more-thing to get into and out of…  The mummy style works best.  You want that tapered shape instead of a rectangular one – the rectangular one has more space for air inside that will need to be warmed and that heat comes from you body.  The tapered one is better in that regard.

2.  Wipies

Oh, wipies, thou art so versatile!   Whether it is cleaning yourself after a day of hiking or cleaning yourself after nature calls – or just to wipe your hands after eating, these little suckers are quite helpful.  Take some.  Take a good amount.

3.  Pee bottle

“Huh??,” you may say.  That’s what I said too.  But, stay open-minded…

Picture this:  middle of the night, you zipped into your zero/sub-zero rated sleeping bag, in a tent, with two pairs of zippers in your way to go outside, you with little clothing on, outside freezing cold, you needing to put on clothes, shoes too, stumbling to find the headlamp so you don’t stumble outside OR, middle of the night, you zipped into your zero/sub-zero rated sleeping bag, stumbling to find the bottle (i.e., the pee bottle), then trying to carefully point/aim.  Done.  Yea, I thought so.  Pee bottle.

A tip:  Get a wide mouth bottle (improves the odds of filling it not your tent).

Another tip:  Make sure it seals tight so, when it tips over as you move in your sleep, it will not fill your tent.

Final tip:   Make it big enough.  Do not underestimate how much pee comes out in one “go” plus you may go more than once per night.  Any questions?

4.  Headlamp (with plenty of batteries)

The headlamp will be key on summit night as you start the hike up to the summit at midnight.  You will need to watch your step even if you go with a full moon.  Additionally, at camp at night and in your tent, you will make use of the headlamp.  Make sure you bring extra batteries and save those for summit night.  An extra little light bulb may be good but if the one you have is new, you may not need it (I didn’t).

5.  Pain killer

While my personal preference is to deal with the pain without the need of meds, this approach is suspended when I am trying to climb a 19,340 ft mountain, you know?  I was not sure how my knees would perform nor what other pains may arise during this week long adventure.  I only used them on the descent (not at the start while going down the scree field but after leaving base camp).  It is EXTREMELY rocky in this part of the mountain and I could feel my knees were going to have issues.  I took 2 preventive Advils and repeated once later during the descent and then with dinner that night.  Whether because of my preventive measures or not, I had only very slight soreness on my knees.

6.  Ambien

I was leery of using Ambien at altitude not knowing what effects, if any, it could have on me (other than making me fall asleep).  I had them more for the flight and my first night in-country not for the hike.  But our lead guide said it was OK and maybe even a good idea to take half an Ambien to take the edge off and be able to fall asleep in the evenings since rest was so important during the hike.  So I did and it all worked great.

7.   Hiking poles (two of them!)

Yes, this hike will be a lot easier with two, not one, poles.  Poles give you impulse as you climb over a big step and also you can push off with them as you move forward.  However, they shine in the descent:  my knees would have been pulp (more than they were) if I had not had these poles to soften the impact when stepping down over rocks.  Can’t recommend using them enough (even if you are “tough” – everyone has them) – and if you can score the ones with shock absorbers, even better!

Do try them out somewhere as the grip will be important.  I liked the foam grip and cork handle as it would feel better if my hands got sweaty either way I held it.  I could unscrew the handle to use it as a camera mount (though I did not use that feature during this hike).  Also, make sure they are adjustable:  when you go up, you may want them shorter than when you are going down when you may want them longer!  There are hiking poles at every price point so just check them out in person, ask questions, and then pick!  Or even better, borrow them from someone you know 🙂

8.  Duct tape

You never know what you will need this for and therein the beauty of duct tape:  it fixes anything.  OK, I exaggerate.  Most anything.  I roll it on a pencil as taking the roll itself is bulky.  You can use it to fix a broken backpack or to nip a budding blister before it becomes a nightmare.  You choose the color!

9.  A camera!

OK, this may be obvious.  I was trying to keep the weight down in my “carry-on” during the hike but I clearly needed a camera.  How would I otherwise take magnificent pictures??  I did make a good decision to get a high quality pocket camera instead of my regular bulky camera.  Good call – I got plenty of great photos but without too much bulk/weight.  The views and the moments are worth the camera weight!

 10.  Quick dry towel

While you are not showering for the duration of the hike, you will be brushing your teeth and, likely, your porters will have warm water ready for you when arrive at camp to wash your hands, face, etc.  The quick dry part is likely self-explanatory (when you leave a camp, you don’t return to not a lot of time for the towel to dry out).

 11.  Pad for the sleeping bag

The ground you will be sleeping on is often hard and cold.  In fact, at a couple of places it was even rocky.  The little pad the hike organizers provide for you to lay your sleeping bag on is rather thin and will not do a good enough job to add cushion or protection from the soil.  I took with me an inflatable pad that made my sleep more comfortable – and that is priceless.  A fellow hiker was going to let me use her pump but I ended up having no problem blowing up the pad even at higher altitudes (good job, my lungs).  I got to practice my forced breathing by blowing up the pad so it was good all-around!  (I did HATE every morning deflating it and folding it up…)

12.  Notepad

You may want to bring something to write on as you will have a lot of time at camp after a day’s hike and you may have things from the day to jot down so you don’t forget.  I wrote down start/end times, hours walked, and even what I ate.  I also took notes on funny things or things I experienced – not quite a diary, just quick notes.  On the topic of a lot of time at night, you may want to bring anything else that may amuse you (cards, Sudoku sheets, etc.) but don’t add too much weight to your bag!

13.  Water purification method

Water is boiled at camp but that is only for cooking.  It takes too long to boil water at altitude.  And your porters will not be able to boil water for you to drink.  You will need to bring your own purification solution of which there are several options (purification tablets, ultraviolet radiation, etc.).  The tablets, such as iodine tablets, are lighter to carry.  However, you have to wait for the water to be ready to drink and the iodine causes an odd taste.

SteriPENs are a portable ultraviolet radiation option that is quick and easy.  I had brought the tablets but others had SteriPENs in the group and I quickly realized how much better the SteriPEN approach was.  They all offered the rest of the group their SteriPENs so I traded using one of the hiker’s SteriPEN for sterilizing her water bottles in return – a win win!  Just know they can be temperamental and be sure to bring enough batteries!

14.  But the most important item…

Hopefully, this list has been helpful so far – if you have any questions on the above items or any other, feel free to leave a comment and I will get back to you.  While the list is not all-inclusive, it is the list of the items I most appreciated having with me.  However, the most important item I brought along was… a photo of my family.  This photo went with me to the summit which meant they went up Kilimanjaro too, with me…

Uhuru Peak, Kilimanjaro, Tanzania, hiking, climbing, Kilimanjaro Packing List

Want to read how the hike went?  Start on Day 1

Other posts on climbing Kilimanjaro:

The items recommended above are mentioned for their key features, not because I have an opinion on whether they are the best in their class.   While this is not my entire Kilimanjaro packing list, I am happy to share my full list if you need one as a starting point for creating yours.  It is not an easy thing to plan for, but quite doable.

————————————————————————-

Pin the image below to your Pinterest hiking board as you build your own Kilimanjaro packing list!

packing list kilimanjaro, packing tips kilimanjaro, what to bring kilimanjaro, climb kilimanjaro, hiking, trekking,  Kilimanjaro Packing List
Kilimanjaro, planning, gear, packing, climb, hiking, trekking, Tanzania, mountaineering, Kilimanjaro Packing List
Pin my visual Kilimanjaro packing list – and visualize the day you summit Kili!

My Arrivals in Dar es Salaam, Tanzania

I have arrived into Dar es Salaam three times in my life over two separate trips.  On my first visit, I flew in from Atlanta (via London and Dubai).  On that same trip, I went to Zanzibar by ferry – and returned from Stone Town by ferry into Dar es Salaam’s port.  Years later, I hiked Kilimanjaro and on the way out of Tanzania, our flight from the Kilimanjaro airport made a short stop in Dar es Salaam on our return flight to Amsterdam.  Of course, this last arrival is inconsequential and I will not talk about it in this post.  But the other two bits with a little on the hotel I stayed at in Dar will be the subject of this post.

Arriving in Dar es Salaam – the first time

The airport in Dar es Salaam is, as you may imagine, not too big so not much to say about arriving there after my 5-hr plus flight from Dubai.  I flew Emirates which meant service was good even though I was traveling in economy class.  Of course, before leaving the airport, I had to clear the typical points of immigration, baggage claim, and customs.

I had pre-obtained my visa at the Tanzanian embassy in Washington, D.C. via a via service my employer used.  That meant that I, at least, saved the messy line to get the visa at arrivals (where it was also very hot!).  The visa desk sat in the baggage claim area which was chaotic and very hot as well.  So, once I had my bag, I was ready to go through customs and out of the airport, on my way to my hotel.

Once outside, I found the driver our local office had sent for me – he was ready to take me to my hotel so that part of my arrival was smooth.  The airport was on the small side but the arrivals area was in the shade and convenient to parking so even if I had had to wait, it would have been comfortable and safe.

Airport in Dar es Salaam, Tanzania

As we drove into the city from the airport, the areas we drove through looked industrial at first.  Eventually, we passed some residential areas that looked poor but didn’t seem to be shantytowns.  In fact, it was better than I had expected though I am not really sure I had a clear mental image of what to expect.

My Lodging

My hotel was outside of the city center near Oyster Bay and next to St. Peter’s Catholic Church – right by Ali Hassan Mwinyi Rd, a main drag.  There did not seem to be much around it except a church.  It seemed rather puzzling.  The hotel grounds were surrounded by a high wall and had a gate and guardhouse at the entrance.  It was kind of like a Residence Inn (it was part of the South African Protea chain, now affiliated with Marriott but not back then).

St. Peter Catholic Church, Dar es Salaam, Oyster Bay church, where to go for Mass Dar es Salaam, travel

(Photo courtesy of St. Peter’s CC)

Protea Oyster Bay hotel in Dar es Salaam, Tanzania

Protea Oyster Bay hotel in Dar es Salaam, Tanzania

As I learned later, the hotel which was near Oyster Bay, was at the edge of a neighborhood of large houses where ex-pats and government officials live but, again, there was no commercial establishment in the immediate vicinity.  I also eventually learned we were not far from the new U.S Embassy built after the former embassy was destroyed by terrorist bombs in the 1990s (as was the Nairobi one).  This embassy was of significant size and very well secured.  A little further from the Embassy lay a restaurant and shopping area (Masaki) clearly targeted at ex-pats and people of money.  It was no different in a way to places we see in the U.S. and that surprised me especially the restaurant area near the Sea Cliff Hotel, where one can find a supermarket with Western products (if one needs stuff!).

The best though was a local shopping strip between my hotel and the embassy (Shoppers Plaza on Mwai Kibaki Rd.) which, though probably also geared to ex-pats, also seemed to have a local bent.  There was a great little bakery, a supermarket, and a homestyle eatery that was actually pretty good (though on my first visit there I was a little hesitant…).  It is where I had my first biriani – mmm!!

I did eat my breakfasts and many dinners in the hotel’s restaurant (I went into the office on a normal business schedule so did not explore much during the weekdays except the places mentioned beforehand).  The food at the hotel was very good and the staff attentive but also, I could tell, fairly green (not that they were messing up, just that they seem new at the hospitality business).  One big downside (especially after so many days staying at the hotel and eating at the restaurant):  the same playlist kept playing over and over with maybe 5-7 songs in it…  It was beginning to drive me nuts!

Returning to Dar from Zanzibar by ferry yields a mild scare…

My funnest experience was the day I arrived by ferry from Zanzibar and I accidentally skipped the path to customs (it’s all the same country but they make you go through customs on the way back from Zanzibar) and I missed my driver picking me up…  I waited for like 45 mins as it was getting dark and the crowd from the ferry left.  I was left alone with some local young guys and a taxi or two.  I didn’t have enough currency for a taxi ride to my hotel but I figured the hotel would have to help me out on the fare… when all of a sudden, my driver comes out from the customs area!  He had been waiting for me down there and had been calling folks from the local office to figure out what had happened to me.  A little bit of a moment for all of us (especially when the taxi driver I was about to use wanted one of his “friends” to ride with us – which I refused to very forcefully).

Driving around Dar es Salaam, Tanzania

Anyone have any other insights for tourists or others who may be moving there?  What are some recommendations on places to live, dine, etc.?

Visiting Jozani-Chwaka Bay National Park in Zanzibar

Most people likely think of Zanzibar (Tanzania) for its beaches and resorts.  Or perhaps also for its very unique history and architecture.  Or maybe as the birthplace of Freddie Mercury.  However, get off-the-beaten-path and you will discover Zanzibar has other interesting places to explore.  One such place for those who like things to do outdoors is the Jozani-Chwaka Bay National Park which sits between the towns of Jozani and Chwaka Bay and, therefore, easily accessible for those staying in Stone Town or resorts in the eastern side of the island.   I went to the island not for vacation but, actually, for work as part of a larger visit to Tanzania that took me to Dar es Salaam and Mwanza, out west on the shores of Lake Victoria.

Zanzibar, Jozani, Chwaka Bay, National Park, photo, travel, Tanzania

Welcome!

Zanzibar, Jozani, Chwaka Bay, National Park, photo, travel, Tanzania

On the way to the park

Zanzibar, Jozani, Chwaka Bay, National Park, photo, travel, Tanzania

Entrance to the park

The park is a great example of conservation efforts that involve the adjacent communities that otherwise would tap the park for its natural resources, over time depleting them.  The efforts to conserve the park (in which my employer at the time, CARE, was involved) were part of my visit there and it was great to see how the neighboring communities, once brought on board, understood the long-term considerations and began adapting their own approaches.

The park is west known for its red colobus monkeys.  Quite comfortable with humans (which may be a concern), they are amusing to watch for sure.

Zanzibar, Jozani, Chwaka Bay, National Park, colobus, monkey, photo, travel, Tanzania

Red colobus monkey

Zanzibar, Jozani, Chwaka Bay, National Park, colobus, monkey, photo, travel, Tanzania

Red colobus monkey monkeying around

Besides the monkeys, it is neat walk around and look at the flora native to the area.  A bit humid but otherwise a great walk!

Zanzibar, Jozani, Chwaka Bay, National Park, photo, travel, Tanzania

Vegetation at the Jozani-Chwaka Bay National Park

Zanzibar, Jozani, Chwaka Bay, National Park, photo, travel, Tanzania

Vegetation at the Jozani-Chwaka Bay National Park

So if  you ever head to Zanzibar, enjoy the beaches, Stone Town, and the local contribution to world music but do not miss the Jozani-Chwaka Bay Park, a peaceful oasis within any visitor’s reach.


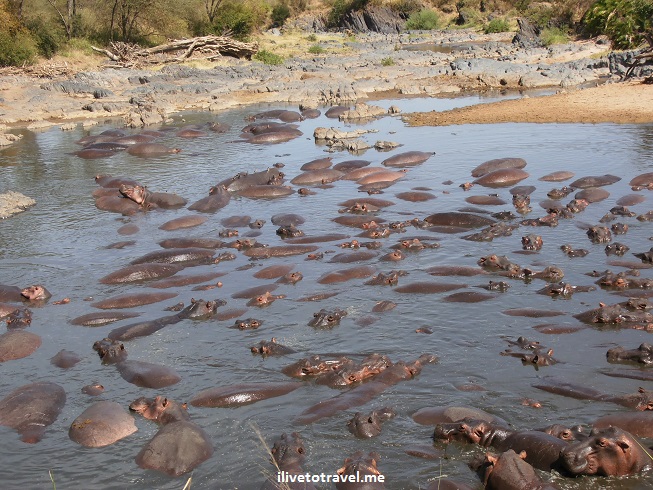
Photo Essay – Hungry Hippos

While visiting the Serengeti in Tanzania on safari, we ran into a few pools of hippos.  They are one of the many incredible sights in the Serengeti along with things like a lioness kill or a beautiful sunset.  Hippos look cute but these animals can be quite dangerous.  Our drivers and guides clearly knew where to take us to be able to look at them yet be safe.  I have to say they were quite a sight even if the baby one went to town eating stuff that came out of another hippo…  Also, it was cool to see how birds co-exist with the hippos.

I thought I’d share some of my favorite pictures of these incredible beasts!

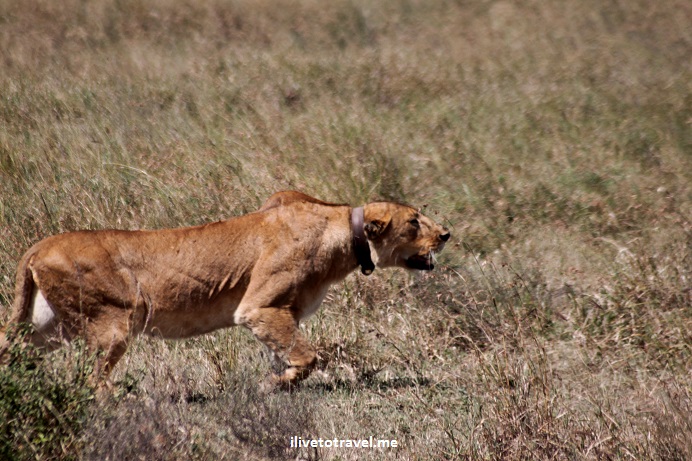
Photo Essay – Anatomy of Lioness Kill in the Serengeti

During my trip Tanzania to climb Mt. Kilimanjaro, I made time to do a safari.  We first visited Lake Manyara, then the Serengeti and at the end the Ngorongoro Crater.   Never in my wildest dreams did I think I was going to see a lion kill.  But that’s exactly what we got to see.  We saw two of them in progress, one with a solo lioness in the Serengeti and another with a trio of lionesses working together in the Ngorongoro Crater.

Lion kills are a slow thing with the beast slowly and deliberately moving to not alert the prey to their presence.  The trio of lionesses was way too slow and after like 45 minutes of watching them without them getting an inch closer to the target group, we moved on.  But the solo lioness was a different story.  Though it was taking a long time too, at least she was moving towards the target group (wildebeests, or “gnus“) so we hung in there.  And we were rewarded with quite a sight.  And the weird thing was, there were vehicles like ours all around (all of us silent, of course) and the presence of the vehicles did not seem to distract her from her focus on the target group and her cautious approach.  That probably was the most amazing thing for me!

So here is a series of photo from the moment we saw her until her moment of rest when it was all said and done…

Lioness, lion kill, wildebeest, Serenget, safari, Tanzania, photo essay

A cute lioness just soaking up the sun in the Serengeti?

Lioness, lion kill, wildebeest, Serenget, safari, Tanzania, photo essay

Nah! She is looking at the source of her next lunch: the wildebeest resting under an acacia!

Lioness, lion kill, wildebeest, Serenget, safari, Tanzania, photo essay

The lioness lies very low, hidden in the tall grass. I lost sight of her a few times!

Lioness, lion kill, wildebeest, Serenget, safari, Tanzania, photo essay

She is a beauty for sure! A tough beauty!

Lioness, lion kill, wildebeest, Serenget, safari, Tanzania, photo essay

She is monitoring the wind so her scent does not carry to the wildebeest scouts who are away from the group to protect it

Lioness, lion kill, wildebeest, Serenget, safari, Tanzania, photo essay

She pauses every now and then. Sometimes she sat there for 5 mins or more

Lioness, lion kill, wildebeest, Serenget, safari, Tanzania, photo essay

She finally moves again. I am leaning on the roof of the vehicle without movement while we wait! My arm falls asleep…  We are ready to snap pictures the moment she makes the final run!

Lioness, lion kill, wildebeest, Serenget, safari, Tanzania, photo essay, gnu, Africa, outdoors, nature

She goes low again and we lost her for a moment  This is the final stretch!

Lioness, lion kill, wildebeest, Serenget, safari, Tanzania, photo essay, gnu, Africa, outdoors, nature

She is too fast and the chaos that ensues makes me lose her but here she is… she got a young one so she does not have to give chase.

Lioness, lion kill, wildebeest, Serenget, safari, Tanzania, photo essay, gnu, Africa, outdoors, nature

The group of wildebeests (or gnus) flies off. I had followed the group thinking she went after them but she was already enjoying her prey under the tree.  Newbie me.

Lioness, lion kill, wildebeest, Serenget, safari, Tanzania, photo essay, gnu, Africa, outdoors, nature

The lioness enjoy a moment in the shade enjoying her success. She is probably about to post a selfie in Instagram as she chews on her lunch.


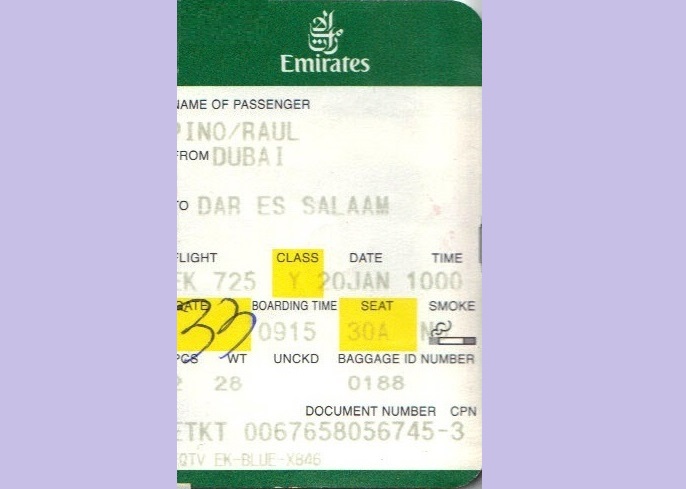
Boarding Pass Stories: Dar es Salaam

This installment of the Boarding Pass Stories goes to Dar es Salaam – via London and Dubai! Boarding pass, Dar es Salaam, Emirates, airline, travel, flight, Dubai

The destination, the when(s), and the reason(s)

While working for an international non-profit, I traveled to visit field projects and to do an internal audit.  It was a toss-up between Bangladesh and Tanzania and the latter was just a bit more interesting to me so that’s the one I went for.  The trip was in 2007 and to get the cheapest price possible, I did a 2-stop itinerary via London and Dubai. I could have done a one-hop via Amsterdam or London but I was being thrifty with our limited funds. A 6-hour layover in London and a 9-hour one in Dubai were enough the wear me down. But it was neat to fly Emirates Airlines and to see the incredible Dubai airport (Atlanta to London was on my local airline, Delta).

The airline

Emirates was phenomenal. Though I flew coach, I felt I was being treated like a business class customer. The plane was the first I had ever flown with nose and underbelly cameras. I loved the camera viewing especially at takeoff and landing.

What fascinated me about this experience

Well, it was my first trip south of Egypt in the African continent so that, by itself, was fascinating.  Dar was interesting.  A mainly expat district helps expats stay as if in their country.  But I greatly enjoyed my time at work, where I got to collaborate and eat lunch with Tanzanians who worked for the same organization.  Their friendliness and soft-spokenness warmed me up immediately to them and, to them, I say asante sana!

Dar es Salaam, Tanzania, Africa, travel

Driving along a main road in Dar es Salaam

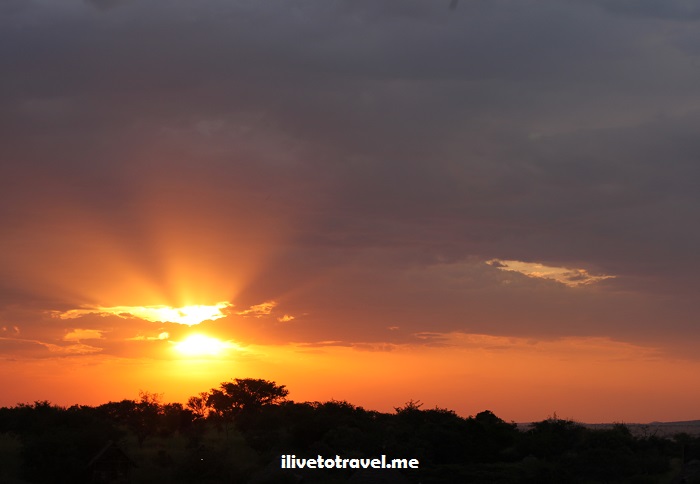
A Wild Time in the Serengeti – Safari!

The Serengeti is the epitome of the national park offering what we call a safari experience (“safari” actually means “journey” in Swahili).  Its vast expanse and, of course, the natural beauty and wildlife offer a very unique experience to us who don’t love in remote areas of Africa.  I had done a one day in-and-out visit to this incredible site a few years ago.  Work activities only permitted that one day.  I KNEW I had to go back someday….

That opportunity came on the trip I made to Tanzania to climb Mt. Kilimanjaro.  After 7 days of working the mountain and a few days of working with a local orphanage with Trekking for Kids, 13 of us from the climbing group devoted 4 days to Lake Manyara, Ngorongoro, and the Serengeti.  Oh, and a visit to a Masai village!

These parks are very different from each other, even if some of the wildlife is the same.  If you do this circuit, start with Lake Manyara.  Leave Ngorongoro and the Serengeti for after it.  We used Zara Tours who had also been the operator Trekking fro Kids had chosen for the Kili hike.

Here is an overview of our visit and some pictures.  Clearly  I have too many pictures and many are very good so to not overload you here, I will continue posting those over time in different posts be it photos of the week or photo essays.  Keep checking in!

Where we stayed

Due to the route we were taking, we stated at two different places:  the Highview Hotel Karatu on our first and fourth night, and the Ikoma Tented Camp the middle two nights.  Two very different experiences and worthwhile in their own way.  The best part:  both offered good views of neighboring areas – and both sold wine and beer, something we were ready to partake in since we were eager to celebrate our climb of Kili.

The Highview Hotel, offered more standard hotel rooms which was nice from a normalcy standpoint.  Of course, being in Africa, A/C is not a common amenity and this hotel was no exception but the building does sit high on a mountainside so there was a little more chance for a breeze.  You could sit in the hallway which was one large, open porch and view the land around the hotel.  Or you could go downhill to the hotel main building and sit there, sipping a glass of wine (likely South African) and watching the sky’s colors change.  When our last day of safari ended, we loved getting back to the hotel to jump in the pool which, oddly, was very cold!

hotel, tanzania, highview, karatu, serengeti, ngorongoro, vista, view, safari, zara tours

Headed up to the rooms at Highview Hotel Karatu

The Ikoma Tented Camp was a great place to stay right outside the northern boundary of the Serengeti   The advantage of staying here is the proximity to the park (less time driving).  The camp’s tents are not small thing:  our tent had two full-sized beds with plenty of room around us to spare.  Each tent also had its own bathroom which though not luxurious were the size of a normal bathroom

hotel, tanzania, highview, karatu, serengeti, ngorongoro, vista, view, safari, zara tours, ikoma, camp, tents

Our tent. Zippered windows and doorway to help keep critters out

The restaurant was perched on top of a small hill, offering EXCELLENT sunrise and sunset views over the plains of the Serengeti.  See for yourselves!

Ikoma, tent, camp, Serengeti, safari, sunrise, vista, view, Olympus, photo, tanzania

Sunrise view over the Serengeti from the restaurant

Ikoma, tented camp, Serengeti, sunset, safari, sunrise, photo, Canon EOS Rebel, Tanzania

Sunset view

You can stay in lodges inside the Serengeti too (if you want to dish out a lot more money) and that may be convenient but I have nothing but good things to say about where we stayed!

Wildlife watching

Of course, the reason you came here was, first and foremost, animals!  So let me share a little on that…  First, let’s debunk that you have to be up at the crack of dawn.  Yes, less people out and about and yes, the animals don’t like the heat of the early afternoon.  However, we managed to see lion kills and all the animals we wanted to see without an absurd wake-up time.  Now, if you want to maximize how many hours of daylight you spend out there, then yes, wake up really early.  While having a lot of vehicles can be a nuisance at peak times, it also helps your driver pinpoint where there may be something interesting as there are more driver-eyes looking out for things!

We saw everything… Here are some of my favorite shots.

Safari, Serengeti, Tanzania, wildlife, animls, zebra, outdoors, nature, photo, Canon EOS Rebel

Double the pleasure; butt shot

Safari, Serengeti, Tanzania, wildlife, animls, giraffe, outdoors, nature, photo,, Olympus, camera

So majestic whenever we saw them

Safari, Serengeti, Tanzania, wildlife, animls, wildebeest, gnu, outdoors, nature, photo, Canon EOS Rebel

A former wildebeest (aka gnu) left up in a tree by a cheetah

Safari, Serengeti, Tanzania, wildlife, animls, hippo, outdoors, nature, photo, Canon EOS Rebel

Hungry hippos nesting on each other. More on this scene in a future post as an “event” happened…

Safari, Serengeti, Tanzania, wildlife, animls,lions, acacia, outdoors, nature, photo, Canon EOS Rebel

Lions resting before or after a kill. One of my favorite pix

Safari, Serengeti, Tanzania, wildlife, animls, giraffe, outdoors, nature, photo, Olymmpus

There is other entertaining stuff going on besides the wildlife!

Safari, Serengeti, Tanzania, wildlife, animls, elephant, school, outdoors, nature, photo, Canon EOS Rebel, acacia

One of my favorite scenes: a school of elephants grabbing a shady spot!

But that’s not all…

OK, the lion kill I saw will go in another post as this one has become quite long.  But I will leave you with two beautiful parting shots as we left the Serengeti one day… Breathtaking.

Safari, Serengeti, Tanzania, wildlife, animls, giraffe, outdoors, nature, photo, Olympus, sunset

Look at that sky!

Safari, Serengeti, Tanzania, wildlife, animls, elephant, outdoors, nature, photo, Olympus, sunset

Now THIS is what I call an “elephant sunset”!

Photo of the Week – Approaching Stella Point in Kilimanjaro

You may have already tracked my hike of Mt. Kilimanjaro via the Machame Route through my prior posts (if not, you may want to check them out starting with Day 1!).  One of the most spectacular moments in the climb of the roof of Africa is the approach to Stella Point.  See, Stella Point is one of the entry points to the rim of Kilimanjaro from which the final push to the summit (less than an hour away on less sloped terrain) takes place.  For many people, like me, arriving at Stella Point is a moment of celebration even if you are not done yet.  I just KNEW I would make it to Uhuru Peak (the summit) even if there is no guarantee really as you still have to climb 600 ft or so crossing the 19,000 ft threshold along the way to Uhuru.

But not only is reaching Stella Point a key milestone, you also approach it right as the sun breaks the horizon which makes it a priceless moment for sure – one I will never forget…

Approach to Stella Point in Mt. Kilimanjaro on the way to Uhuru Peak sunrise roof Africa

Climbers on the final approach to Stella Point under a beautiful sunrise(Photo credit: A. Ruppert) 

%d bloggers like this: