I just returned from an early January trek in Chile’s fantastic Torres del Paine National Park in Patagonia, near “the end of the world”. It was my third time visiting the area in 15 years and my second hike of the world famous W Circuit (my first time doing the W was in Feb 2015). I already knew that Patagonia was my favorite spot on Earth before that hike but, after doing the Torres del Paine circuit then, I was even more certain that it was a place I’d want to return over and over. And so I got to!
A buddy of mine, who is also an avid hiker, wanted to see Patagonia so a few months ago I began the planning process. My first W hike was with a non-profit that organized the trek, Trekking for Kids (with whom I have hiked in Nepal, Kilimanjaro, Romania, the Dolomites, etc.) so I had to start from scratch figuring things out for this trek…
In this post I will cover:
- Key planning questions to do the W Circuit of Torres del Paine NP
- Actual itinerary of my 2nd time doing the circuit including distances, times, elevation gain and key observations
- The weather at Torres del Paine NP
- Random tips (or, the lazy person’s way to add every other suggestion or tidbit without creating an outline <grin>)
1. Planning Questions to Do the W Circuit
There are several questions to work through in planning the W Circuit hike. I will share in this post how I solved for them. Questions:
- In which direction to do the W Circuit: west-to-east or east-to-west?
- How to enter the Torres del Paine NP once the direction has been settled?
- Where to stay while in the Torres del Paine NP: refugios or camping?
- How to book lodging at Torres del Paine NP?
Route Direction: West-to-East or East-to-West?
One thing I already knew: what the trek could look like going west-to-east since that is what I did the first time. I read up on the east-to-west option and I felt the west-to-east was better for us.
Why do east-to-west? A couple of reasons why I believe this to be better:
- “Las Torres”, or the towers that rise above the Torres del Paine National Park and that give rise to the park’s name, are the crown of the park. So much so that the park gets many a day-tourist who will only come to do this part of the W on a daytrip from Puerto Natales. If you start east-to-west, it means that you will arrive at the park at the same time as the daytrippers. The trail from the park’s entry point to Mirador Las Torres will get crowded after Refugio Chileno where the trail narrows, making it not only a strenuous hike but also a painful one with single-file hiking at times and slowing everything down. If you stay at Refugio Chileno and then take off in the AM to go to Las Torres, then your hike will be much more enjoyable. Of course, your day 1 could be to just go to Refugio Chileno and then you go to Las Torres on day 2, in which case this bullet is made irrelevant.
- The hike to the crown is quite hard for a day 1 hike if you go from the entry point to Mirador Las Torres. The other days of the hike help build up endurance and conditioning so that the hike to the Mirador Las Torres is much more enjoyable (though still strenuous enough). I like easing up on days 1 and 2 of the W for the more strenuous day 3 and day 5 of the W Circuit.
- Las Torres, nestled behind a beautiful lagoon, offer one of the most majestic views the park has to offer. I feel this one should be the last of the great views to discover at Torres del Paine NP. Otherwise, it is like reading the final chapter of a mystery novel first.
Others find it better to go east-to-west for their own reasons, though I am not fully sure I know what they are or that they apply to me and how I roll! LOL
How to enter Torres del Paine National Park?
Once the direction has been settled, then you will know which entry point you will use to the park.
- In east-to-west, you will come in through Laguna Amarga / Visitor Center in the direction of Hotel Las Torres, and then on to Refugio Chileno and Mirador Las Torres.
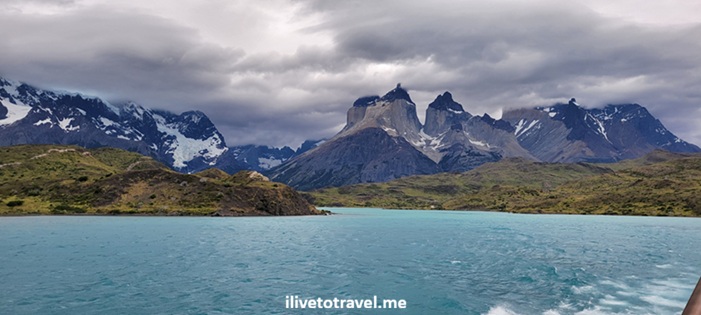
- In west-to-east, the entry point will be Refugio Paine Grande which requires taking a catamaran from Pudeto, a ~30 min spectacular boat ride across Lake Pehoé giving you a preview of the Torres del Paine. Getting to Pudeto is easy with buses departing from Puerto Natales’ bus station (“Terminal Rodoviario”).

Note: Buses to/from Puerto Natales fill up and you should buy tickets well-ahead of time. Also, there are a limited number of times when the buses are available and this could influence what you can do on day 1 (if you take a late bus from Puerto Natales, how far you can go on day 1 will be different than if you take the early bus at 7 AM).
Where to stay in Torres del Paine?
Torres del Paine NP offers quite a few places to stay. Note that you cannot just camp anywhere. If you look at a map of the park, you will notice “refugios” or “campamentos”.
- Refugio usually means there are indoor accommodations (usually dormitory or shared rooms/spaces) and outdoor sites (outdoor sites can be either bring-your-own-tent or premium camping where they provide you the tent/bags so you don’t have to carry them, depending on the site.
- Campamento means only outdoor camping sites are available at the site.
On my first trek, we always stayed indoors. This time, I stayed in both indoor spaces and in premium tents.


A few things to know:
- Some refugios’ indoor spaces are good and some less so. Premium tents, I learned on this trek, are quite comfortable and quieter than indoor spaces. The only drawback to premium tents for me is that they can be far from the bathroom facilities (plus, using somewhat rocky paths in the middle of the night isn’t fun…). Both premium camping sites I stayed at (Cuernos and Chileno) provided the sleeping bag (no liner) and a pillow with pillowcase.
- In both camps, our tents were near running water which made for a peaceful sleep time, and less noise from others around you.
- We paid for full board at all our refugios which meant dinner, breakfast and a solid takeaway bag for lunch usually with a large sandwich and multiple other snacks (protein bar, etc.).
- All refugios offer bar service (wine, beer, mixed drinks) for those looking to chill après-hike with a bev.
- No refugio space (indoor or outdoor) provided towels so be sure to bring a large quick dry towel.
- Also, all had soap in the shower but not all shower stalls’ soap dispensers had soap. So… bring a small bar of soap just in case. None offered shampoo.
How to book lodging at Torres del Paine?
Well, this is where things get tricky. Unless someone is booking lodging for you, this will require concentration… The various sites within the national park are operated by one of two companies: Vertice or Las Torres. You would have to use their websites to book you spaces, however, availability could be exhausted for a particular date at one of the places which will require you to move the “pieces” of your itinerary (or change your itinerary dates altogether) until you get each site on the date and sequence you need for your itinerary across two websites.
In researching how to work this through, I found a company, torreshike.com, which abstracted this through their website, so you only deal with one website to see how it can all “fit” per your desired itinerary. It worked beautifully and all arrangements worked perfectly once on the trail. They can help with a couple of other items as part of the service they offer. Also, I had many other questions to which I was not finding good answers on the Internet and torreshike’s staff went above-and-beyond offering their knowledge to connect me to the right websites or operators to solve my questions. (NOTHING was given to me for saying all of the above; I paid for every penny of my costs. They were just SO good!)
2. Summary of My W Circuit Hike
- Day 1: Refugio Paine Grande to Refugio Grey
- Day 2: Refugio Grey to Refugio Paine Grande
- Day 3: Refugio Paine Grande to Refugio Cuernos (via Mirador Francés and Campamento Británico)
- Day 4: Refugio Cuernos to Refugio Chileno
- Day 5: Refugio Chileno to Mirador Las Torres, back to Refugio Chileno, and then off to Hotel Las Torres (to exit park via Refugio Central)
Day 1: Refugio Paine Grande to Refugio Grey
- The day starts by traveling from Puerto Natales to Refugio Paine Grande:
- 3-hr bus ride to Pudeto via Laguna Amarga/Welcome Center at 7 AM
- 30-min wait in Pudeto
- ~30-min catamaran ride from Pudeto to Refugio Paine Grande at 10:30 AM
- You can buy snacks, fill up with water, etc. at Paine Grande.
- Refugio Paine Grande to Refugio Grey
- Distance: 11 km / 7 mi
- Elevation gain: 1,270 ft
- Moving time per AllTrails: 3 hrs 20 min
- Total time per AllTrails: 3 hrs 35 min
- Trail starts in a narrow path between mountain ridges (not the most exciting part of the trail) and eventually opens up as the trail goes up. That’s when the great views begin along Lake Grey. And then, all of a sudden, one sees it. Glaciar Grey!

- About Refugio Grey:
- It offers dormitory rooms (bunk beds) and camping.
- Dinner was OK; single serving of the main protein but you can repeat on the side dishes.
- One may also be able to buy pizzas/burgers though I am not sure if those are only available until proper dinner time. (Leave a comment if you know!)
- There is a small store between the main building and the campsite with all sorts of munchies and practical items (toiletries, etc.).
- It has a nice (though small) outdoor area to relax. And we did!
- There is a nearby Mirador to see Glaciar Grey a little closer maybe 1 km past the main building.
- Operated by Vertice.
- I like this refugio a lot!

Day 2: Return to Refugio Paine Grande
- As day 1, but in reverse.

- Options to do an ice hike on Glaciar Grey (~$250) or go kayaking in the morning with an easy return to Refugio Paine Grande in the afternoon. Bigfoot Adventures, just 500m or so from Refugio Grey, offers these services.
- Operated by Vertice.
- Refugio Paine Grande is the biggest. It has an outdoor seating area and many indoor lounges around the building.
- Dinner was pretty good and plentiful.

Day 3: Refugio Paine Grande to Refugio Cuernos via the center of the W
- The center of the W goes all the way to Campamento Británico (“C.B.”, no longer open as a camp and actually now called Mirador Británico) which offers a spectacular viewpoint. However, it gets strenuous with a rock climb section at the end so not everyone pursues going that far. The view at C.B. is of the peaks around the center of the W, no great views of the Glaciar Francés (“French glacier”). However, it is a grandiose setting! I think going to C.B. is WELL worth the extra effort and time.

- Halfway to C.B. you get to Mirador Francés. It offers stunning views of this massive glacier. This is a must. If you don’t have the energy to go all the way to C.B., at least be sure to make it halfway to Mirador Francés! Glaciar Francés, along with Mirador Británico, is one of the top sights of the W Circuit.

- There is a stream/small river of glacier water part of the way. There are a couple of easy spots to approach it and refill your water bottle with some very clean and cold water. That means you do not need to carry a full water supply for the entire middle of the W to lighten the load a tad. And you can admire the glacier from those spots too!

- At the entrance to this trail is Campamento Italiano, with bathrooms in pretty bad shape, and a place to leave your backpacks before you embark on your trek to C.B or Mirador Francés. This helps with alleviating the effort to go all the way up. I recommend doing that.
- Dinner at Refugio Cuernos was so-so. We must have gotten the last of the salmon inventory as our slice of salmon seemed to be half of what others got earlier… It was my least favorite meal while at Torres del Paine. Of course, others may differ, especially if they got a full serving!
- Bathroom and showers were much further away for the premium tents than at other sites.
- 27 km / 16.8 mi broken down as follows (distances below are rounded but the total distance is per the final AllTrails-measured distance; duration of the hike includes many short and long stops to enjoy the vistas and/or take many pics; the hike can be shorter with short or no stops but what’s the point??!!)
- R Paine Grande to C Italiano: 8 km / 5 mi; ~3 hrs
- C Italiano to C Británico: 6 km / 4 mi (one way) ~3 hrs
- C Italiano to R Cuernos: 5 km / 3 mi; ~2 hrs
- Elevation gain: 3,812 ft
- Moving time per AllTrails: 8 hrs 20 min
- Total time (includes time to sit, have rest breaks, and admire the great views along the way – and there were a lot): 11 hrs


Day 4: Refugio Cuernos to Refugio Chileno

- A good bit of the first half of this trail borders Lake Nordenskjöld. Somehow, this makes it the windiest of the trails in my experience across both times I have done the W.

- The strongest winds happened once not facing the lake, near Paso de los Vientos or “Wind Pass”. It was fun to experience this but always mindful of whether the winds were going to gust even stronger.
- Once you depart the lake-facing part of the trail, you hit some incredible views as you walk on a high trail above a small river running to the lake.

- Outdoor seating area was plentiful either in the sun or in the shade.
- Dinner was decent. There was a separate storefront to get an empanada or some other snack which was nice.
- Bathroom and showers for campers at Chileno were very good and clean.
- 14 km / 8.6 mi
- Elevation gain: 2,228 ft
- Moving time per AllTrails: 4 hrs 15 min
- Total time: 5 hrs 30 mins

Day 5, part 1: Refugio Chileno to Mirador Las Torres and back
On this day, people have an option of whether to be up at the Mirador for sunrise OR to not do so. If the latter, it is recommended to get going well before the daytrippers arrive to save the hassle, as explained earlier. To see the sun rise at the Mirador, given the very early sunrise in summer that far south, your wakeup time may be around 3:30 AM. You need to factor how fast (or not) you will do the strenuous hike up. Of course, sunrise is visible only if the weather cooperates. Both times I have gone up, we have skipped the sunrise view. I have seen many sunrises in many cool places already…

Going up:
- 4.5 km / 2.8 mi
- Elevation gain: 1,581 ft
- Moving time per AllTrails: 1 hr 32 min
- Total time: 1 hr 38 min

The return to Refugio Chileno was about the same time. I think going up the final rock scramble was faster going up that coming down for me. The other parts were, give or take, faster or slower in one direction or the other. So I would suggest planning the same amount of time for both directions.
Day 5, part 2 (the end): Refugio Chileno to Hotel Las Torres
After the exhilaration of reaching the crown of the park and making it back to the Refugio to have lunch, then the way out of the park begins. We crossed the Paso de los Vientos again though the winds were a tad less strong than the previous day going up to Refugio Chileno. Pretty soon after the Paso is the fork on the trail to go down to Hotel Las Torres which is also the way to the Welcome Center and Refugio Central.

The second half of this trail is the least interesting part of the entire W Circuit for me so my mind went to “let’s just get to the end point”. Still there were some good views on this second half thanks to water crossings and seeing the lake in the distance.


3. The Weather at Torres del Paine
This is one of the more fascinating topics I read/see discussed about Torres del Paine: the weather!
It is said (and it is true) that the weather during the W can change on a dime or from one day to another. That was indeed my experience back in 2015.
Torres del Paine offers great wind experiences! On this second W trek, day 1 was gray and a little windy. From then on (days 2-5) we had blue skies with light cloud coverage. It was never freezing cold, though with the wind, there were times I felt cold. Wearing shorts or short sleeves was OK half the time.
All days were windy though some days had stronger winds. Days 2 and 3 on this trek were not too windy. Day 1 was windy but nothing too crazy. Day 4, especially as one approaches the aptly-named Paso de los Vientos (Winds Pass), does get some crazy winds/gusts. Somewhere I read the experience described as “psychotically” windy – true though the winds were much worse on my first W circuit. Check out the winds of the W Circuit here!

So, expect anything on the trek. Bring layers so you can dress up/down depending on the weather of the day. Note that if it rains and it is windy, the rain may fall sideways! Rain gear (pants and a rain/windbreaker) are a must to bring. though I never needed the rain pants on this second W trek). Rather have them and not need them, than the reverse!
4. Other Useful Info, Perhaps?
- Check-in for camps is usually in a separate desk than the refugios main check-in. Look for the signs.
- There are set dinner times at most refugios; you will pick once you check-in.
- Box lunches from the refugios offer a LOT of edibles: usually a large substantial sandwich and multiple snacks. I rarely kept the sandwich and just consumed one or two of the snacks. However, I am a light eater when I am active so take that with a grain of salt. Lesson learned, though: no need to bring snacks if getting the box lunch as part of full board.
- Refugios’ front desks or restaurants have a big pot of sunblock. Pretty neat of them to have that for skin protection! Apply that before you head out. But also, bring a small snack ziplock bag and take some “for the road”.
- Power is often shut off after midnight until the early morning so plan to charge devices in the afternoon/evening.
- Power outlets may be available within your refugio room or not. If not, they become popular in the shared spaces so plan ahead to secure a spot. Often, there are devices plugged in with multiple power ports so share.
- A form of nightlight is needed so you can hit the bathroom. If you are tenting, the trail between the tent and the bathroom can be rocky so you will need the light!
- Wifi is available. At Vertice lodges, you get 30 mins for free; after that, you can purchase more time. At Las Torres lodges, you can purchase access.
- Water is drinkable out of any faucet or tap since it comes straight down from the glaciers. Keeping that in mind, if you must “go” outdoors on the trail, please do so far away from any stream or rivulet, no matter how small 😉
- The refugio staff at all sites were super helpful and friendly. They work very hard so we can have a memorable experience. Tips are most welcome (and deserved) by the staff (not just an American thing to do…).
- Your Torres del Paine trek can be as solo a thing as you want or as social. My buddy and I were more or less in the middle of that spectrum. We met a lot of neat people, some of which we kept running into as they were doing the same route we were, and some we met before starting but only saw them in the middle of the route as they had started in the opposite direction. It was cool to meet Ralph and his son Sean, the three Minnesotans Alanna, Alyssa, Anna, Charlie & Deb from the UK, Arjan and Sonia, Aiden from Sydney, the Dutch family of six, Alexander & Emmie, the Brit/Chilean couple with their two sons, my friend’s Phil look-alike and his wife, and so on and so forth. We took pictures with many of them as it is not just the landscapes one takes away from this awesome trek!
I love Torres del Paine and Patagonia!!

(Some photos courtesy of my hiking buddy, Mark VZ – thanks for the awesome pix!)
Leave a Reply