How Hard Is It to Climb Kilimanjaro?

A few years ago I climbed Mount Kilimanjaro, the roof of Africa by virtue of being the tallest mountain thereI have written about how I prepared, what I wore for the climb, and how each day was from day 1 to reaching Uhuru Peak (Kili’s summit) to coming down the mountain.  However, one of the things I have not written about directly is one of the questions I commonly get asked:  “how hard is it to climb Kilimanjaro?”

I get the question directly but I also it in a different way:  when people look at me like I did an almost impossible feat.  I get that it is not something most people do hence why it is a feat of a kind. But to me there are crazier and/or harder things (it is all relative, isn’t it??).  So I wanted to share a little of my perspective on how hard it is to climb Kili.

Kili, Kilimanjaro, Moshi, Tanzania, trekking, hiking, climbing, adventure, Africa, outdoors, photo, travel

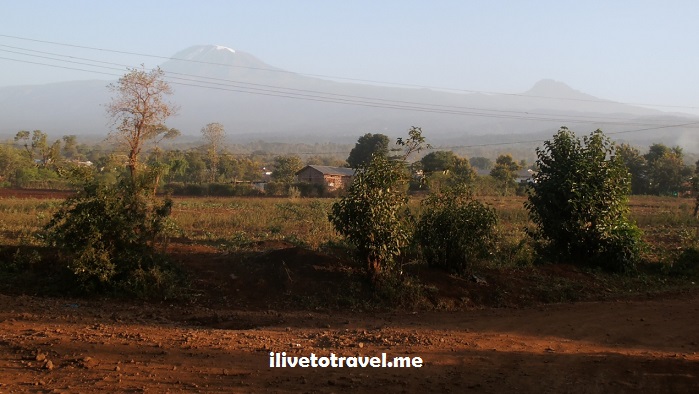
The first time I saw Kili outside of the Honey Badger Lodge – such an amazing mountain!

Kili, Kilimanjaro, what to pack, Tanzania, trekking, hiking, climbing, adventure, Africa, outdoors, photo, travel

A photo shared in my earlier post showing what I took with me (for the climb and subsequent safari)

A bucket list item that never was:  Kilimanjaro

I never planned or thought of climbing Kilimanjaro.  It had never occurred to me even as a fleeting thought.  Nowhere in the radar.  I had barely heard or read of people who had done it.  Nor was I a big hiker to begin with (I had never slept in a tent until my first night on Kili!).  My first multi-day hike ever had been the year before I climbed Kili when I hiked four days in the Transylvanian Alps in Romania with Trekking for Kids (TFK).  This all changed one night at a fundraiser for TFK a few months later.

At this event, folks started egging me on to join them in a few months later on the climb Kilimanjaro with TFK.  I considered the whole idea preposterous. I felt tremendously ill-suited for something so physically demanding.  “Climbing Kilimanjaro is too hard,” I thought.  While I exercise regularly and consider myself to be generally fit, I was not running half marathons (had done it once a dozen years before) nor doing bootcamps a few days a week nor anything of the like.

Climbing Kilimanjaro was for the super athletes of the world.  I was far from being that though I knew I was in slightly better shape than the average person.  But, a lot of cajoling, elbowing, and a couple (or 4) glasses of wine later, I succumbed to friendly group pressure and banter.  I said yes.  In a way, I was feeling excited that I would attempt something so ‘crazy’ and out of my comfort zone (always a good thing to do every now and then).

The next morning I woke up and incredulously remembered the prior night’s events.  I was asking myself why I had agreed to undertake this ludicrous effort instead of politely saying I’d think about it.  Well, I am not one to disappoint so I decided I was going to give it a shot after all.  I decided that not because I thought that I had what it took.  In fact, I thought it would take a LOT of training time I did not have.  Training at altitude I also did not have easy access to.  And requiring plenty more hiking experience at altitude or not that I did not possess…

Kili, Kilimanjaro, Moshi, Tanzania, trekking, hiking, climbing, adventure, Africa, outdoors, photo, travel

Ready to start the climb – clean, well-prepared, and eager!

Getting ready for climbing Kilimanjaro

A million questions started swirling in my head once I accepted I was indeed going to stick to this.  SO many question!  How do I best prepare?  What do I need to bring with me?  What do I need to wear to deal with the cold?  Can I do anything to improve my chances at the doing well under exertion?  Can I do anything to help me be ready for the high altitude?  What did I need to know in terms of my personal safety?  How much was it going to cost me when it was all said and done?  And on and on.

I was fortunate to have been doing the expedition to Kili with an outfit like TFK.  They provided a good bit of info to help us prepare ourselves, and gladly answered all my questions as I researched things and acquired the things I needed.  I even remember being at REI looking at stuff.  I called TFK’s Director of Operations, an all-around hiking guru.  And started asking many questions to understand the options, look at items, see if the items’ features were really needed, and all that sort of good stuff.  It was not easy but having access to expert knowledge helped make these key decisions, Especially when spending is required and one has to be careful what one spends the hard-earned money on!!

I won’t repeat here all the things I decided to do in terms of preparation or to pack in terms of the best clothing options and non-clothing items to bring; I will provide links to those posts below.  But now I will address here the “how hard” question…

So how hard is it to climb Kilimanjaro then?

Hiking to the summit of a 19,340 foot mountain is not something to be undertaken lightly.  OK, perhaps if you are a superstar athlete or have the right genes you can… but most of us do not fit that category.  Actually, I take that back:  even being a superstar athlete does not guarantee you will make it to the top of the mountain or even to the rim of the volcano (Stella Point for our route up).

Physical conditioning is only part of what is needed to make it to Uhuru Peak, the summit.  It will most CERTAINLY help you tons. I experienced difficulties after the intimidating Barranco Wall and, of course, summit night for not being in the best possible shape.  However, the other key factor affecting your chances of success is, well, simply how your body deals with the high altitude and lower oxygen levels.

The good news: you can do a couple of things that help a tad.  Nevertheless, you have to have an OK fitness level.   You WILL be exerting your body through a few hours a day of walking and gradual climbs, mixed with some steeper climbs at certain points!

Kili, Kilimanjaro, Lava Tower, Tanzania, trekking, hiking, climbing, adventure, Africa, outdoors, photo, travel

Leaving the Lava Tower looks harder than it was (Day 3)

Training at altitude would help but, from what I understand, the body’s adjustment to altitude dissipates within a few days/a week so that may not be logistically possible for most (if money and time were no object, of course, one would train at high altitude in another continent for a week or two and head straight to climb Kili without wasting days in between – not a likely approach for most).  I did not do any high altitude / long climbs as part of my training due to many constraints but certainly they can only help so if you are able to do some of that in the weeks before, then your fitness level will be better.

Kili, Kilimanjaro,Barafu Camp, Machame Route, Tanzania, trekking, hiking, climbing, adventure, Africa, outdoors, photo, travel

Heading to Barafu Camp from where we would launch to the summit (Day 5)

Part of my training as I share elsewhere was walking on a treadmill on a high incline with a backpack loaded with twice the weight I would carry on the mountain.  It was an odd sight at the gym for sure but it helped physically if not just mentally…  That and the fact that I am in general good shape through routine exercise were in my favor but I still struggled summit night (who doesn’t?) and after the Barranco Wall.

Kili, Kilimanjaro, Barranco Wall, Tanzania, trekking, hiking, climbing, adventure, Africa, outdoors, photo, travel

Climbing along (not up) the Barranco Wall had its challenging spots (me in orange!) (Day 4)

Kili, Kilimanjaro, Barranco Wall, Tanzania, trekking, hiking, climbing, adventure, Africa, outdoors, photo, travel

A little while after the Barranco Wall (OK, an hour or so), we got hit by a little rain

Kilimanjaro was far from easy (each day I would end completely drained and able to move but barely). But I feel it is a reasonable, attainable goal for people with a fair degree of training/fitness.  And with the drive to push themselves beyond what they think they can do.  Yet, with all that, it will still all depend on how the high altitude hits each particular individual.  And that reaction cannot be predicted.

I have to say that MOST CERTAINLY going with a great organization (in my case, a non-profit like Trekking for Kids) and having a one-of-a-kind extremely seasoned lead guide as we had (Luis Benitez – read about him here) were key success factors in helping ME complete the journey from planning to trekking to summitting.  And making it down in one piece!

What was the hardest part about climbing Kilimanjaro?

It is a hard question to answer.  We are all so different.  My answer may not be yours.  Things I can think of include:

  • the cold, especially at summit night,
  • the longing for a nice glass o’ wine or a beer (OK, I threw that in for comic relief),
  • the badly needing to get up to pee in the middle of the night (if taking Diamox – or not),
  • the constant packing and unpacking, inflating and deflating,
  • the not showering,
  • the bathroom situation at camp and on the trail,
  • the rocks to climb requiring longer legs than I have,
  • the having a sick tent-mate and wondering for days if you will catch it and not be able to summit,
  • etc.

(NOTE:  Observe that food is not on this list of possible “hard” things.  I ate great stuff thanks to our great porters and crew!)

But, frankly, all these things are overcomeable.  For instance, while I used wipies every day to sort of clean up after a day of hiking, I had no such thing for the hair.  Yet not even ONCE on the mountain did I think that it had been days since I had washed my hair last.  Those who know me will know how incredible THAT sounds.

Kilimanjaro:  Hard climb but special

That’s what makes going up Kili something special.

YES, it is hard in many ways. Indeed, physically, no matter how well trained you are (with those rare exceptions).  But the hardest part is the mental part.  When you wonder if you really can make it all the way.  And when you wonder whether you want to – on one of those rare moments when you are too tired to think straight.

The hardest part is keeping going, putting one foot in front of the other when you think you can step no more.  But you can.  And you will.  Pole, pole.  Slowly, slowly – our internal Swahili chant.  And you will be so amazed when it is all done that you actually did it.  That you had it in you.  I never knew I did.  But I did.  And I found out through this amazing experience…  I am eternally grateful for those folks at that fundraiser who egged me on. Because the sense of achievement and the self-discovery was truly a gift received – or earned, actually 🙂

And this is the face of happiness at 19,340 ft above sea level at the summit, with my family close to me.

Kili, Kilimanjaro, Uhuru Peal,, Tanzania, trekking, hiking, climbing, adventure, Africa, outdoors, photo, travel

At Uhuru Peak, the summit of Mt. Kilimanjaro!!  (with the short-lived too-reflective sign; it’s gone now)

————————————————————————————————–

Some key links to other posts I have written here based on my experience of climbing Mount Kilimanjaro:

Gear for Climbing Mount Kilimanjaro Clothing

Preparing to Hike Kili: More than Training and Gear

Top 14 Items to Bring on a Climb of Kilimanjaro

And if you want to read a day-by-day walkthrough of what it is to summit Mt. Kilimanjaro, start with Day 1.

And if you just like hiking in general, check out some of my posts about hiking in different places around the world!

Hiking in the state of Georgia: Blood Mountain

Hiking in the Transylvanian Alps in Romania

Trekking the W Circuit in Patagonia

Doing the Camino de Santiago in Spain

A Hike around Fitz Roy in Argentina

how hard climb kilimanjaro, kilimanjaro training, can i climb kilimanjaro

Would love to hear from you about places you hope to hike or favorites past hikes – always good to get ideas from others for future hikes!!

Top 14 Items for a Kilimanjaro Packing List

I assume that, if you are on this post you must be thinking of your Mount Kilimanjaro packing list.  Well, you came to the right spot!  How to prepare for climbing Kilimanjaro is a crucial step in your planning efforts. 

Via this blog, I share my preparation and packing tips for what to bring on this amazing endeavor (in this post and others; see bottom of post for more inclusive posts).  As I was helped with my planning, I’d like to help others.  In a separate post I cover clothing.  In this post I cover my 14 top items to bring to Kili.  Hopefully, my list and accompanying explanations will be helpful!

A Kilimanjaro packing list is no small thing!

gear, Kilimanjaro, clothing, Olympus, hiking, climbing, Kilimanjaro Packing List

Climbing Kilimanjaro is quite the experience – an achievable one for most people with some training and mental readiness for the effort.  But climbing to the “roof of Africa” is also an operational endeavor!  Lots of planning for the clothing and other items that are needed. This while balancing needs, cost, and weight.  The following picture sort of gives you a visual of the amount of stuff that my Kilimanjaro packing list included.

I have written in another post about what to bring as far as clothing if you are climbing Mt. Kilimanjaro.  That post can help you build the clothing part of your Kilimanjaro packing list.  In no particular order and without further ado, here are the top 14 non-clothing items that were most helpful for me in my hike.

My top 14 items for your Kilimanjaro packing list

1.  Sleeping bag

Get a good one.  One that keeps you warm.  Remember that some of them work best when you wear the least amount of clothing.  I know.  It seems counter-intuitive.  But it is true.  Zero (Fahrenheit) -rated is recommended.  If not, get a liner with extra warmth.  But the best is just a good sleeping bag as the liner would be just one-more-thing to get into and out of…  The mummy style works best.  You want that tapered shape instead of a rectangular one – the rectangular one has more space for air inside that will need to be warmed and that heat comes from you body.  The tapered one is better in that regard.

2.  Wipies

Oh, wipies, thou art so versatile!   Whether it is cleaning yourself after a day of hiking or cleaning yourself after nature calls – or just to wipe your hands after eating, these little suckers are quite helpful.  Take some.  Take a good amount.

3.  Pee bottle

“Huh??,” you may say.  That’s what I said too.  But, stay open-minded…

Picture this:  middle of the night, you zipped into your zero/sub-zero rated sleeping bag, in a tent, with two pairs of zippers in your way to go outside, you with little clothing on, outside freezing cold, you needing to put on clothes, shoes too, stumbling to find the headlamp so you don’t stumble outside OR, middle of the night, you zipped into your zero/sub-zero rated sleeping bag, stumbling to find the bottle (i.e., the pee bottle), then trying to carefully point/aim.  Done.  Yea, I thought so.  Pee bottle.

A tip:  Get a wide mouth bottle (improves the odds of filling it not your tent).

Another tip:  Make sure it seals tight so, when it tips over as you move in your sleep, it will not fill your tent.

Final tip:   Make it big enough.  Do not underestimate how much pee comes out in one “go” plus you may go more than once per night.  Any questions?

4.  Headlamp (with plenty of batteries)

The headlamp will be key on summit night as you start the hike up to the summit at midnight.  You will need to watch your step even if you go with a full moon.  Additionally, at camp at night and in your tent, you will make use of the headlamp.  Make sure you bring extra batteries and save those for summit night.  An extra little light bulb may be good but if the one you have is new, you may not need it (I didn’t).

5.  Pain killer

While my personal preference is to deal with the pain without the need of meds, this approach is suspended when I am trying to climb a 19,340 ft mountain, you know?  I was not sure how my knees would perform nor what other pains may arise during this week long adventure.  I only used them on the descent (not at the start while going down the scree field but after leaving base camp).  It is EXTREMELY rocky in this part of the mountain and I could feel my knees were going to have issues.  I took 2 preventive Advils and repeated once later during the descent and then with dinner that night.  Whether because of my preventive measures or not, I had only very slight soreness on my knees.

6.  Ambien

I was leery of using Ambien at altitude not knowing what effects, if any, it could have on me (other than making me fall asleep).  I had them more for the flight and my first night in-country not for the hike.  But our lead guide said it was OK and maybe even a good idea to take half an Ambien to take the edge off and be able to fall asleep in the evenings since rest was so important during the hike.  So I did and it all worked great.

7.   Hiking poles (two of them!)

Yes, this hike will be a lot easier with two, not one, poles.  Poles give you impulse as you climb over a big step and also you can push off with them as you move forward.  However, they shine in the descent:  my knees would have been pulp (more than they were) if I had not had these poles to soften the impact when stepping down over rocks.  Can’t recommend using them enough (even if you are “tough” – everyone has them) – and if you can score the ones with shock absorbers, even better!

Do try them out somewhere as the grip will be important.  I liked the foam grip and cork handle as it would feel better if my hands got sweaty either way I held it.  I could unscrew the handle to use it as a camera mount (though I did not use that feature during this hike).  Also, make sure they are adjustable:  when you go up, you may want them shorter than when you are going down when you may want them longer!  There are hiking poles at every price point so just check them out in person, ask questions, and then pick!  Or even better, borrow them from someone you know 🙂

8.  Duct tape

You never know what you will need this for and therein the beauty of duct tape:  it fixes anything.  OK, I exaggerate.  Most anything.  I roll it on a pencil as taking the roll itself is bulky.  You can use it to fix a broken backpack or to nip a budding blister before it becomes a nightmare.  You choose the color!

9.  A camera!

OK, this may be obvious.  I was trying to keep the weight down in my “carry-on” during the hike but I clearly needed a camera.  How would I otherwise take magnificent pictures??  I did make a good decision to get a high quality pocket camera instead of my regular bulky camera.  Good call – I got plenty of great photos but without too much bulk/weight.  The views and the moments are worth the camera weight!

 10.  Quick dry towel

While you are not showering for the duration of the hike, you will be brushing your teeth and, likely, your porters will have warm water ready for you when arrive at camp to wash your hands, face, etc.  The quick dry part is likely self-explanatory (when you leave a camp, you don’t return to not a lot of time for the towel to dry out).

 11.  Pad for the sleeping bag

The ground you will be sleeping on is often hard and cold.  In fact, at a couple of places it was even rocky.  The little pad the hike organizers provide for you to lay your sleeping bag on is rather thin and will not do a good enough job to add cushion or protection from the soil.  I took with me an inflatable pad that made my sleep more comfortable – and that is priceless.  A fellow hiker was going to let me use her pump but I ended up having no problem blowing up the pad even at higher altitudes (good job, my lungs).  I got to practice my forced breathing by blowing up the pad so it was good all-around!  (I did HATE every morning deflating it and folding it up…)

12.  Notepad

You may want to bring something to write on as you will have a lot of time at camp after a day’s hike and you may have things from the day to jot down so you don’t forget.  I wrote down start/end times, hours walked, and even what I ate.  I also took notes on funny things or things I experienced – not quite a diary, just quick notes.  On the topic of a lot of time at night, you may want to bring anything else that may amuse you (cards, Sudoku sheets, etc.) but don’t add too much weight to your bag!

13.  Water purification method

Water is boiled at camp but that is only for cooking.  It takes too long to boil water at altitude.  And your porters will not be able to boil water for you to drink.  You will need to bring your own purification solution of which there are several options (purification tablets, ultraviolet radiation, etc.).  The tablets, such as iodine tablets, are lighter to carry.  However, you have to wait for the water to be ready to drink and the iodine causes an odd taste.

SteriPENs are a portable ultraviolet radiation option that is quick and easy.  I had brought the tablets but others had SteriPENs in the group and I quickly realized how much better the SteriPEN approach was.  They all offered the rest of the group their SteriPENs so I traded using one of the hiker’s SteriPEN for sterilizing her water bottles in return – a win win!  Just know they can be temperamental and be sure to bring enough batteries!

14.  But the most important item…

Hopefully, this list has been helpful so far – if you have any questions on the above items or any other, feel free to leave a comment and I will get back to you.  While the list is not all-inclusive, it is the list of the items I most appreciated having with me.  However, the most important item I brought along was… a photo of my family.  This photo went with me to the summit which meant they went up Kilimanjaro too, with me…

Uhuru Peak, Kilimanjaro, Tanzania, hiking, climbing, Kilimanjaro Packing List

Want to read how the hike went?  Start on Day 1

Other posts on climbing Kilimanjaro:

The items recommended above are mentioned for their key features, not because I have an opinion on whether they are the best in their class.   While this is not my entire Kilimanjaro packing list, I am happy to share my full list if you need one as a starting point for creating yours.  It is not an easy thing to plan for, but quite doable.

————————————————————————-

Pin the image below to your Pinterest hiking board as you build your own Kilimanjaro packing list!

packing list kilimanjaro, packing tips kilimanjaro, what to bring kilimanjaro, climb kilimanjaro, hiking, trekking,  Kilimanjaro Packing List
Kilimanjaro, planning, gear, packing, climb, hiking, trekking, Tanzania, mountaineering, Kilimanjaro Packing List
Pin my visual Kilimanjaro packing list – and visualize the day you summit Kili!

Hiking Tips from an Unexpected Climb of Blood Mountain

I enjoy hiking and love exploring new routes.  On one recent hike, near my home in Atlanta, I had the opportunity to learn some lessons in hiking so I’d thought I’d share some hiking tips from that experience.  While these tips may be common sense, the refresher is always good…  But before I share the hiking tips (located at the end of the post), let me tell you what happened…

The setup to the story

Living in Atlanta, Georgia I have access to great hiking an hour and a half away from the city at the southern end of the Appalachian Mountains, host of the famous Appalachian Trail (AT) that runs from north Georgia all the way to Maine.  There is nice hiking closer to Atlanta (like around the Chattahooche River National Park) but for longer and more strenuous hikes (and overall better vistas), I like going up to the north Georgia mountains despite the trip adding a 3-hour round trip to and from the mountains.

I was looking for a long hike to do on a daytrip as part of general conditioning for my hike in Patagonia and I was seeking a loop, instead of an in-and-out hike.  A good friend who also enjoys hiking offered to come along (I don’t hike solo) and we set out to do Jarrard Gap Trail connecting it to the Slaughter Creek Trail by traversing a 1.85 mile stretch of the AT for a total hike of around 5.75 miles.  It was a great hike but I learned some lessons in hiking from an unexpected twist in our hike…

While I have hiked in interesting places (like the Transylvanian Alps in Romania and Mt. Kilimanjaro), I am not an expert hiker who knows all the tricks of the trade, who is used to half-missing signage, who is secure in his inner compass, etc.  So I rely on maps and stuff I find on the Internet to create a route.  (My friend Val in Real Life would probably laugh her rear off at my lack of innate outdoor skills!)  On this occasion, my friend and I got a little complacent thinking we had clear in our head the route we were taking.  I will first share with you the hike we DID as it was definitely diverse in terrain and views, and enjoyable, if long.  I will then tell you what we THOUGHT we were going to do that day and highlight the difference between the two.  And then, I will share some lessons I learned!

The innocent start to the hike

After driving about 1.5 hrs, we arrived at Winfield Scott Lake, a rather small lake at the start of our hike.  To get there, we passed the entrance where visitors are supposed to take an envelope and place $5 in it and drop it in a locked box.  One is supposed to tear off part of the envelope and hang it on the rear view mirror of the vehicle (the number on that stub and the envelop in the locked box would match, telling the part ranger that this car has paid).  There were no envelopes to be found so we improvised and dropped the fee with a label that indicated my license plate in case someone checked.  We doubted anyone would be checking on this Sunday but we preferred being good citizens.  I took a picture of what I dropped in in case I needed it later to fight a citation!dollars

The actual hiked route

We entered the trail and, after crossing a narrow and single-side handrail bridge, we were dumped on a paved road where we saw a house with Halloween decorations still on the mailbox (this would prove useful later!).  There was a simple sign indicating the way and we walked maybe 0.25 miles on the road until the real entrance to the real Jarrard Gap Trail.

Appalachian Trail, north Georgia mountains, hiking, trail, Jarrard Gap, photos

On the Jarrard Gap Trail

The terrain was a nice upward slope but not too intense.  Nice views of the downhill on this winter day.  Once we exited this trail at the Jarrard Gap, we walked a little to the next set of signs which helped point the way in this 4-way intersection.  Except it was not all too clear as it did not have any of the names in our map.

Someone told us which way was the AT and we walked little on it until we saw the white mark that is used to mark the AT so on we went.  So we entered the AT in the direction of Blood Mountain.  There were slight (rolling, I would call them) downhills and flat bits of terrain.  We passed a camp area on the left after having taken a quick break, and soon on the right we saw the trailhead to the Freeman Trail which sort of parallels the AT (it re-meets the AT on the opposite end).  At that point, we were 2.6 miles from our beginning point and so we went off on Freeman Trail.

Freeman Trail is about 1.8 miles of very different terrain than what we had been on on the Jarrard Gap Trail and the AT.  At parts narrow, often very rocky (small and big), it was actually a fun trail to hit as long as one is not expecting a cozy walk.  We were not.  We even passed an icy spot on our way to the other end of the trail.

We understood we would exit Freeman Trail and take the AT in the direction back towards the entrance to Freeman Trail.  But, before setting on the AT, we stopped to eat our lunch at this popular intersection.  At this intersection, besides the AT and the Freeman Trail, there is a trail that leads to a parking lot 0.7 miles away.  That parking becomes probably the point with the shortest route up to Blood Mountain.

Appalachian Trail, north Georgia mountains, hiking, trail, Blood Mountain, Samsung Galaxy, photos, climb

At the spot where Freeman Trail hit the AT

By taking the AT in the direction of the entrance we took into the Freeman Trail, we were proceeding to ascend Blood Mountain which, at near 4,400 ft, is the fourth tallest mountain in the state of Georgia and one of the most popular mountaintops in the state with breathtaking views all the way to North Carolina and Tennessee.

The climb to the summit was hard.  Rocky and steep with many switchbacks, with vegetation everywhere.  It definitely worked out my gluteus maximus and my hamstrings!  I had the same trouble I had had on Day 4 on Kilimanjaro after passing the Barranco Wall segment of that hike.  I carried a 16-lb backpack as part of my training but ended up emptying my extra bottle of water (one that I carry precisely as a way to drop backpack weight should I feel like I need to; it is not the water I expect to consumer during the hike). It indeed was a challenge – an unexpected one – but I am glad I did it as it was good training for my upcoming hike and a great workout.

Appalachian Trail, north Georgia mountains, hiking, trail, Blood Mountain, photos, climb

On the way to the summit!

At some point, we reached a clearing with large smooth rocks replacing the ground, like how Stone Mountain is when you are climbing it.  We stopped briefly and chatted with some folks who had gone up ahead of us; they had not heard of Slaughter Creek (which was a little unnerving but they had come from the “nearby” parking lot so they were likely not expecting to hit the creek on the other side of the mountain).  From this clearing, one could see Stone Mountain and Atlanta in the distance.  That was very impressive given how far north we were.

Appalachian Trail, north Georgia mountains, hiking, trail, Blood Mountain, photos, climb

The view from the clearing

The AT is well-marked with rectangular white boxes painted on trees and rocks so no issues knowing where we were so we continued on it as we knew the AT would connect to the Slaughter Creek Trail.  Not long afterwards, we reached the summit which has a neat rock outcropping from which to soak the entire view.  It is located right next to a nice shelter structure for those who stay overnight (further down, there is a “privy” or basic toilet facility).  After checking the view and confirming which of the two possible ways was the way down (other than the one we came up from), we began our descent which I welcomed as going up had been hard.  I read later that the side we went up was harder but I am glad we did it that way because going down that way would have killed my knees with all the rocks…

The descent was uneventful.  We passed a campsite area on the left and it was a little mis-leading as the white box marking the trail made us think we had to detour at the campsite because the other part of the trail did not have the white rectangular boxes.  But the crude wooden map on the campsite and a brief exploration of the other trail (where we saw a sign that said “Water” and pointed down that path) led us to determine that the unmarked way was the way to go.  Confidently we moved forward and downward and soon we ran into a trio that confirmed for us that was the way down indeed.  So it was nice to have that validation.  They told us that we would make a left at the steps at the bottom that were still iced over.   The descent was not too rocky at all so that made it better for our knees.

We reached the iced-over steps and felt really good that we were on the final stretch.  We walked maybe 0.4 miles before we hit the entrance that we had taken to enter the Freeman Trail and then returned to repeat backwards the way in – a final 2.6 miles to get to our parking lot.  Along the way, we had forgotten about the road we had been dumped into before hitting the real Jarrard Gap Trail.  Thankfully, the house that still had Halloween decorations on the mailbox saved the day as we remembered having passed it.

The INTENDED route

So after having read what we did.  Here is what we had intended to do…

We were supposed to get on Jarrard Gap Trail (check) and hike it until it ended at the Jarrard Gap (check) and then connect with the AT (check) and walk towards Freeman Trail (check) but continue 0.4 miles past the entrance to Freeman Trail without taking Freeman Trail (NOT CHECKED!).  After the 0.4 mile stretch, we would encounter the trailhead to Slaughter Creek Trail which would have taken us back to the road near Winfield Scott Lake.  End of a moderate day hike.

That, ladies and gentlemen, is what we were supposed to do.  5.75 miles that could have taken us 2.5-3 hrs, perhaps.  I will explain what happened next but stay tuned for hiking tips at the end of the post!

What went wrong on this north Georgia mountain hike? 

No, no banjos or bears

The map from the website where I got the route instructions did not label the trails the proposed route would take us on.  Thank goodness there was a clear map at the parking lot by the lake that had trails with names on them.  We could not quite reconcile this map to the one in our printout so we took a photo of the map so we could have handy along the way (boy, was that a good idea!).

map, Appalachian Trail, north Georgia mountains, hiking, trail, Blood Mountain, photos,Jarrard Gap

The parking lot map

However, the map sort of helped get us confused – we saw that there was clearly a way from Freeman Trail on to Slaughter Creek Trail (via the AT) so we thought we were good.  But, what we failed to grasp was the increased distance such a route meant:  instead of our intended 5.75 mile plan, we ended up doing about 10.5 miles (per our reconstruction of the facts once back in the comfort of our respective homes).  This is how…

Remember when I said earlier that we encountered the start of the Freeman Trail so off we went on it?  Well, as you read on the “intended route” bit above, we were not supposed to take Freeman Trail.  The route instructions we had printed were just highlighting that at mile 2.6 we would encounter the trailhead for Freeman Trail. The explanation of the route was peppered with beautiful photos that certainly kept us from focusing on reading the text carefully as, upon careful reading later, we realized it never indicated that we needed to get on the Freeman Trail!

0.4 miles after passing the Freeman Trail, we were supposed to find the start of Slaughter Creek Trail at which point we would be returning along the same-named creek.  After a while on Freeman Trail we wondered if we had missed a turn 0.4 miles after we had started on it to find Slaughter Creek Trail (the connection to that trail was not evident in the map from the parking lot).

Appalachian Trail, north Georgia mountains, hiking, trail, Freeman Trail, Olympus, photos

Along the Freeman Trail

We should have turned around…  However, the map we had taken a picture of did show that we would hit the AT again and would swing back to hit Slaughter Creek Trail at some point (which we didn’t realize was much later than expected…).

And so we kept going on the rougher trail that is Freeman Trail.  Partly perhaps because we were distracted by our conversation and maybe partly because the trail was unusual (narrow, rocky, with more interesting vegetation that leafed-out winter trees).  Maybe it was just such a nice day for a hike so why rush it?  Eventually,we ran into a man and his dog and we asked him how far to hit the AT and he told us “one mile or so.”  We were taken aback but pressed on as we knew this way we would get to where we wanted to go.  We finally hit the AT and decided it was time to sit down and eat our lunch.  We had worked hard and had, at least, the same effort to go still to finish!

As we continued the hike by getting back on the AT, I still didn’t realize we were headed all the way to the top.  I thought this trail would swing on the south side of the mountain and some other trail would take hikers all the way to the top since I didn’t think the AT would run through mountaintops.  But we agreed we didn’t want to backtrack across the Freeman Trail so we went forth.  I think this was a good decision as, at least, we experienced reaching the top of Blood Mountain.

Appalachian Trail, north Georgia mountains, hiking, trail, Blood Mountain, photos, climb

Yours truly on the climb to the summit – note the white mark towards the bottom

The descent from Blood Mountain was uneventful except that we totally missed the entrance to the Slaughter Creek Trail!  When we reached the spot where we were supposed to turn off, we ran into a group of folks and we briefly chatted as we passed each other (after having seen a sign indicating the trail was coming up) and seemed to have missed the trailhead.  We had seen a little of the creek but missed the fact that we lost it at some point.  Or we assumed that for part of the trail, it would not be right by us. I am not really sure.  Anyway, we realized something was amiss when… we encountered the sign that marked the entrance to Freeman Trail that we had seen a few hours before!

At this point, I don’t think we were in the mood to backtrack and find Slaughter Creek Trail.  We understood we had missed the entrance and, given how much we had done already, we decided to back out the way we had come in via the Jarrard Gap.

Appalachian Trail, north Georgia mountains, hiking, trail, Jarrard Gap, Olympus, photos, climb

Back in the familiar territory of the Jarrard Gap

So, there you have it.  A series of mis-steps that, while annoying, did give us what looking back was a challenging and rewarding day of hiking.  However, there are lessons to be learned and that is also a good by-product of this experience!

hiking tips, lessons in hiking, Appalachian Trail, north Georgia mountains, hiking, trail, Blood Mountain, photos, climb

Neat view from the summit of Blood Mountain

Key lessons learned for future hikes

  • Read the route carefully, pay attention, and if it does not explicitly say to take a trail, do not; do not be distracted by pretty pictures!
  • Use a clear map that labels all the trails and shows a scale so you can properly estimate things.
  • Snap a photo of the route map (or download it if it exists in that format); great way to study what is going on if you think you took a wrong turn or presented with an unfortunate trail intersection where the sign is missing or damaged -> yes, all too common.  The signs are useful but don’t count on them being there or usable.
  • Corroborate the route on another website if possible; sometimes hikers post comments on their experience on the particular trail and highlight some potential gotchas; most helpful!
  • Signage will not always be clear so the points above are important.
  • Cell service, though not always available, can be available at some clearings.  GPS is great as long as the signal can find you…
  • Be prepared with enough food and water (we were, mercifully).  You never know what happens.  Hunger is preferable to thirst if you have to prioritize – though I doubt that you have to pick one or the other.  Also, while you may plan properly, your hiking partner for the day hike may or may not be like you.  So a little extra of both food and water can’t hurt to be extra safe.
  • Bring a headlamp even if you think you are hiking in the daytime (had the hike been even longer than we thought, it would have started getting darker).  Again, not a lot of weight and just helps you be ready in case things do take longer than expected (either because you got lost, or someone twisted an ankle and you proceed at a much slower pace, etc.)
  • Always hike with someone. The enjoyment of solitude in the midst of nature can be the point of hiking for some – but not for me.  I enjoy hiking with someone whether for good conversation or just general keeping company.  But also, if something goes wrong, I want another head thinking about things along with me!
  • Never stop hiking because you had one hike were you were not “with it.”  That is how one learns and it can still be very rewarding and worthwhile – plus it gives you a good story to laugh at and not take yourself too seriously!  And one does learn…

Regardless of all this, if was great to be able to do such a long hike to help my training for Patagonia and to prove to us that we were fit enough for such a hike combining length and climbing.  I look back at the simplicity of the mistake we made and how it really changed the nature of the hike.  BUT, I am most glad I got to do all I was planning to do that day PLUS get to the top of Blood Mountain!!

——————————————————————————–

Read about other hikes in Georgia that I have taken once or several times!

Sope Creek

Sweetwater Creek

Island Ford

Tallulah Gorge

Panther Creek

%d bloggers like this: