Hiking the Torres del Paine W Circuit | Patagonia Day 1

My first visit to Patagonia left me wanting to go hiking the Torres del Paine National Park.  That was 2010.  Luckily, the opportunity arose in 2015 to return to Patagonia to trek the W Circuit, the set of trails that goes around the Torres del Paine peaks in the park.

Back in 2010, I was not into hiking but I recall seeing people who had just finished the hike.  I was left wondering what it would be like and wishing I got to do something like that.  So, the wish became true when the opportunity arose with my friends from Trekking for Kids.  And now here I was on day one of the five day trek!

Getting to the starting point at the Torres del Paine NP

We had made it to Puerto Natales, the gateway to the Torres del Paine, from Argentina where we had gone hiking around Fitz Roy.  That was one long and mostly forgettable drive – hours and hours.  At least the bus the group had was fairly comfortable.  And the group was fun.

In any case, on day 1, we left Puerto Natales early in the morning.  We had to cover the 2-hour+ route to get to the port where we would take a catamaran to cross Lake Pehoé.  The boat ride took about 30 minutes. But, before getting on the boat, we got a preview of the majesty we would be getting ourselves into and explore during our hike.

The peaks or towers of the Torres del Paine stood before us in simple but great majesty.  Do you agree??

Chile, Patagonia, Torres del Paine, W circuit, hiking, trekking, travel, photo, lago Patos,Olympus

The Paine Grande on the left and the towers/peaks on the right. Awesome view!

Chile, Patagonia, Torres del Paine, W circuit, hiking, trekking, travel, photo, lake Pehoe,OlympusThis boat ride would take us to the Refugio Paine Grande, the starting point in our hike.  Right at the departure “port,” we saw evidence of the fires that ravaged the area a few years ago.  The trees were reminders of the fragility of the environment there (or anywhere, for that matter).Chile, Patagonia, Torres del Paine, W circuit, hiking, trekking, travel, photo, dead tree,OlympusThe map below shows where we took the catamaran (A), where we landed at near Refugio Paine Grande (B), and where we were going to hike that day, Refugio Grey (C).  The next day we would return to and stay at Refugio Paine Grande again.Chile, Patagonia, Torres del Paine, W circuit, hiking, trekking, travel, photo, map,Olympus

But, before hiking the Torres del Paine, let’s have lunch

The ride was smooth and the views were awesome, especially because the day was so beautiful.  By the time we got to the refugio, it was about lunch time so we had lunch at the refugio.  The meal was simple but pretty tasty and, certainly, hefty enough to help us with the trek ahead.  However, by the time I was done eating the lentils and rice dish, I was longing for a nap, not a hike 🙂

Chile, Patagonia, Torres del Paine, W circuit, hiking, trekking, travel, photo, refugio Paine Grande, lentils, food, Olympus

My first lunch on the trail!

Off to Refugio Grey

We got on our way to Refugio Grey around 2 PM.  The landscape started a little on the bland side and then we moved through forest of burnt trees before stepping back into the beauty of life with purple, pink and yellow flowers as we bordered lakes.Chile, Patagonia, Torres del Paine, W circuit, hiking, trekking, travel, photo, refugio Paine Grande, OlympusChile, Patagonia, Torres del Paine, W circuit, hiking, trekking, travel, photo, dead tree, Samsung GalaxyChile, Patagonia, Torres del Paine, W circuit, hiking, trekking, travel, photo, wild berries,Samsung Galaxy Chile, Patagonia, Torres del Paine, W circuit, hiking, trekking, travel, photo, dead tree, flowers, flora,Samsung Galaxy Chile, Patagonia, Torres del Paine, W circuit, hiking, trekking, travel, photo, flora, flowers,OlympusApproaching a high point overlooking Laguna Los Patos, we got our first taste of strong winds – and our first long break.  The route is not overly signed but I did like the signs located along the way.

At this point, we had covered 1/3 of the total hike for the day as the sign at Laguna Los Patos shows.  We would encounter a couple more of these signs before reaching our destination.Chile, Patagonia, Torres del Paine, W circuit, hiking, trekking, travel, photo, OlympusSoon after we could see the end of the lake facing the Grey glacier.  In 2010 I had visited that edge of the lake and walked it, resigned to see the glacier from a distance.  This time, I would get to walk on it!!

Chile, Patagonia, Torres del Paine, W circuit, hiking, trekking, travel, photo, Grey glacier, Samsung Galaxy

Behind me, the grounds I walked on 2010!

One of our vantage points, the Mirador Lago Grey, was close to the highest point on this trail sitting at around 250m over sea level.  By virtue of its location and altitude, it offered phenomenal view of the glacier straight ahead.  And it was WINDY up there!!!

Chile, Patagonia, Torres del Paine, W circuit, hiking, trekking, travel, photo, Grey glacier, glaciar,Olympus

About to have the best views of the glacier at this point

Chile, Patagonia, Torres del Paine, W circuit, hiking, trekking, travel, photo, Grey glacier, glaciar,Olympus

Our first full frontal view of the Grey Glacier

Chile, Patagonia, Torres del Paine, W circuit, hiking, trekking, travel, photo, Grey glacier, glaciar,Samsung Galaxy

The next day, we would be hiking on the glacier (the left corner in this pic)!

Chile, Patagonia, Torres del Paine, W circuit, hiking, trekking, travel, photo, Grey glacier, glaciar,Samsung Galaxy

Chile, Patagonia, Torres del Paine, W circuit, hiking, trekking, travel, photo, Grey glacier, glaciar,Samsung Galaxy

Fellow trekkers Jose and Kat fighting the wind to take photos of the glacier

Chile, Patagonia, Torres del Paine, W circuit, hiking, trekking, travel, photo, Grey glacier, glaciar,Olympus

At some point, one must pose for a photo with the glacier!

Among the beautiful scenes I saw was this marsh or bog (not sure what it was, technically) which sat, across the lake, the Grey glacier.  Out of a movie!Chile, Patagonia, Torres del Paine, W circuit, hiking, trekking, travel, photo, marsh, bog peat,OlympusChile, Patagonia, Torres del Paine, W circuit, hiking, trekking, travel, photo, marsh, bog peat,Samsung GalaxyAnother neat spot was when we crossed the small but quite powerful Rio Olguin.  We were getting close to the destination!Chile, Patagonia, Torres del Paine, W circuit, hiking, trekking, travel, photo, Rio Olguin, Olympus Chile, Patagonia, Torres del Paine, W circuit, hiking, trekking, travel, photo, Rio Olguin, Olympus

Overnight at the Refugio Grey

And finally, we arrived, 4 hours and 15 minutes later!  The Refugio Grey was very welcoming and a great place to rest and relax.  The outdoor seating area hosted us as we sipped some wine after showering.  Eventually we made it inside for a great meal (carne mechada and rice chased by chocolate mousse!) and camaraderie.

Soon thereafter, I crashed, ready to let my body recover before our fun-filled day 2.  The sights from this day confirmed for me that hiking the Torres del Paine National Park was a great thing to have aimed for!

Chile, Patagonia, Torres del Paine, W circuit, hiking, trekking, travel, photo, Refugio Grey,Olympus

Welcome to Refugio Grey!

Chile, Patagonia, Torres del Paine, W circuit, hiking, trekking, travel, photo, Refugio Grey,Samsung Galaxy

Outdoor porch – very nice!

———————————————————————————–

Read more about hiking the Torres del Paine NP


Pin this image to your Pinterest board for -perhaps- a future trip to go hiking the Torres del Paine!  

hiking the Torres del Paine, W circuit, Patagonia, Chile

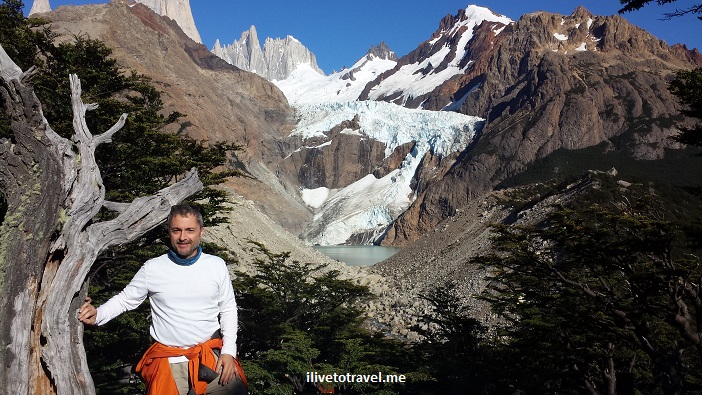
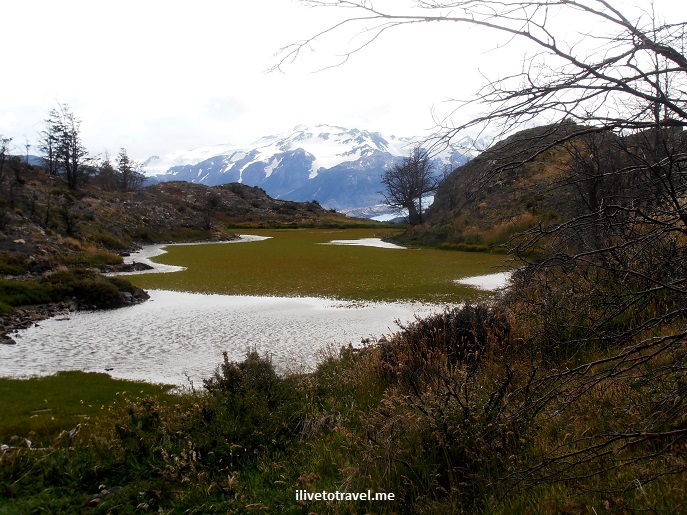
Fitz Roy and Glacier National Park: Nature at Its Best

My recent trek with Trekking for Kids in Patagonia, the southern part of the continental Americas, had two components:

  1. A day hike and a glacier visit in the Argentinian side of Patagonia, and
  2. A 5-day hike in the Chilean side of Patagonia, including a glacier hike.

Here, I will cover the day hike in Argentina.  A later post will cover the glacier visit to Perito Moreno glacier and further posts will cover the 5-hike along the W circuit in the Torres del Paine Park in Chile.

Hiking in Argentina:  Fitz Roy and its siblings

The day hike in Argentina took us to a beautiful setting north of the town of El Calafate in the large southern provide of Santa Cruz:  the National Glaciers Park and Reserve (Parque y Reserva Nacional Los Glaciares).  After landing in El Calafate from Buenos Aires (about 3 hour+ flight time), we headed to the small town of El Chaltén (established in 1985 mainly to serve as a border town and entry point to the area we were going to hike in).  From El Chaltén we would start our day hike anchored on the majestic Fitz Roy peak.  What makes this area magnificent is not just Fitz Roy (which used to be called El Chaltén) but the series of peaks that go with it along the glaciers that sit in the spaces in between.

Fitz Roy, Chaltén, glacier national park, parque nacional glaciares, Patagonia, Argentina, hiking, trekking, photo, travel, Samsung Galaxy, mountains, clouds

The peaks and the town of El Chaltén as we approached at the end of a day

Approaching Fitz Roy taking Senda El Pilar

We left our hotel, El Barranco, on a vehicle to take us to the entry point for our hike.  It was not the typical entry point as we had to cut through a small hotel (Hostería El Pilar) that sits right by one of the entrances to the park (we had permission to do so!).  We reached the trail we were looking for, Senda El Pilar, which we took and followed the Río Blanco facing first Torre Eléctrica and its glacier, then moving on to see the Marconi glacier.Fitz Roy, Chaltén, glacier national park, Senda el Pilar, Patagonia, Argentina, hiking, trekking, photo, travel, Olympus,

Fitz Roy, Chaltén, glacier national park, Patagonia, Argentina, hiking, trekking, photo, travel, Samsung Galaxy, Torre Electrica

Torre Eléctrica initially blocks full view of Fitz Roy upon starting the hike

There are quite a few spots to stop for great pictures but Fitz Roy and its siblings are ever-present.  In no time, we got to a point with a great view of Fitz Roy and the Piedras Blancas (“white rocks”) glacier:

Fitz Roy, Chaltén, glacier national park, parque nacional glaciares, Patagonia, Argentina, hiking, trekking, photo, travel, Samsung Galaxy, mountains, blue sky

One of the great views from Senda El Pilar

Fitz Roy, Chaltén, glacier national park, parque nacional glaciares, Patagonia, Argentina, hiking, trekking, photo, travel, Samsung Galaxy, mountains, blue sky

Gotta play with the camera’s features sometime…

Fitz Roy, Chaltén, glacier national park, parque nacional glaciares, Patagonia, Argentina, hiking, trekking, photo, travel, Samsung Galaxy, mountains, blue sky

Headed to Poincenot camp

Fitz Roy, Chaltén, glacier national park, parque nacional glaciares, Patagonia, Argentina, hiking, trekking, photo, travel, Samsung Galaxy, mountains, blue sky

Enjoying a break and the view (Fitz Roy is the tallest and Poincenot peak second tallest)

Soon after that, at Poincenot camp, Senda El Pilar would end and we would then turn to take Senda Fitz Roy to return to El Chaltén.  Poincenot has camping grounds that have latrines if people prefer using those.  From Poincenot, trekkers can go up to Laguna de los Tres but we did not do that portion.

Fitz Roy, Chaltén, glacier national park, parque nacional glaciares, Patagonia, Argentina, hiking, trekking, photo, travel, Samsung Galaxy

Markers were strategically placed along the route

We proceed to take Senda Fitz Roy for the second and longer part of our hike.  On that trail, we hit the Capri Lake where some enjoyed cooling off their feet – or even a quick dip!

Fitz Roy, Chaltén, glacier national park, parque nacional glaciares, Patagonia, Argentina, hiking, trekking, photo, travel, Samsung Galaxy, mountains, blue sky

Lake Capri and the peaks behind it

This was one of the last great vantage points for admiring the peaks and glaciers.  We entered different terrain as we proceeded to the last part of our hike.

Glacier National Park, Patagonia, Argentina, trekking, hiking, photo, travel, Olympus, El Chalten

Along Senda Fitz Roy

Glacier National Park, Patagonia, Argentina, trekking, hiking, photo, travel, Olympus, El Chalten

Along Senda Fitz Roy

Glacier National Park, Patagonia, Argentina, trekking, hiking, photo, travel, Olympus, El Chalten

Along Senda Fitz Roy:  these rocks are much taller than they appear – we saw rock climbers on it

Once we finished the trail, we just walked right into town!

Argentina, Patagonia, El Chaltén, Senda Fitz Roy, trekking, hiking, Olympus, photo

Senda Fitz Roy leads us back to El Chaltén!

Our hike had been around 15 kms and it took us around 7 hours with a few nice stops along the way.  I highly recommend this hike – not strenuous but moderate and with the amazing views I have shown you here (and others I did not!).

Hiking Tips from an Unexpected Climb of Blood Mountain

I enjoy hiking and love exploring new routes.  On one recent hike, near my home in Atlanta, I had the opportunity to learn some lessons in hiking so I’d thought I’d share some hiking tips from that experience.  While these tips may be common sense, the refresher is always good…  But before I share the hiking tips (located at the end of the post), let me tell you what happened…

The setup to the story

Living in Atlanta, Georgia I have access to great hiking an hour and a half away from the city at the southern end of the Appalachian Mountains, host of the famous Appalachian Trail (AT) that runs from north Georgia all the way to Maine.  There is nice hiking closer to Atlanta (like around the Chattahooche River National Park) but for longer and more strenuous hikes (and overall better vistas), I like going up to the north Georgia mountains despite the trip adding a 3-hour round trip to and from the mountains.

I was looking for a long hike to do on a daytrip as part of general conditioning for my hike in Patagonia and I was seeking a loop, instead of an in-and-out hike.  A good friend who also enjoys hiking offered to come along (I don’t hike solo) and we set out to do Jarrard Gap Trail connecting it to the Slaughter Creek Trail by traversing a 1.85 mile stretch of the AT for a total hike of around 5.75 miles.  It was a great hike but I learned some lessons in hiking from an unexpected twist in our hike…

While I have hiked in interesting places (like the Transylvanian Alps in Romania and Mt. Kilimanjaro), I am not an expert hiker who knows all the tricks of the trade, who is used to half-missing signage, who is secure in his inner compass, etc.  So I rely on maps and stuff I find on the Internet to create a route.  (My friend Val in Real Life would probably laugh her rear off at my lack of innate outdoor skills!)  On this occasion, my friend and I got a little complacent thinking we had clear in our head the route we were taking.  I will first share with you the hike we DID as it was definitely diverse in terrain and views, and enjoyable, if long.  I will then tell you what we THOUGHT we were going to do that day and highlight the difference between the two.  And then, I will share some lessons I learned!

The innocent start to the hike

After driving about 1.5 hrs, we arrived at Winfield Scott Lake, a rather small lake at the start of our hike.  To get there, we passed the entrance where visitors are supposed to take an envelope and place $5 in it and drop it in a locked box.  One is supposed to tear off part of the envelope and hang it on the rear view mirror of the vehicle (the number on that stub and the envelop in the locked box would match, telling the part ranger that this car has paid).  There were no envelopes to be found so we improvised and dropped the fee with a label that indicated my license plate in case someone checked.  We doubted anyone would be checking on this Sunday but we preferred being good citizens.  I took a picture of what I dropped in in case I needed it later to fight a citation!dollars

The actual hiked route

We entered the trail and, after crossing a narrow and single-side handrail bridge, we were dumped on a paved road where we saw a house with Halloween decorations still on the mailbox (this would prove useful later!).  There was a simple sign indicating the way and we walked maybe 0.25 miles on the road until the real entrance to the real Jarrard Gap Trail.

Appalachian Trail, north Georgia mountains, hiking, trail, Jarrard Gap, photos

On the Jarrard Gap Trail

The terrain was a nice upward slope but not too intense.  Nice views of the downhill on this winter day.  Once we exited this trail at the Jarrard Gap, we walked a little to the next set of signs which helped point the way in this 4-way intersection.  Except it was not all too clear as it did not have any of the names in our map.

Someone told us which way was the AT and we walked little on it until we saw the white mark that is used to mark the AT so on we went.  So we entered the AT in the direction of Blood Mountain.  There were slight (rolling, I would call them) downhills and flat bits of terrain.  We passed a camp area on the left after having taken a quick break, and soon on the right we saw the trailhead to the Freeman Trail which sort of parallels the AT (it re-meets the AT on the opposite end).  At that point, we were 2.6 miles from our beginning point and so we went off on Freeman Trail.

Freeman Trail is about 1.8 miles of very different terrain than what we had been on on the Jarrard Gap Trail and the AT.  At parts narrow, often very rocky (small and big), it was actually a fun trail to hit as long as one is not expecting a cozy walk.  We were not.  We even passed an icy spot on our way to the other end of the trail.

We understood we would exit Freeman Trail and take the AT in the direction back towards the entrance to Freeman Trail.  But, before setting on the AT, we stopped to eat our lunch at this popular intersection.  At this intersection, besides the AT and the Freeman Trail, there is a trail that leads to a parking lot 0.7 miles away.  That parking becomes probably the point with the shortest route up to Blood Mountain.

Appalachian Trail, north Georgia mountains, hiking, trail, Blood Mountain, Samsung Galaxy, photos, climb

At the spot where Freeman Trail hit the AT

By taking the AT in the direction of the entrance we took into the Freeman Trail, we were proceeding to ascend Blood Mountain which, at near 4,400 ft, is the fourth tallest mountain in the state of Georgia and one of the most popular mountaintops in the state with breathtaking views all the way to North Carolina and Tennessee.

The climb to the summit was hard.  Rocky and steep with many switchbacks, with vegetation everywhere.  It definitely worked out my gluteus maximus and my hamstrings!  I had the same trouble I had had on Day 4 on Kilimanjaro after passing the Barranco Wall segment of that hike.  I carried a 16-lb backpack as part of my training but ended up emptying my extra bottle of water (one that I carry precisely as a way to drop backpack weight should I feel like I need to; it is not the water I expect to consumer during the hike). It indeed was a challenge – an unexpected one – but I am glad I did it as it was good training for my upcoming hike and a great workout.

Appalachian Trail, north Georgia mountains, hiking, trail, Blood Mountain, photos, climb

On the way to the summit!

At some point, we reached a clearing with large smooth rocks replacing the ground, like how Stone Mountain is when you are climbing it.  We stopped briefly and chatted with some folks who had gone up ahead of us; they had not heard of Slaughter Creek (which was a little unnerving but they had come from the “nearby” parking lot so they were likely not expecting to hit the creek on the other side of the mountain).  From this clearing, one could see Stone Mountain and Atlanta in the distance.  That was very impressive given how far north we were.

Appalachian Trail, north Georgia mountains, hiking, trail, Blood Mountain, photos, climb

The view from the clearing

The AT is well-marked with rectangular white boxes painted on trees and rocks so no issues knowing where we were so we continued on it as we knew the AT would connect to the Slaughter Creek Trail.  Not long afterwards, we reached the summit which has a neat rock outcropping from which to soak the entire view.  It is located right next to a nice shelter structure for those who stay overnight (further down, there is a “privy” or basic toilet facility).  After checking the view and confirming which of the two possible ways was the way down (other than the one we came up from), we began our descent which I welcomed as going up had been hard.  I read later that the side we went up was harder but I am glad we did it that way because going down that way would have killed my knees with all the rocks…

The descent was uneventful.  We passed a campsite area on the left and it was a little mis-leading as the white box marking the trail made us think we had to detour at the campsite because the other part of the trail did not have the white rectangular boxes.  But the crude wooden map on the campsite and a brief exploration of the other trail (where we saw a sign that said “Water” and pointed down that path) led us to determine that the unmarked way was the way to go.  Confidently we moved forward and downward and soon we ran into a trio that confirmed for us that was the way down indeed.  So it was nice to have that validation.  They told us that we would make a left at the steps at the bottom that were still iced over.   The descent was not too rocky at all so that made it better for our knees.

We reached the iced-over steps and felt really good that we were on the final stretch.  We walked maybe 0.4 miles before we hit the entrance that we had taken to enter the Freeman Trail and then returned to repeat backwards the way in – a final 2.6 miles to get to our parking lot.  Along the way, we had forgotten about the road we had been dumped into before hitting the real Jarrard Gap Trail.  Thankfully, the house that still had Halloween decorations on the mailbox saved the day as we remembered having passed it.

The INTENDED route

So after having read what we did.  Here is what we had intended to do…

We were supposed to get on Jarrard Gap Trail (check) and hike it until it ended at the Jarrard Gap (check) and then connect with the AT (check) and walk towards Freeman Trail (check) but continue 0.4 miles past the entrance to Freeman Trail without taking Freeman Trail (NOT CHECKED!).  After the 0.4 mile stretch, we would encounter the trailhead to Slaughter Creek Trail which would have taken us back to the road near Winfield Scott Lake.  End of a moderate day hike.

That, ladies and gentlemen, is what we were supposed to do.  5.75 miles that could have taken us 2.5-3 hrs, perhaps.  I will explain what happened next but stay tuned for hiking tips at the end of the post!

What went wrong on this north Georgia mountain hike? 

No, no banjos or bears

The map from the website where I got the route instructions did not label the trails the proposed route would take us on.  Thank goodness there was a clear map at the parking lot by the lake that had trails with names on them.  We could not quite reconcile this map to the one in our printout so we took a photo of the map so we could have handy along the way (boy, was that a good idea!).

map, Appalachian Trail, north Georgia mountains, hiking, trail, Blood Mountain, photos,Jarrard Gap

The parking lot map

However, the map sort of helped get us confused – we saw that there was clearly a way from Freeman Trail on to Slaughter Creek Trail (via the AT) so we thought we were good.  But, what we failed to grasp was the increased distance such a route meant:  instead of our intended 5.75 mile plan, we ended up doing about 10.5 miles (per our reconstruction of the facts once back in the comfort of our respective homes).  This is how…

Remember when I said earlier that we encountered the start of the Freeman Trail so off we went on it?  Well, as you read on the “intended route” bit above, we were not supposed to take Freeman Trail.  The route instructions we had printed were just highlighting that at mile 2.6 we would encounter the trailhead for Freeman Trail. The explanation of the route was peppered with beautiful photos that certainly kept us from focusing on reading the text carefully as, upon careful reading later, we realized it never indicated that we needed to get on the Freeman Trail!

0.4 miles after passing the Freeman Trail, we were supposed to find the start of Slaughter Creek Trail at which point we would be returning along the same-named creek.  After a while on Freeman Trail we wondered if we had missed a turn 0.4 miles after we had started on it to find Slaughter Creek Trail (the connection to that trail was not evident in the map from the parking lot).

Appalachian Trail, north Georgia mountains, hiking, trail, Freeman Trail, Olympus, photos

Along the Freeman Trail

We should have turned around…  However, the map we had taken a picture of did show that we would hit the AT again and would swing back to hit Slaughter Creek Trail at some point (which we didn’t realize was much later than expected…).

And so we kept going on the rougher trail that is Freeman Trail.  Partly perhaps because we were distracted by our conversation and maybe partly because the trail was unusual (narrow, rocky, with more interesting vegetation that leafed-out winter trees).  Maybe it was just such a nice day for a hike so why rush it?  Eventually,we ran into a man and his dog and we asked him how far to hit the AT and he told us “one mile or so.”  We were taken aback but pressed on as we knew this way we would get to where we wanted to go.  We finally hit the AT and decided it was time to sit down and eat our lunch.  We had worked hard and had, at least, the same effort to go still to finish!

As we continued the hike by getting back on the AT, I still didn’t realize we were headed all the way to the top.  I thought this trail would swing on the south side of the mountain and some other trail would take hikers all the way to the top since I didn’t think the AT would run through mountaintops.  But we agreed we didn’t want to backtrack across the Freeman Trail so we went forth.  I think this was a good decision as, at least, we experienced reaching the top of Blood Mountain.

Appalachian Trail, north Georgia mountains, hiking, trail, Blood Mountain, photos, climb

Yours truly on the climb to the summit – note the white mark towards the bottom

The descent from Blood Mountain was uneventful except that we totally missed the entrance to the Slaughter Creek Trail!  When we reached the spot where we were supposed to turn off, we ran into a group of folks and we briefly chatted as we passed each other (after having seen a sign indicating the trail was coming up) and seemed to have missed the trailhead.  We had seen a little of the creek but missed the fact that we lost it at some point.  Or we assumed that for part of the trail, it would not be right by us. I am not really sure.  Anyway, we realized something was amiss when… we encountered the sign that marked the entrance to Freeman Trail that we had seen a few hours before!

At this point, I don’t think we were in the mood to backtrack and find Slaughter Creek Trail.  We understood we had missed the entrance and, given how much we had done already, we decided to back out the way we had come in via the Jarrard Gap.

Appalachian Trail, north Georgia mountains, hiking, trail, Jarrard Gap, Olympus, photos, climb

Back in the familiar territory of the Jarrard Gap

So, there you have it.  A series of mis-steps that, while annoying, did give us what looking back was a challenging and rewarding day of hiking.  However, there are lessons to be learned and that is also a good by-product of this experience!

hiking tips, lessons in hiking, Appalachian Trail, north Georgia mountains, hiking, trail, Blood Mountain, photos, climb

Neat view from the summit of Blood Mountain

Key lessons learned for future hikes

  • Read the route carefully, pay attention, and if it does not explicitly say to take a trail, do not; do not be distracted by pretty pictures!
  • Use a clear map that labels all the trails and shows a scale so you can properly estimate things.
  • Snap a photo of the route map (or download it if it exists in that format); great way to study what is going on if you think you took a wrong turn or presented with an unfortunate trail intersection where the sign is missing or damaged -> yes, all too common.  The signs are useful but don’t count on them being there or usable.
  • Corroborate the route on another website if possible; sometimes hikers post comments on their experience on the particular trail and highlight some potential gotchas; most helpful!
  • Signage will not always be clear so the points above are important.
  • Cell service, though not always available, can be available at some clearings.  GPS is great as long as the signal can find you…
  • Be prepared with enough food and water (we were, mercifully).  You never know what happens.  Hunger is preferable to thirst if you have to prioritize – though I doubt that you have to pick one or the other.  Also, while you may plan properly, your hiking partner for the day hike may or may not be like you.  So a little extra of both food and water can’t hurt to be extra safe.
  • Bring a headlamp even if you think you are hiking in the daytime (had the hike been even longer than we thought, it would have started getting darker).  Again, not a lot of weight and just helps you be ready in case things do take longer than expected (either because you got lost, or someone twisted an ankle and you proceed at a much slower pace, etc.)
  • Always hike with someone. The enjoyment of solitude in the midst of nature can be the point of hiking for some – but not for me.  I enjoy hiking with someone whether for good conversation or just general keeping company.  But also, if something goes wrong, I want another head thinking about things along with me!
  • Never stop hiking because you had one hike were you were not “with it.”  That is how one learns and it can still be very rewarding and worthwhile – plus it gives you a good story to laugh at and not take yourself too seriously!  And one does learn…

Regardless of all this, if was great to be able to do such a long hike to help my training for Patagonia and to prove to us that we were fit enough for such a hike combining length and climbing.  I look back at the simplicity of the mistake we made and how it really changed the nature of the hike.  BUT, I am most glad I got to do all I was planning to do that day PLUS get to the top of Blood Mountain!!

——————————————————————————–

Read about other hikes in Georgia that I have taken once or several times!

Sope Creek

Sweetwater Creek

Island Ford

Tallulah Gorge

Panther Creek

On the Camino de Santiago: Day 7 from Lavacolla to Santiago!

The big day arrived on Day 7.  On this day, we departed on the Camino for the last time as we left lovely Pazo Xan Xordo to enter Santiago de Compostela as many have done over the last 1,000 years on this ancient pilgrimage for the final 2.5 hours of our trek.  We were excited but were also on a schedule as we needed to arrive on-time to attend Pilgrim’s Mass at the Cathedral of Santiago de Compostela at noon.  Since this Mass gets packed, we wanted to be there at minimum 30 minutes in advance.  We wanted to sit on the nave on the side of the altar in case they used the “botafumeiro.”  They did not, to our great disappointment, but if they had, it would have flown right over us!

Cathedral, Santiago de Compostela, Camino, The Way, pilgrimage, Spain, España, Espagne, travel, photo, Olympus

Waiting for Pilgrim’s Mass to start

Monte de Gozo

But I get ahead of myself.  So we left Lavacolla sharp at 8 AM and made one stop at the impressive Monte de Gozo on the outskirts of town.  It was from this vantage point that pilgrims would get their first glimpse of the final destination.  “Gozo” means happiness which is exactly what the pilgrims would feel at this point after so many months/years of hiking their way across Europe and Spain.  I was more impressed by the monument built here and taking pictures of the sun showing through the top of the monument.

Monte de Gozo, Santiago de Compostela, Camino, The Way, pilgrimage, Spain, España, Espagne, travel, trekking, hiking, photo, Olympus

The monument at Monte de Gozo

Monte de Gozo, Santiago de Compostela, Camino, The Way, pilgrimage, Spain, España, Espagne, travel, trekking, hiking, photo, Olympus

Each side of the monument commemorates something different

Monte de Gozo, Santiago de Compostela, Camino, The Way, pilgrimage, Spain, España, Espagne, travel, trekking, hiking, photo, Samsung Galaxy

Loved catching the sun through the glass cross

The great arrival in Santiago de Compostela

At some point in the walk (I think it was on a big downhill), we stopped being “outside” of Santiago and entered the outlying sectors of the city.

Santiago de Compostela, Camino, The Way, pilgrimage, Spain, España, Espagne, travel, photo, Olympus

One of the last villages we passed before entering Santiago proper (after Monte de Gozo)

We crossed a long bridge over a highway and we felt like this was the final stretch.  OK, it was a long final stretch and we did stop at a café to make a final pit stop and to get a snack (not sitting down).  We knew once we hit Santiago, we were likely not going to get a break until noon Mass ended so this was a smart choice!

sign, Santiago de Compostela, Plaza del Obradeiro, Camino, The Way, pilgrimage, Spain, España, Espagne, travel, trekking, hiking, photo, Olympus

Welcome to Santiago de Compostela!

As we got closer, it seemed the streets got narrower which kept making us more eager to finally get there.  I was eager to see the reaction of my fellow trekkers when they first saw the Cathedral (I had been there in 1994 already).

Getting the Compostela and Pilgrim’s Mass

Our plan was to hit town and immediately head to the Pilgrim’s Office (on rua Vilar) to get our “Compostela,” the certificate granted to those who complete the Camino.  A nice volunteer from Ireland named (of course) Mary helped English speakers with instructions to be ready to step inside and get the Compostela; a few questions were asked and the credencial (passport) was briefly examined.

Cathedral, Santiago de Compostela, Plaza del Obradoiro, Camino, The Way, pilgrimage, Spain, España, Espagne, travel, trekking, hiking, photo, Olympus

Pilgrims filling out their papers while waiting for their Compostela

It was an exhilarating moment to get the Compostela (after standing in line about 25 minutes) even if I briefly embarrassed myself by telling the lady that she had gotten my first name wrong.  She politely told me that they write the first name in Latin not in its regular form…  As soon as I got to the hotel later, I took photos of the Compostela just in case something happened to it on the rest of the trip!

Cathedral, Santiago de Compostela, Camino, The Way, pilgrimage, Spain, España, Espagne, travel, photo, Canon EOS Rebel

The big moment of getting the Compostela!

We had been told we could not take our backpacks in for Mass so we then proceeded to drop off our backpacks next to the Pilgrim’s Office for 2 euros.  We then were free to make our way to the Cathedral but, first, we took quick group and individual photos in the Plaza del Obradoiro in front of the Cathedral.

Cathedral, Santiago de Compostela, Plaza del Obradoiro, Camino, The Way, pilgrimage, Spain, España, Espagne, travel, trekking, hiking, Trekking for Kids, photo, Olympus

Our Trekking for Kids group posing in front of the Cathedral

We then moved in to claim our spots for Mass and we took turns while we waited for the start of Mass to go behind the main altar to see the tomb of Santiago (St. James), after all, all this started because of him!

Cathedral, Santiago de Compostela, Plaza del Obradoiro, Camino, The Way, pilgrimage, Spain, España, Espagne, travel, photo, Olympus

Another detail of the interior

Cathedral, Santiago de Compostela, Plaza del Obradoiro, Camino, The Way, pilgrimage, Spain, España, Espagne, travel, St. James' tomb, photo, Canon EOS Rebel

St. James’ tomb

Cathedral, Santiago de Compostela, Plaza del Obradoiro, Camino, The Way, pilgrimage, Spain, España, Espagne, travel, photo, Olympus

Details from inside the Cathedral

Cathedral, Santiago de Compostela, Plaza del Obradoiro, Camino, The Way, pilgrimage, Spain, España, Espagne, travel, altar, photo, Canon EOS Rebel

A side altar

During Mass, in the part where they greet the pilgrims, they mention groups by name.  I had told them at the Pilgrim’s Office that we were a group, Trekking for Kids, from the U.S. and Canada and it was neat to hear us greeted during Mass.

We had heard that because 2014 was the 800th anniversary of St. Francis doing the Camino, the Church of San Francisco (St. Francis), not far from the Cathedral was issuing another certificate to pilgrims (the “Cotolaya“) so we went later that day to claim it (at this point, we would have taken any certificate issued to pilgrims, I think!).

Church of San Francisco, St. Francis, Santiago de Compostela, Camino, The Way, pilgrimage, Spain, España, Espagne, travel, trekking, hiking, photo, Olympus

Walking towards the Church of San Francisco (St. Francis)

Church of San Francisco, St. Francis, Santiago de Compostela, Camino, The Way, pilgrimage, Spain, España, Espagne, travel, trekking, hiking, photo, Olympus

Main altar at the Church of San Francisco

So our week-long trek along this millennial pilgrimage came to a glorious end.  It was a unique experience and I loved returning to Santiago de Compostela of which I will write some more in another post.  I have some suggestions for those considering the Camino.  Keep an eye out for that post!

—————————————————————————————————————

Read more about my Camino:

Day 1

Day 2

Day 3

Day 4

Day 5

Day 6

On the Camino de Santiago: Day 6 from Salceda to Lavacolla

Day 6 saw our last full day of our walk along the Camino de Santiago as Day 7 would be a short day.  Day 6’s walk took about 5 hours (perhaps about 18 km) not including our lunch stop at Amenal.  I felt both excited at getting close to the finish line and also a little bit sad that the end was so close.  We left the hotel (and our luggage) in Salceda after a good breakfast and walked a few minutes to get back on the Camino.  Along the way, I had been collected the needed stamps on my “credenciales” (pilgrim’s passport); these are required to be able to get the “Compostela” certificate upon arrival at the offices in Santiago de Compostela.

Camino de Santiago, passport,Lavacolla, Spain, España, Espagne, trekking, hiking, pilgrimage, travel, photo, outdoors, Olympus

The pilgrim’s “passport” (credenciales) that you must stamp every day

Camino de Santiago, passport, pilgrim,Lavacolla, Spain, España, Espagne, trekking, hiking, pilgrimage, travel, photo, outdoors, Olympus

Proudly showing my stamped “credenciales” (or pilgrim’s passport)

Sights along the Camino

As usual, our way was a mix of fields of flowers, small forests, farms, and churches.  And the ever present signs pointing the way.  Here are a few of the images from this day in our trek.Camino de Santiago, nature, Lavacolla, Spain, España, Espagne, trekking, hiking, pilgrimage, travel, photo, outdoors, Olympus

Camino de Santiago, yellow flowers, Lavacolla, Spain, España, Espagne, trekking, hiking, pilgrimage, travel, photo, outdoors, Olympus

Beautiful field of yellow

Camino de Santiago, Lavacolla, Spain, España, Espagne, trekking, hiking, pilgrimage, travel, photo, outdoors, Olympus

Camino de Santiago, flowers, hydrangea,hortensia, Lavacolla, Spain, España, Espagne, trekking, hiking, pilgrimage, travel, photo, outdoors, Canon EOS Rebel

Hydrangeas were popular along the way

Camino de Santiago, Lavacolla, Spain, España, Espagne, trekking, hiking, pilgrimage, travel, photo, outdoors, Olympus

Just keep following the signs…

Camino de Santiago, church, Lavacolla, Spain, España, Espagne, trekking, hiking, pilgrimage, travel, photo, outdoors, Olympus

Church

Camino de Santiago, church, Lavacolla, Spain, España, Espagne, trekking, hiking, pilgrimage, travel, photo, outdoors, Olympus

Camino de Santiago, church, Lavacolla, Spain, España, Espagne, trekking, hiking, pilgrimage, travel, photo, outdoors, Olympus

Cemetery

An amazing place to stay:  Pazo Xan Xordo

Once we got to Lavacolla, a stone’s throw from Santiago’s airport actually, we walked a little bit to get to our lodging for the night:  Pazo Xan Xordo.  We were wowed by this 17th century home and farm with its own chapel and beautiful gardens.  This place was a real dream!

Camino de Santiago, hotel,Lavacolla, Spain, España, Espagne, trekking, hiking, pilgrimage, travel, photo, outdoors, Olympus

Pazo Xan Xordo and its front patio

Camino de Santiago, church, Lavacolla, Spain, España, Espagne, trekking, hiking, pilgrimage, travel, photo, outdoors, Olympus

Chapel near the front entrance of Pazo Xan Xordo

Camino de Santiago, church, Lavacolla, Spain, España, Espagne, trekking, hiking, pilgrimage, travel, photo, outdoors, Olympus

The inside of the chapel

It also has a small restaurant but it was not open for dinner so our host dropped us off and picked us back up for dinner in town, where we celebrated being so close to finishing with a great dinner and a dessert I had not had, but seen often, yet:  ice cream cake!

Camino de Santiago, restaurant,Lavacolla, Spain, España, Espagne, trekking, hiking, pilgrimage, travel, photo, outdoors, Olympus

The final dinner on the trail (in Lavacolla)!

Camino de Santiago, ice cream cake, dessert,Lavacolla, Spain, España, Espagne, trekking, hiking, pilgrimage, travel, photo, outdoors, Olympus

The ice cream cake

A perfect ending to another great day along the Camino!

Camino de Santiago, Lavacolla, Spain, España, Espagne, trekking, hiking, pilgrimage, travel, photo, outdoors, Olympus

Yours truly

——————————————————————————————————–

Read more about my Camino:

Day 1

Day 2

Day 3

Day 4

Day 5

Day 7

On the Camino de Santiago: Day 4 from Palas del Rei to Boente

After a great dinner in Palas del Rei and a nice comfortable stay overnight, we left the town on Day 4 to head to Boente, a tiny town and our next overnight.  On this day, I would walk 21 km (about 13 miles) in around 5 hours to get to my destination.  But we would first make a stop in Mélide to try its famous “pulpo” (octopus).  Now, I am not a fan of octopus and similar ugly sea creatures but I had heard about how good the pulpo was in this part of Spain so we took off from Palas del Rei knowing lunch would be in the town of Mélide – I had to try it, I mean, I didn’t come this far to not try the local specialty!

But let’s not get ahead of ourselves, we had to have a mid-morning snack (even though the breakfast at the hotel in Palas del Rei was pretty darn good!).

food, Camino, Spain, pain au chocolat, croissant, Samsung Galaxy, photo, delicious

The pain au chocolat (chocolate croissant) along the Camino is huge!

After eating that monster (OK, I shared…), I had too much energy as my trek roommate, Emory, could attest…Camino, Santiago, Spain, trekkers, blue, travel, hiking, photo, Samsung Galaxy

As usual, the path is well marked and consists of a wide range of trail types, some more natural than others.

Camino, Santiago, Spain, trekking, hiking, Olympus, photo, trails Camino, Santiago, Spain, trekking, hiking, Olympus, photo, trails Camino, Santiago, Spain, trekking, hiking, Olympus, photo, trails Camino, Santiago, Spain, trekking, hiking, Olympus, photo, trailsCamino, Santiago, Spain, trekking, hiking, Olympus, photo, trails It is always amazing how there is a symbiosis between the age-old trails and the farms or villages the trails go through.  Sometimes you feel bad you are walking right by people’s homes but, it is likely that the trail was there first…

Camino, Santiago, Spain, trekking, hiking, Olympus, photo, bridge, trails

The scenery can be quite charming!

One of my favorite parts of the walk is running into the old churches in the small towns along the way.  I am not sure how active these churches are (I am sure they don’t all have their own priest) but they serve as witnesses to the needs of the pilgrims back when the Camino was truly a journey of faith, not just a modern-day trek.

Camino, Santiago, Spain, church, small town, village, Olympus, photo, travel, The Way, facade

One of several churches we passed this day

Camino, Santiago, Spain, church, small town, village, Olympus, photo, travel, The Way

Another church on our way

One of the good things about the Camino is the availability of clean, safe water to drink so you don’t have to be buying bottled water or treating water.  I filled my bottles at the places I stayed but you can also do refills along the way in any of the public fountains available to the trekkers.

Camino, Santiago, Spain, trekking, hiking, Olympus, photo, water fountain

Water fountain along the trail

Now before I get to the “pulpo”, I have to say I enjoyed the chorizo small plate more than the pulpo.  The place we ate at was across a small church along the main street in Mélide.  It had long picnic-like tables and a nice mix of locals and pilgrims!

chorizo, Melide, Camino, Santiago, Spain, food, foodie, trek, hiking, photo, bread, foodporn, Samsung Galaxy

Chorizo al vino in Mélide

food, foodie, foodporn, Camino, Santiago, Spain, pulpo, octopus, travel, photo, Olympus, cooking

The guy at the “kitchen” (right by the front door) preparing the pulpo!

Oh, and I have not told you about one of my favorite discoveries along the Camino:  the delicious tarta de Santiago (a dense almond cake, sort of)!!  Yum.  #period

food, foodie, foodporn, tarta, Camino, Santiago, postre, dessert, sweets, cake, photo, travel, Samsung Galaxy

Tarta de Santiago

Camino, Santiago, Spain, Melide, walk, hiking, trekking, Olympus, photo, travel

Leaving Mélide after a nice lunch of chorizo, pulpo, bread – and some wine…

The walk that day was long and, as we approached Boente, we could not wait to arrive at our “albergue”.  You could say this was the day we stayed at the “least” of our accommodations (not being a hotel or house) but it was perfect.  We had reserved two private rooms to share across the 8 of us and it was perfect as we did not have to fight with individual trekkers to get a bunk bed, etc.  The albergue was more than adequate and clean, and the dinner they served was delicious.  At this point in my life, I don’t want to do a trek where I have to wonder if I will find a spot to sleep on a given town, or whether the one I will find will be not right by the toilet so booking ahead is the way I trek.

Spain, Camino, Santiago, Boente, albergue, lodging, trek, hiking, photo, Olympus,

The awesome Albergue Boente!

church, igrexa, iglesia, Camino, Santiago, Spain, Olympus, travel, photo, Boente, pilgrimage, trek, hiking

The Igrexa Santiago de Boente (right across the albergue)

After a stroll around town and dinner, it was time to end Day 4 and rest for Day 5!

———————————————————————————————————————-

Read more about my Camino:

Day 1

Day 2

Day 3

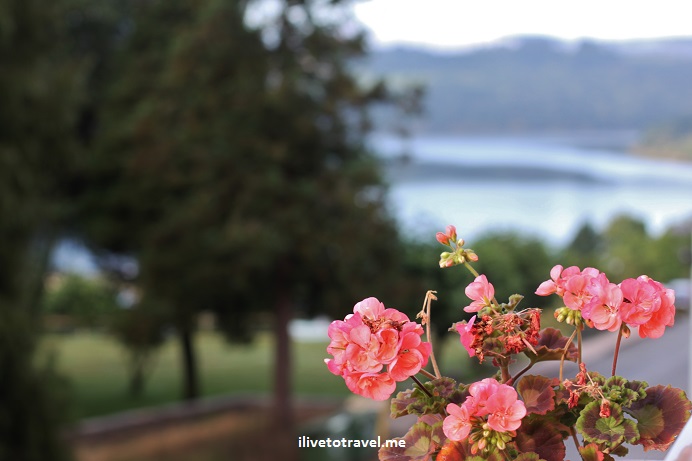
On the Camino de Santiago: Day 3 from Portomarín to Palas del Rei

I enjoyed our night in Portomarín as the town had a nice location along the Miño River – and we enjoyed sitting at a bar the night before with a nice wine enjoying the awesome weather.  So I was rested and ready for Day 3.

We left the hotel (and our luggage, which was picked up by a service that dropped it off at our next hotel)around 9 AM and went towards the river where we had just a little confusion as to which way to go.  We crossed the river and returned to the path that would take us to Palas del Rei.

As usual, we stopped for lunch at a place past Hospital but before Ligonde.  It has a very nice outdoor seating area with plenty of shade.  The menu was typical of the pilgrim’s menu.

pilgrim's menu, Camino de Santiago, Camino, Spain, food, trekking, hiking, Canon EOS Rebel

Menu board with the offerings for the day

In this case, for example, 9 euros would get you a nice burger or lomo (pork) with real French fries accompanied with fried eggs!

lomo, pork, food, Spain, Camino, pilgrim's menu, fried eggs

Delicious!!!

I also have to highlight one of my favorite dishes:  ensalada mixta which has tomatoes, lettuce, tuna, onions, olives and just goodness!

mixed salad, ensalada mixta, tomatoes, tuna,food, Spain, Camino, pilgrim's menu, fried eggs, Canon EOS Rebel, foodporn

Not only colorful and diverse but mighty tasty!

Palas del Rei is a small town of over 3,000 people.  We arrived around 4:30 PM after a beautiful, but long walk, with some good climbs.

Camino de Santiago, Spain, trekking, hiking, path, Palas del Rei, wildlife, farm

Wildlife along the way!

Camino de Santiago, Spain, trekking, hiking, path, Palas del Rei, Samsung

Dirt path going between farms

Camino de Santiago, Spain, trekking, hiking, path, Palas del Rei, Olympus

Sometimes the Camino overlaps with a modern road

Camino de Santiago, Spain, trekking, hiking, path, Palas del Rei, Olympus

Continuing to walk in rural parts of the Camino

We walked into it and past a church where a funeral service was being held.  We approached it from the back and then saw the steps leading down from the church to the street below – a steep walk down.

San Tirso, Palas del Rei, Spain, Camino, church, charming, Santiago, trekking, photo, España, Spain

San Tirso Church

Our hotel, Hotel Casa Benilde was not far from that point (maybe 50 meters?).

We arrived at the hotel and the manager and his assistant were at the front desk, likely expecting us.  They were the nicest folks, so ready to make us feel at home, walking us through every detail – including how they could accommodate our celiac and vegetarians in the group.  The hotel lobby was small and, we found out, that was the reason they “scored” low on the star rating system in Spain.  We were shocked at the low star rating as this place had excellent customer service, incredible breakfast catering to the dietary needs (all items were labeled gluten-free or not, etc.), the rooms were clean (if small), and the wifi was great in the rooms.

—————————————————————————————————–

More about the Camino before Day 3:

–  Day 1

–  Day 2

And after Day 3:

–  Day 4


On the Camino de Santiago: Day 2 from Barbadelo to Portomarín

Finally, the first long day of our Camino started on Day 2 in Barbadelo.  Day 1, as I wrote about, was really a “baby” hiking day.  All good; ’twas for a good reason (like getting to see O Cebreiro).  But I (along with my fellow trekkers) were really ready to tackle the ‘mino.

I enjoyed breakfast with jamón serrano (Spanish ham), cheese, fresh bread, OJ, and my café con leche.  I was well-fueled for the day!

As luck would have it, it was raining that morning.  And with my cheap rain poncho, I was looking like a Camino fool on a tear!

Camino, Santiago, Spain, rain, poncho, Olympus, travel, trekking, hiking, photo

Yep, this is me in my rain gear…

Once again, the trails are well-marked with yellow arrows (or the kilometer markers with the seashell).  Rarely did these markers fail us!

yellow arrow, Camino, Santiago, Spain, travel, photo, trekking, Samsung Galaxy

The ever-present yellow arrow!

Camino, Santiago, fountain, fuente, art, Olympus, travel, photo, water

Art mixed in with function after leaving Barbadelo

The trail is so varied all along the Camino.  I loved that because it kept me looking forward to what else we would see.  And it kept me paying attention to my surroundings – which made me not take the scenery for granted.

Camino frances, trail, Camino, Santiago, Spain, travel, photo, trekking, Olympus

The Camino’s paths are very diverse.

Camino frances, trail, Camino, Santiago, Spain, travel, photo, trekking, Olympus Camino frances, trail, Camino, Santiago, Spain, travel, photo, trekking, Olympus

As lunch time was nearing, we passed Ferreiros, a small hamlet with a cute little church with an accompanying cemetery.

Ferrieros, Santa Maria church, Camino, French Way, Camino Frances, Santiago, trekking, architecture, cemetery, Olympus, photo, travel

The Church of Santa Maria in Ferreiros

But all wasn’t pretty landscape and charming little churches.  Lunch time was a time for rest, and a time for good food.  And, occasionally, a glass of local table wine or a glass of beer (I normally did not drink but a couple of times did have a glass of wine).

Camino, French Way, Camino Frances, Santiago, trekking, architecture, cemetery, Olympus, photo, travel, wine

Lunch on the Camino: wine is always near!

After what felt like a very long day, we finally spotted the Miño River, which meant we had arrived at our destination for the day:  the town of Portomarín, one of the largest we went through at over 2,00o or so inhabitants.  The original town (with a long history with the Camino) is now under water as it was flooded when a dam was built downstream – so the town we stayed in is fairly young.  However, it is worth noting that key buildings, like the main church, were moved before the old town was flooded to a new spot in the town.

Portomarin, Rio Miño, Minho, river, Spain, Camino, Santiago, French Way, Camino frances, trekking, hiking, travel, bridge, photo, Olympus

The Río Miño – and our destination on other side!

Portomarin, Camino, Santiago, street scene, photo, travel, Samsung Galaxy, brudge

About to enter Portomarín!

Portomarin, Camino, Santiago, street scene, photo, travel, Samsung Galaxy, brudge

A choice of stairs OR a riverside road to get to our hotel…

Portomarin, Camino, Santiago, street scene, photo, travel, Samsung Galaxy, bridge

Not that I was tired and trying to hitch a ride to Santiago!

Portomarin, Camino, Santiago, street scene, photo, travel, Canon EOS Rebel

The charming streets of Portomarin

A festival had just taken place and there were some types of branches strewn about the main square and down the main pedestrian street.  The main street was cute and colorful and clearly well-lived by the locals.

main plaza, Portomarin, Gallicia, Camino, Santiago, street scene, photo, travel, Olympus

The main plaza after a festival

Portomarin, Galicia, Camino, Santiago, street scene, photo, travel, Canon EOS Rebel

Colorful balconies and one seemingly bored local

Portomarin, Galicia, Camino, Santiago, street scene, photo, travel, Canon EOS Rebel

The reminders of the festival make for a beautiful carpet on the main street

The Church of San Juan (San Xoán) was moved, as I said, from the old town to a new spot.  It is late Romanesque and feels like a church and a castle at the same time.  We went in as we found out it was open to stamp pilgrims’ Camino passports but, unfortunately, there was no Mass scheduled for that evening.

Church San Juan, Portomarin, Galicia, Camino, Santiago, architecture, photo, travel, Olympus

The moved Church of San Juan

The interior was simple without being plain.  I found it very peaceful.

altar, Church San Juan, Portomarin, Galicia, Camino, Santiago, architecture, photo, travel, Olympus

Main altar of the Church of San Juan – modest

After our first full day of hiking, I was glad to enjoy a nice meal, some vino, and a nice peaceful view from our room at the hotel.

Portomarin, Camino, Santiago, view, rose, rio Miño, Spain, Miño river,scene, photo, travel, Canon EOS Rebel

The end of the day offered this reward from the balcony of my room.

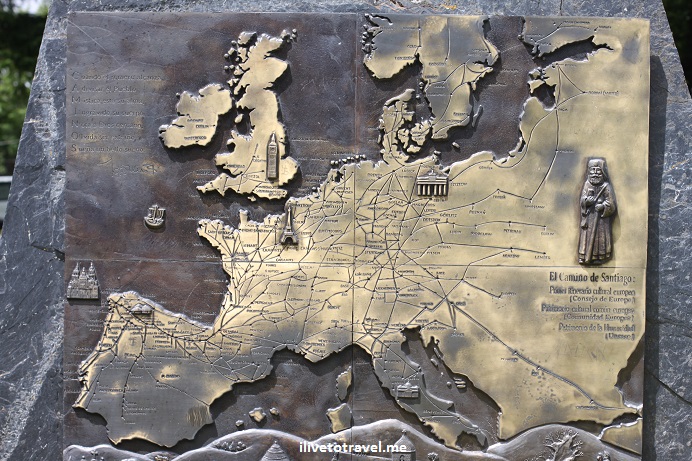
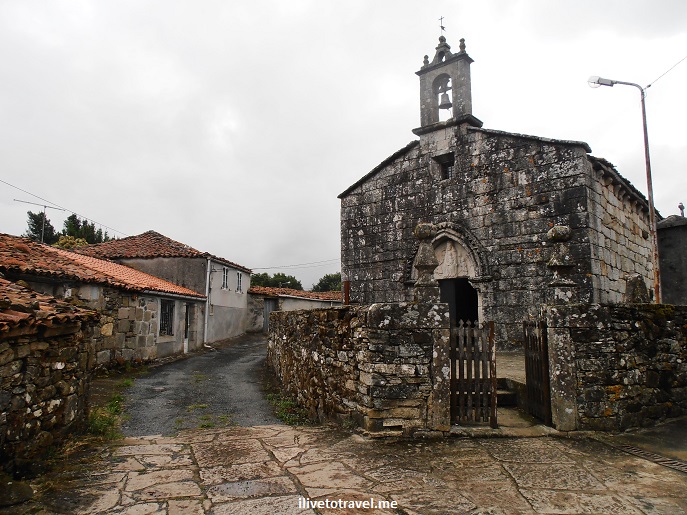
Another Pilgrim on the Camino de Santiago

The Camino de Santiago, or the Way of St. James, is an ancient pilgrimage indeed with a timeline of over 1,000 years.  Pilgrims from all over Europe would come from far and near to visit the place where St. James (or Santiago) is buried:  under the Cathedral of Santiago de Compostela in northwestern Spain (Galicia, to be more precise). I became another pilgrim on the Camino….

Camino, Santiago, St. James, The Way, pilgrimage, Europe, routes, travel, trekking, journey
A map in O Cebreiro showing the many routes pilgrims took from all over Europe to get to NW Spain

In modern days, though, not all who “do” the Camino are necessarily doing it for spiritual reasons but I would find hard to believe that most don’t get something spiritual out of the sacrifice and effort doing the Camino requires.

The Camino is a joy not only for the experience of trekking these ancient “ways”.  I have to admit that the social and culinary were also part of my Camino.

croqueta, food, Spain, Camino, foodporn, foodie, delicious, travel, photo
One of my favorites from my childhood re-encountered in the Camino: croquetas!

I will aim to share about the experience in a couple of different ways in this and upcoming posts:

  • The first way will be to simply share what everyday was like using photographs and other thoughts – whether you ever plan to or want to do it.
  • The second will be by sharing what I did to prepare and do the Camino, in case you are yourself hoping to, or actually planning to, do the Camino.

Why I went

I first learned more about the Camino when I met a co-worker back in 2003 who had just done the Camino from St. Jean Pied de Port – so about 30 days’ worth of trekking (close to 800km or 500 miles).  It all sounded hard and just too much time.  Over the years, as we became good friends, I enjoyed hearing stories about what the Camino was like and the friendships he struck along the way.  It made me curious about the Camino though I never thought I would want to “walk” for 30 days.

Years later, as I got more into trekking/hiking, I started thinking that I -some day- would want to do it (or part of it, to be more precise).  Watching the movie “The Way” helped inspire me but not tons more.  The coup de grace was when an organization I do treks with, Trekking for Kids, announced they would do a trek to do the Camino in the summer of 2014.  That sealed the deal.  Combining both my desire to do the Camino with the mission of Trekking for Kids (to improve the lives of orphaned and at-risk children around the world) was the perfect reason to go.

Trekking for Kids, trek, Bayti Centre, voluntourism, Essaouira, Morocco, travel, photo
The group of trekkers and the children and staff of the Bayti Centre in Essaouira

How we did the Camino de Santiago

The Trekking for Kids trek mixed a few days at a center for at-risk children in Essaouira, Morocco, called Bayti Centre, followed by seven days on the Camino (read more about our time at the Bayti Centre here).  Because the overall trek had to be kept to less than two weeks, the starting point of the Camino had to be picked such that we could do the minimum required distance (100km for those walking; 200km for those cycling) to be able to get the “compostela” (or the certificate issued in Santiago de Compostela that validates that you did the Camino) yet stay within the desired overall trip duration.  In addition, it had to allow for the travel day or two between Morocco and the start of the hike.

The preferred route was the traditional Camino Francés which is sort of parallel to the northern coast of Spain but further inland.  It is likely the most popular route of all though I wonder how the other routes are (and secretly hope I can check out some day!).

This meant we would need to start the hike at the last possible point we could and still meet the minimum walking requirements:  the town of Sarria, which meant we would do more than the 100km minimum (at least, 110km).  There were, however, a couple of important towns right before Sarria that were worth seeing (O Cebreiro and Samos), yet we did not have time to hike through them (would have required one or two more hiking days) – so the itinerary included driving through these towns before being dropped off on the trailhead from which our hike would start.

Our Camino route

Our hiking itinerary was as follows (click on the Day to read the post for that day!):

  • Day 1:  Begin at Sarria.  After a very short (“warm-up”) hike, we would overnight at Barbadelo.
  • Day 2:  From Barbadelo to Portomarín
  • Day 3:  From Portomarín to Palas del Rei
  • Day 4:  From Palas del Rei to Boente
  • Day 5:  From Boente to Salceda
  • Day 6:  From Salceda to Lavacolla
  • Day 7:  From Lavacolla to Santiago.
Galicia, Camino, Santiago, Compostela, camino frances, Frenc route, Sarria, map, pilgrimage

The map that follows highlights in a blue oval the town of Sarria, our starting point (immediately to the right, you will see Samos; further to the right, you will notice O Cebreiro).  The purple line that connects the blue oval to Santiago de Compostela to the west (left, on the map) is the route of our itinerary.

On to Day 1!

(You may want to subscribe to this blog so you receive an email when each article is posted.  Don’t worry, this is no more than three times a week so it is only three emails from ilivetotravel on a given week!)

Sope Creek: A Hike, a Creek, and an Old Mill

I was looking for another spot in Atlanta to hike while also hitting some waterway AND hitting history after having enjoyed going to Sweetwater Creek and to Island Ford (on the Chattahoochee River).  Tall order, huh?  NOT in Atlanta!  Plenty of spots along creeks and rivers to find great hiking and reminders of the life in the South back when mills ruled the day.  Enter, stage left, Sope Creek.

I am training for hiking the Camino de Santiago in Spain with Trekking for Kids, an organization that took me to Transylvania’s “Alps” in Romania and to the top of Mt. Kilimanjaro.   As part of my training, I want to do more than Kennessaw Mountain or Stone Mountain.  So after some research and talking to friends, I discovered the many trails that are right within 15 miles of the city, like Island Ford, for example.

But on another weekend, I wanted to try something new.  I was taking friends’ kids out on this hike so it also had to be friendly enough for me and three other kids 🙂  That’s when a co-worker recommended Sope Creek, a creek where a Civil War era mill use to operate and whose ruins you can not only see but also get up close and personal with!

Sope Creek, Atlanta, hiking, tadpoles, nature, outdoors, Georgia, old mill, Civil War, Paper Mill Road, rapids

The old mill ruins

The kids, aged 14, 10, and 8, were excited to come for the hike.  I decided to take the longer way to the creek so that the “hard work” took place before we saw the creek and the mill which I figured would be the highlight of the hike.

Sope Creek, Paper Mill, Atlanta, Georgia, hiking, kids, lake, colorful, photo, travel

Early on the hike, we ran into a small lake.

The park has both hiking-only trails and hiking/biking trails so we did have to keep our eyes and ears open to approaching bikes but the mountain bikers were pretty much nice and careful which we appreciated.  The trails are well-signed and the younger kids enjoyed trying to figure out which way to with the map and the signage while the older kid and I allowed ourselves to be guided.

Sope Creek, Atlanta, hiking, tadpoles, nature, outdoors, Georgia, old mill, Civil War

Tadpoles in our midst!

The trail approached the creek by going almost parallel to it but up high.  It was a nice view and trail which then went away from the creek for a little bit.  We ended up crossing a trickle of a creek right after spotting three deer.

Eventually, we made it to the old mill and the creek.

Sope Creek, Atlanta, hiking, tadpoles, nature, outdoors, Georgia, old mill, Civil War

Looking south

The kids explore the ruins of the mill and then proceeded to walk towards the large rocks at the edge of the creek.

Sope Creek, Atlanta, hiking, tadpoles, nature, outdoors, Georgia, old mill, Civil War, Paper Mill Road, rapids

Kids climbing around the old mill ruins

It was fun climbing and walking on the rocks.

Sope Creek, Atlanta, hiking, tadpoles, nature, outdoors, Georgia, old mill, Civil War, Paper Mill Road, rapids

Two of the three climbing around the rocks

We hung there for a little bit enjoying the scenery and the climbing.  It was also a great spot for pictures and for a snack.

Sope Creek, Atlanta, hiking, tadpoles, nature, outdoors, Georgia, old mill, Civil War, Paper Mill Road, rapids

I love this shot: She looks Photoshopped in!

All that done, we proceeded to exit the park by following the trail that is parallel to the road.  It deviated from the road a little bit because the trail was under repair but it was easy to make it back to the parking lot.

After the hike, we were hungry and the kids had asked for Cracker Barrel (they love it because I keep calling it Crate & Barrel, accidentally!).  It was the perfect ending for a great hike!  The kiddos are definitely hikers and explorers!

Sope Creek, Atlanta, hiking, tadpoles, nature, outdoors, Georgia, old mill, Civil War, Paper Mill Road, rapids

Yours truly

——————————————————————————————————-

Read about these other great hikes in Georgia:

Panther Creek

Sweetwater Creek

Island Ford

Tallulah Gorge

… and more to come!

Photo of the Week – The Alps of Transylvania

This scene was what we were rewarded with after arriving at the Cabana Curmatura in the Transylvanian Alps in Romania and hiking on for another hour.  I dream of returning to amazing Transylvania.  Too bad people’s only notion of it is the legend of Dracula:  there is SO much to enjoy and explore there!

Romania, Transylvania, Transylvanian Alps, hiking, nature, outdoors, travel, photo, Canon EOS Rebel

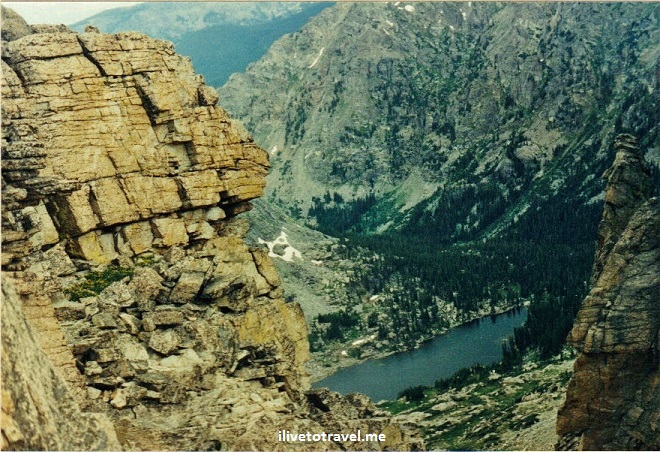
My First Real Hike: to Pawnee Pass in the Rockies

When I went to Boulder, Colorado for my first summer internship, my college roommate drove with me the 24 hrs. it took us to get there almost non-stop (except for the St. Louis Arch from where we got a great view at night time).  It was a wild drive in a way but we made a pact to pull over if while driving we felt sleepy and the other one was asleep.  It worked well and we made it safely to Boulder.  We had dinner and downed almost a pitcher of beer each.  Then we slept about 14 hrs. straight!

My roommate had family in Boulder and I got to meet them which was very nice.  It turned out to be my introduction to hiking.  My friend’s uncle invited me to go hike with him and his not-quite-a-teen son up to Pawnee Pass passing Long Lake and Isabelle Lake along the way to get to our destination at 12,550 ft in altitude, right at the Continental Divide.  I had no training for hiking and had only spent a couple of weeks at Boulder altitude.  This was going to be FUN.National Park, Colorado, Long Lake, Rocky Mountain, hiking, view, vista, photo

The views along the way were like nothing I had seen before.  While I had just driven around the Rocky Mountain National Park a couple of weeks before, these views were more pristine as this was a hiking trail, not for visiting drivers!

National Park, Colorado, Long Lake, Rocky Mountain, hiking, view, vista, photo, nature, outdoors  National Park, Colorado, Long Lake, Rocky Mountain, hiking, view, vista, photo, nature, outdoors National Park, Colorado, Long Lake, Rocky Mountain, hiking, view, vista, photo, nature, outdoors National Park, Colorado, Long Lake, Rocky Mountain, hiking, view, vista, photo, melting snow, nature, outdoors

National Park, Colorado, Long Lake, Rocky Mountain, hiking, view, vista, photo, Pawnee Pass

My hiking partners and I reach Pawnee Pass

I felt the altitude and the exertion but pushed myself through all that.  Oh, to be 24 again!  “Juventud, divino tesoro, te vas para no volver…” as the famous poet wrote mourning youth’s departure to never return…

%d bloggers like this: