The Machame Route: Our Route to the Top of Mt. Kilimanjaro

 (At the end of this post, see the series of posts written post-climb about this route!)

I am a few days away from leaving for Tanzania to climb Mt. Kilimanjaro, the rooftop of AfricaEager anticipation and a modest level of anxiety are my constant companions these last few days before the trek…  How fun will it be to finally see the mountain?  Did I have the right pieces to deal with the extreme cold?  Will my body cooperate?  Will I summit?  etc.

As I do a final review of the gear list, I am checking against the hike itinerary to be sure I am accounting for the right number of pieces given the varying climate zones we will encounter.  Let me share with you what the climb of Mt. Kilimanjaro looks like.  Mind you, this itinerary is based on going up the Machame Route (one of several routes available).  The Machame Route is known to afford better altitude adjustment, offer better views, and typically have much less trekker traffic.  All of these make it -ding, ding- a winner for me.  Especially the better altitude adjustment since it increases the odds of summitting, something that is not assured even with a good fitness level since the lack of oxygen at high altitude can hit every person very differently.

Here is a view of the routes to climb Kilimanjaro to which you can refer as you read the day-by-day breakdown below.

Routes to climb Mt. Kilimanjaro

Source: apartmentinlakeview.com

Itinerary to climb Mt. Kilimanjaro via the Machame Route

Day 1Adrenaline day!!  Start at the Machame Gate at 1,800m/6,000ft.  Head up to Machame Camp at 3,100m/10,200ft.  It should take anywhere between 5-7 hrs depending on the number and duration of stops along the way.  We should be covering around 18km/11miles.  The habitat will mainly be forest.  I am praying that adrenaline will carry me through the mud or whatever we encounter on this part of the hike!

Day 2 “I can’t believe I am here” day.  Continuing the climb, we go to the Shira Camp at 3,840m/12,600ft.  This day we go for 4-6 hrs covering about 9km/5.5miles.  The habitat here is moorland.  You may ask what “moorland” looks like (like I did).  So here you go, courtesy of http://www.africaimagelibrary.com.  The landscape looks surreal, doesn’t it?

Moorland on Mt. Kilimanjaro, Tanzania

Day 3Reality check day!!  We leave the Shira Camp and move into semi-desert habitat.  We head to the Lava Tower at 4,630m/15,200ft but descend to 3.860m/12,700ft to camp overnight at the Barranco Camp at 3,860m/12,700ft.  As you may notice and wonder (like I did), why if we go up do we go through the effort of going BACK DOWN??!!!  Seems counter-intuitive but after hearing the explanation, it makes perfectly good sense:  you want to climb high to force the body to exert itself at altitude but then climb down so you can sleep at lower altitude (which means more oxygen) to help the body adjust better.  OK, maybe also just the lay of the route contributes to this approach.  This is the type of factor that helps improve the odds of making it to the summit.  This hike will take 5-7 hrs and cover about 15km/9miles.

Lava Tower in Mt. Kilimanjaro, Tanzania

Lava Tower (Source: scottkress.com)

Day 4“OK, how much worse can it be compared to yesterday” day.  This day we cross Alpine desert to go up to the Karanga Camp at 4,200m/13,800ft.  This day we go up, and stay up.  But we are not camping at the maximum height reached the day before so we are still sleeping lower than our maximum exertion the day before.  Total time climbing should be around 4-5 hrs covering about 7km/4miles.

Day 5The “are we there yet?” day.  Continuing to climb without descending, this day we move to 4,600m/15,100ft going for 4-6 hrs and covering 6km/3.7miles which seems a cake walk compared to the prior days given the shorter climb and duration but I am sure it will be anything but (you will see why as you read day 6)!  We will stay at the Barafu Camp this night.

Day 6 The big day!!  This day we actually wake up at midnight (midnight between day 5 and day 6 – which means little sleep which will make ilivetotravel a little cranky – if he can muster the energy for that!).  Why do we barely sleep this night?  So we can see sunrise at the summit!!!  It will be a long hard night for most of us as you can imagine.  My headlamp will absolutely be my second best friend after all the layers of clothing that will keep me warm.  Uhuru Peak (the tallest peak on Mt. Kilimanjaro) sits pretty at 5,896m/19,340ft.  It will take us 7-8 hrs to go 7km/4miles.  Yes, twice longer than the same distance on Day 4.  Why?  Well, it will be slower going due to the altitude.  Pole, pole (slowly, slowly in Swahili) will rule this day.  There will be ice/snow towards the summit and I hope to see the glacier that, it is said, will be gone in 30 years or so at the current rate.  Stone scree will also be present so our gaiters will play an important role in keeping stuff out of our boots.

On this same day, of course, we have to get off the summit.  So on to 7-8 more hrs. of descent to the Mweka Camp at 3,100m/10,200ft to what it will feel like drowning in oxygen!

Day 7The happy day!!!  OK, Day 6 will be a VERY HAPPY DAY for those of us who summit.  But Day 7 is happy in other ways – we get to celebrate our climb and we get to shower!!!  We climb down to the Mweka Gate which sits at 1,830m/6,000ft, walking down for 4 hrs and covering 10km/6miles through a forest habitat.  A beer will never taste as good as the one I am planning to have that night at dinner!

Again, another view of the route (there were a few good ones so I couldn’t just use one…).

Machame route to climb Mt. Kilimanjaro

Source: apartmentinlakeview.com

Climbing Kilimanjaro is not without risks

The key to a safe and successful climb is to be aware of what is ahead of you (literally and figuratively).  Going slowly, staying hydrated all the way, minding where you are walking, and very important:  listen to the lead guide and his aides.  We are lucky to have a veteran of Everest, Kili and the rest of the Seven Summits (tallest peaks in every continent) which makes me feel much better.  Able to detect altitude sickness early, knowing the landscape well, supportive leadership, etc. are very important traits in a lead guide and we have that in our lead guide, Luis Benitez, one of the leading high altitude mountaineers in the world.  In addition, I have been on a prior trek with Trekking for Kids and everything is well thought through and planned.  So Luis and TFK are what make me feel confident that I will have a safe and successful climb regardless of the highest point of my climb:  at the summit or somewhere on the way there!

———————————————————————————————————————————–

I have added to this post the writeups for each day AFTER the climb so you can read more about each day!  Also here is a post about the actual clothing I took to climb Kilimanjaro item by item with the corresponding explanations in case it helps you plan your own hike!

Day 1 – Getting Going

Day 2 – The Moorlands and Reaching the Shira Camp

Day 3 – A Lava Tower and then All Hail Broke Loose!

Day 4 – The Barranco Wall and Its Challenges

Day 5 – Rocks Everywhere!

Day 6 – Reaching Kilimanjaro’s Summit:  Uhuru Peak

The descent from Uhuru Peak

Preparing to Hike Kilimanjaro: More than Training & Gear

I sit here, two weeks before my departure for Tanzania, asking myself “Oh my, what did I get into??”.  As you may have read, I am headed to Tanzania to hike Mt. Kilimanjaro, something that 5 months I would have told you was the furthest thing from my bucket list.  Seriously.  As I contemplate the process so far, I have learned a few things and I wanted to share those with folks who may be thinking of hiking Kilimanjaro.  Conditioning and gear are two important elements,  But there is a less immediately obvious element in being prepared…

How did I decide to climb Kilimanjaro?

I already knew I wanted to do more treks with Trekking for Kids (with whom I trekked the Transylvanian Alps) because of the great work they do with orphanages but I was not expecting Kili would be the trek for me.  I attended a TFK event last September where I heard Len Stanmore speak about his incredible journey of extreme outdoor adventure.  His story is quite inspirational and others started talking about TFK’s upcoming trek to Kilimanjaro in February 2013 at the reception afterwards.  I was hooked.  Somehow.  Not really sure what had just happened but I was in.  ALL IN.

Besides the orphanage work (fundraising for it and actually spending a few days there), there are three key aspects for me about the hike itself:  training, gear/packing preparations, and a third that I have yet to name at this point in this writing…

Kids, uniform, Tanzania

The kids at the Kili Centre orphanage sporting the new uniforms paid by funds raised by this trek

Training for climbing Kilimanjaro

Fortunately, when I decided to go on this trek, I was still relatively fresh from my Romania hike and had continued exercising in general.  It makes for a good starting point!

I started more serious training by getting on the treadmill and increasing the incline over a few weeks to 15%, ending up doing this for a couple of hours.  I also used a backpack whose weight I kept increasing beyond the expected weight we would carry on the hike (about 15 lbs for our day needs; porters would be carrying the rest) .  I was doing great with this and was planning to mix in real hikes by going to small but still helpful Kennesaw Mountain near Marietta, Georgia, where I trained for the hike in Romania.  And that is when a mini disaster struck:  I over-stretched my Achilles tendons (both legs!) likely due to the imperfect simulation of a 15% incline on a treadmill.  It all seems obvious now but I had not contemplated that I could hurt myself that way – you just don’t know what you don’t know!

That set me back about 6 weeks at a point when the intensity of my training was really beginning to pay off.  (I am almost back to normal and training again at this point.)   Not only that but I gained weight due to the double whammy of Thanksgiving and Christmas falling squarely in that 6-week period…  So now I will carry even more weight uphill 🙂

Advice:  If you embark on something like this without that type of starting point – don’t fret!  Just be sure to start gradually.  Aggressive training from cold is more than likely counterproductive if not outright a risk!  That’s the easiest way to get injured.  And also, stretch even of days you are not training.  Stretching is your best ally in physical readiness.

Getting in gear.  The gear to climb Kilimanjaro!

After being in good conditioning for the hike, the next item on the list is all the stuff that I will need on the hike.  That short word “stuff” covers a wide range of things that I will need to make this a successful trip.  After getting the packing list from TFK (VERY thorough!), I did an inventory of what I had and what I needed to research/acquire.  I started staging all my items in a spare bedroom.  It looks like a mess but it does two things for me:  1.  allow me to start gathering in one place all that I will need to pack making packing later a lot easier and 2.  allow me to start enjoying the upcoming trek by seeing it shape up!

packing gear for hiking trip

The “mess” in the spare bedroom!

Advice

  • Get a good packing list for the type of hike
  • Go talk to your local outfitter before you acquire things to learn about what they recommend, what materials are out there, criteria for choosing items, etc.
  • Then proceed with sourcing the items (borrow or buy).

Let me share some more specifics about gear and packing here (for a more detailed description of the clothing I took, go here)…  But do check out this post on what I considered my 7 key items for this hike (written BEFORE the hike) and then the top 14 things I took (written AFTER the hike)!

I am happy to email you a copy of my packing list!

Clothing for your packing list

Mt. Kilimanjaro covers multiple climate zones ranging from forest where one may be trudging through mud to extreme cold and windy terrain towards the top.  Guess what?  That means carrying gear to deal with all the climate zones but, most importantly, to deal with the extreme cold and wind which is far more dangerous to a hiker.  The key to all this is layers.  Not rocket science, I know.  I hear the cold towards the top is brutal!

The list I was provided by TFK was very clear on what was needed.  I went (a few times!) to my favorite outfitter and explores the options available for each category of item needed.  I have learned WAY more than I thought I’d ever learn about gear.  And spent way more than I ever thought I’d spend.  But two things help:  one, I have bought thinking of re-use especially at ski time or in future treks and, second, I have tried to borrow some items (though it has not been as much as I would have hoped for).

Advice My advice to you is to borrow, or buy used if possible, and think of re-use as you make choices on what to get.  For example, instead of buying the absolute best gloves for the extreme temperature, think of using liners, etc. so the gloves themselves can work for you in less extreme weather back at home.

Accessories for the Kili climb

This covers a whole range of items like the hiking poles (with shock absorbers!  see here for more on them), headlamp (not only to read at night or go potty in the middle of the night but also for the night hiking we will do on summit day!), sleeping bag liner (to make it warm enough for the coldest nights), sleeping bag pad (for comfort and further insulation from the very cold ground), cameras (yes, plural:  the big one is not summiting with me – too heavy), even duct tape!

Advice:  Borrow, or buy used if possible.  Buy new if that suits you better.  However, another possibility is renting some of the items on-site.  This helps you in two ways:  not buying stuff if you are not going to be hiking/camping more than this trip and also reducing the amount of stuff you have to lug half way around the world!  However, some potential downsides of this:  you don’t know the condition of the item you will rent (dirty, torn up, etc.) and you may not find the right type for the item you are looking for.  For example, you need to be sure that sleeping bag will be warm enough.

Health/”Medical” items for your Kili climb

For this destination, one does have to be ready with anti-malarial and other items as recommended by the CDC.  I have all the hepatitis stuff from prior travels so the anti-malarial (which is taken for every trip) and the typhoid (which I needed) were on the must-have list.  But the medical category is not just the innoculations/vaccines.  Things like ibuprofen, Cipro (for the potential digestive maladies that could affect a traveler…), and maybe even something to help you sleep get on the list.  Other items, such like the iodine tablets, sunblock with DEET, high-SPF chapstick, etc. are more preventive in nature but just as important.  This list is very important and is sometimes less obvious than the gear and clothing lists.

Advice:  Do your research, ask people who have gone before (feel free to ask here!), and don’t try to save money by skimping on these items!

Finally – Emotional Preparedness

I will have to get back to you on this after the trip for a full report.  However, I had heard that a lot about hiking Kili is the mental strength to power through tough conditions like mud and rain, tiredness, perhaps pain, and other discomforts.  So I am thinking this would fall under emotional preparedness.  I have heard from people who have hiked it before that, in the end, this is the most important elements in preparing for Kili.  You may be fit, you may not.  Altitude sickness could keep you from summiting and that is independent of your fitness level (amazing!).  But if you don’t have some toughness in this realm, you may fall short of your goals.

We are lucky that our lead guide is one of the foremost mountain expedition leaders in the world, Luis Benitez.  He is also a Board Member of TFK!  In an email he sent the trekkers last week, he told us that the best thing to do in this category is to expect discomfort, understand it will happen, understand it starts and it ends.  All that so that when it hits at any point in the trip, you remember it will pass and you don’t let it bring you down (figuratively speaking!).  I think this is a great piece of advice that will serve ME well in these 2 weeks before I leave for this hike.

Advice:  Listen to Luis’ advice!

Final thoughts on climbing Kilimanjaro

I am almost done doing all the things that I need to do to be ready but, in the end, it is the emotional preparedness that I am not sure how to measure.  I cannot check it off a list, like I can do with the other items on my packing list.  Yet it is likely one of the most important success factors in this trek.  I don’t know if altitude sickness will beat me to the summit.  I can’t control that.  But I sure hope I am ready enough to control my willpower and discomforts to summit or get very close to it!  Kili, I shall meet you very soon!

Uhuru peak or Kilimanjaro, Tanzania

P.S. – Thanks for all the words of support, advice, and orphanage donations via Trekking for Kids!

——————————————————————————————————————————

A month after this post went up, I had completed climbing Kilimanjaro and started writing about every day in the trek (7 total days) and about the route we were to take.  Check it out!

–  The Machame Route

–  Gear for climbing Kili:  clothing

–  Day 1 (and links to the subsequent days)

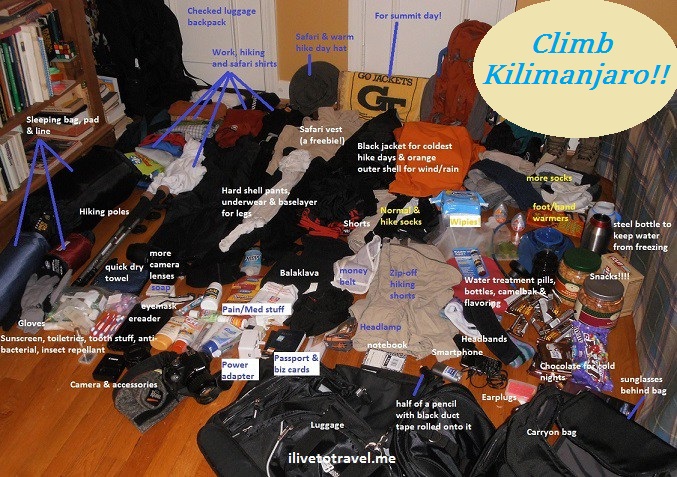
7 Items You Won’t See Me without while Hiking Kilimanjaro

If things go well, I will be trekking in Tanzania soon – hiking up Mount Kilimanjaro, the tallest mountain in Africa.  I am excited about the upcoming hike as I am doing it with Trekking for Kids, with whom I hiked in Romania in the summer of 2012.  Our hike will help a local orphanage with capital improvements to the infrastructure and, therefore, improve the standard of living for the children who live in the orphanage.  I do have anxiety about how well prepared I will be in terms of level of fitness and about how altitude may affect me.  But for everything else, research and planning has helped me ensure I have everything else I need for the hike!  Here are the seven items you will not see me without (should you see me!) while I hike “Kili”…

The things that will keep me warm

One of the most important things to know about Mount Kilimanjaro is that you go through five (5) distinct climate zones as you pursue this mountain.  This means you need to be prepared for the range of climate conditions across these 5 zones.  Pack for cold and pack for warm.  Of course, as the hike goes higher, I am told to expect VERY cold temperatures.  The challenge with this, for me, will be getting out of the sleeping bags in the cold mornings!!

Of course, using layers is how I will handle the variations in temperatures that I will go through during the hike.  Let me share my three most important items to pack to stay warm during the climb to the summit of Kilimanjaro:

#1 – Hardshell Exterior

My outermost layer is a hardshell exterior (see below for picture) to provide me protection from the wind and from water.  The Arcteryx piece I chose is of top quality and its design is perfect for the conditions of the hike, especially its versatility as it can serve in warmer and colder temperatures as a barrier to water.  It uses Gore-Tex and delivers a very lightweight piece – important as I will want to go as light as possible!  Some features that I liked about this model were the under-arm zippers in case extra ventilation is needed, and the hoodie.  Mine is orange, for the record.

Sample Outer ShellArcteryx Alpha SL Jacket

#2 – Jacket

For the second layer from the outside, I needed to choose something to keep me warm and, again, be light enough (begin to see a pattern?!).  I chose an REI Revelcloud jacket which can also serve as a barrier to water for times when I may not want to wear the outer layer.  At higher altitude, I will use both.  It can help withstand winds of up to 50 mph!   This particular jacket uses Primaloft, a synthetic material that emulates down but is not bulky and able to be compacted into the little bag it comes with.   Also, its design eliminates shoulder seams which will help with range of motion, especially good since I will likely be wearing multiple layers and too many seams can become an annoyance.   (I cannot find the item any more in the REI website; likely a new model is being rolled out – I bought mine at a great discount sale!  Below I share a link to what seems to be a similar item for this layer.)  I have to admit that I have been wearing this jacket when the weather has gotten cold as the material is very soft and it just feels good.  🙂

After trying several layers on, it became clear the outer ones described above should be a size larger than I would normally wear if not putting on several layers.  At colder times, I will be wearing two under layers:  a smart wool one and then perhaps a thinner one next to my skin (helping withdraw moisture from my skin).   I will likely not wear as many layers on my legs as I do on my torso.  Hiking pants with a thin layer (like long johns) under them should suffice.  Says he…

#3 – Sleeping bag

After discussing clothing, let me share how everyone stays warm at night.  <Sleeping bag enters the stage left of center>  Instead of buying a sub-zero-rated sleeping bag that I may not use too often, I chose to go for one rated for zero degree (that I may get to re-use in other hikes that do not go as high and cold) and get a liner with something akin to thermonuclear for its rating.  (Do some reading on the ratings ahead of time so you know how to read the sleeping bag specs.)  I also wanted to make sure I used something that would pack relatively light.

The shape of the sleeping bag matters a good bit – something that had not occurred to me prior to researching the matter.  But it makes perfect sense that at very cold settings, you want to maximize heat retention.  Models whose width tapers down as it moves from head to feet are the best – they are called “mummy”-shaped as that is what they look like.  The less air inside, the less cold inside when you get it in that will need your body heat to warm up.  Therefore, more heat stays with you.  (That thermodynamics course in college is paying off – finally!)  This sleeping bag’s 2-way zippers will also make the job of closing and opening it up easier – nice feature!

Coleman Silverton 0 Degree Adult Mummy Sleeping Bag

#4 – My knee’s best friends – hiking poles

I have learned that hiking poles are my knees’ BFFs through my hiking experiences.  Hiking poles help with stability but, more importantly, they have a mission of protecting my knees from too much wear-and-tear, especially while descending when the knees get a pounding – especially if it is a few hours worth of going down like we will do in Kilimanjaro when we descend.  I decided to take advantage of a sale to get a great pair that have anti-shock features.  I am sure people will have different opinions but hikers that I know well (and trust) said they would be worth the extra expense.  The weight of the poles is also something to consider so an aluminum shaft was perfect.

After deciding on the anti-shock and the weight, the next consideration was the grip or handle.  This is a matter of personal preference.  I chose a round cork top (that unscrews to also serve as a camera mount!) with a long foam cover under the top for the different grip I will want.  The locking mechanism can matter – some are easier to lock.  The ones I got use twist-lock for ease of adjusting since I will be wearing gloves a good bit.  Oh, and I bought rubber tips to use.  I share both the one I ended up getting and another I considered.   The one I got from REI.  What sold me on the REI one was the handle.

Black Diamond Trail Pro Shock Trekking Pole

#5 Big priority – stay hydrated:  Camelbak and Steripen to the rescue!

Hydration will be key to my well-being during this hike (pretty much true of any hike).  Carrying a bottle and dealing with pulling it out when I want to drink is a little bit of a nuisance.  This will especially be true on this hike when I may be wearing gloves a lot.  A camelbak is perfect as it allows easy access to water at any point without having to stop or slow down.  Additionally, I have learned that I drink water on a more frequent basis by sipping because it is easy with a camelbak tube versus gulping water more spaced out whenever I decide to pull a water bottle out.  Sipping has another added benefit:  because I don’t take in water in bigger gulps, I need fewer nature stops – who’s with me?? 🙂

My camelbak bag is inserted into my backpack (designed for this).  I may be buy something to protect the tube coming out of the backpack to prevent it from freezing when it is very cold.   Of course, making sure I have safe-to-drink water is a big priority.  Steripen or something similar will be crucial so consider it item #5.5!

SteriPEN Adventurer, Handheld UV Water Purifier
Oh, and someone suggested a hot water bottle that you fill in with hot water before zipping up the sleeping bag to help keep you warm AND to have non-freezing cold water when you wake up to drink!  Now, does that go in this section or on the first section about keeping warm??

#6 Finally, show me the way…  My headlamp

No, my final item is not my boots but that’s not because they are not important – they are supremely so!  Please be sure to find comfortable boots, that are water resistant, and then be very sure to break them in through practice hikes before you embark on the big hike.  Blisters are your worst enemy and proper footwear is key.  Back to #6… my headlight.  The ascent to Kili’s summit starts around midnight so this will be an essential item to go up.  Why does it start at this weird hour?  Because you want to be up there to see the first morning light!!  However, this headlamp will also be important so I can see at nighttime before I head to “bed” and in case I wake up in the middle of the night and need to relieve myself, something I hope I don’t have to do often!

Petzl – ACTIK Headlamp, 300 Lumens, Active Lighting
 

#7 OK, one more thing (I did say 7 in the title…)

Duct tape!  Duct tape can serve MANY purposes.  If anything breaks, you can likely fix it with some duct tape.  But also, should you start developing blisters, apply some small strips of duct tape to protect the spot as soon as you feel the heat coming on and prevent a full-blown blister.  Blisters are THE last thing a hiker needs!  In any case, duct tape can help repair things that are important to you during the hike.  Sure, you may toss the things later but not while on the mountain!  So, duct tape can keep things going until you can properly fix or dispose of them.  I recommend rolling duct tape along the hiking poles for easy access without looking through a backpack’s worth of contents or having to remember to put it in the backpack to begin with!  I will let you pick the color of duct tape – bright orange could be useful if you get lost – ha!  (Mine was white, for what that’s worth.  No reason for it!)

Well, a few more things to bring along… bonus round!

I hope this has been a helpful list – would love to hear your own suggestions or get your questions.  There are many other things to consider as you prep for a hike like this and I would be remiss if I don’t list some of them here just to be sure you don’t miss some key items:  a backpack that feels comfortable (and that has both waist and chest front straps to prevent back issues), sunblock (and wear it!), chapstick (with sunblock – the sun’s rays are much more powerful at altitude), snacks, wipies, underwear that wicks moisture away from your skin (prevent chaffing), sunglasses, a nice warm hat, very warm gloves (OK, you may want two types:  one for extreme cold and a regular pair), ear plugs (because you never know who may be sleeping next to you…), a hot water bottle (will feel nice inside that sleeping bag!), and finally:  a camera for all the great shots you will want to take!

Bottom line:  do your research and be prepared – it will make the experience much more memorable!  Stay tuned for my updates from my hike of Kilimanjaro!

I did write more in two other posts AFTER the hike so check them out for more insights after the specific Kilimanjaro experience:


Pin this to your hiking board so you can refer back to this post and a visual of all the things you will pack!

Kilimanjaro, planning, gear, packing, climb, hiking, trekking, Tanzania, mountaineering

Pin it and dream of Kili!

First Experiences in Tanzania – Arrival in Dar es Salaam and Heading to Work

Before the days of this blog, I would send periodic emails to family and friends about my travel. At first it was report that I’d made it to wherever and then I started adding some of the things I was seeing for no real reason other than I wanted to tell someone about anything interesting I saw from the trivial to the significant. What follows is the email I sent soon after arriving in Tanzania in 2007… Enjoy!

Hello, hope everyone is well. I have been now about 4 days in Tanzania for my work trip. After the long journey here, it is nice to be “settled” into a normal day-to-day living schedule though the first few days I kept waking up way too early for sanity (4 AM, 5 AM, etc.). Today, I slept past the desired wake up time. I think that is a good thing.

So what is my workday like? I start with a FULL breakfast at the hotel since lunch will not be until 1 PM, at the earliest, and since we start at the office at 8 AM. There is nothing in the vicinity of the office where you can buy any snack or other food, so I must load up at the hotel before coming over. No vending machines either. I fear hunger almost as much as I fear critters so I am proactive 🙂

The work location is what looks like an old house, big for the standards of Tanzania but smaller than the McMansions in Atlanta. Being an old house, rooms are small and I imagine some rooms where broken up into offices at some point too. Each little office has its own window A/C unit to keep people cooled. I was actually surprised they had these in every office but I am VERY glad for many reasons. I sit with the IT manager who has technical equipment in her office so her A/C unit works especially well to keep everything cool. I will miss her next week when she will not be at work since her office has to be kept locked due to the equipment and I will not be able to enter it…

Lunch is cooked on site by some ladies they hire to cook lunch for the office. Apparently everyone chips in like a subscription type of scheme because there is nowhere to eat around here. Visitors pay 2,000 shillings for lunch which sounds like a lot but it is less than $2. A bargain for a full plate of rice, a couple of small pieces of meat, beans or vegetables, and some fresh fruit. Around 530 PM we go back to the hotel. We are able to go out if we want but it means a taxi ride as there is nothing near the hotel (it is not near the city center).

Tanzania, unlike other countries where we do work, is quite safe so we are not required to stay in the hotel for our safety. I have heard stories of other countries where once you get to the hotel you must stay in per security standards. Transportation to and from work is provided by the local office, so we don’t have to worry about catching a cab, etc. That is a nice thing.

In the hotel I can get free wireless Internet access, unlike the US where we are squeezed to pay for that in most hotels. However, some nights the Internet connection is down which may have nothing to do with the hotel. That may not be atypical in many of the countries we work in from what I hear. Infrastructure (power, water, etc.) can be rather fragile. I have not experienced power outages in the hotel which is nice because it keeps the A/C on! (I am, I have to say, a little needy that way though I would survive without it if I had no choice which may happen when I travel outside of the big city.)

Alright, this has become quite a long email so I will begin to wrap up. My plans for the next few days are to travel to a town called Mwanza in the NW of the country to visit the field work Saturday and Monday (here is a link to my hotel there http://64.91.230.207/accomdation.html). From there, I get a small break on Sunday to visit the Serengeti National Park (hopefully) (this is where I may stay outside of the park http://www.spekebay.com/). I will return to Dar on Tuesday and probably head out to visit the field in Zanzibar.

Finally, I return to Dar and visit some of the field work done in the urban area here. We do a lot of work here related to health, education and national resource management (I was ignorant about this last area and now I am very curious to see the work we do; there is a strong correlation with national resource development like mining, forestry, etc. and poverty; the former when not managed tends to impact those who live in those areas rather strongly and negatively).

OK, now I will stop.

On the Shores of Lake Victoria in Mwanza and on to the Serengeti

In early 2007, I went to Tanzania for work reasons and I was excited to get to this part of Africa.  Two other entries in this blog cover the trip over and  some observations about Dar es Salaam.  This entry will share more of the logistical items about my visit to Mwanza, the actual stories of what I saw once there (field visits, the city, and the Serengeti) merit their own to-be-written entries and I don’t want to make this entry too long!

Part of the reason to be sent to Tanzania, as I may have mentioned in earlier entries, was to better understand my organization’s operations in the developing world.  I was fairly new to the organization so this was to be part of my onboarding, if you will.  There were a few places in Tanzania to potentially visit but we settled on a 1-day visit to Zanzibar and a 4-5 day visit to Mwanza, on the shores of Lake Victoria.

Getting to Mwanza

To get to Mwanza, I flew Air Tanzania as land travel is extremely slow (there is a train and some sort of road but nothing that would make for an easy and speedy trip; the latter being more important due to time constraints).  The plane was brand new and very well kept.  I was not sure what to expect but the service and the food were quite good and I felt quite safe flying the local airline.   I landed in Mwanza and, though I have flown to a smaller airport (Contadora Island in Panama), I was amused by smallness of the airport and the baggage claim area:  a wall divided the area where the plane was from baggage claim and a big rectangular hole in the wall was where the baggage handlers placed the luggage to then be claimed by the passengers.

Mwanza airport in Tanzania, on the shores of Lake Victoria

Mwanza airport

Lodging in the City

I was picked up at the airport and taken to a hotel on the shores of Lake Victoria, named Hotel Tilapia (http://www.hoteltilapia.com/).  There were different types of rooms  and over the few days I was there,  I got to try one of the rooms in the building and one of the rooms on the docked boat (the Buganda, which appeared in the movie the African Queen!).  (I didn’t stay at the bungalows, the 3rd type of room.)

Tilapia Hotel House Boat Buganda in Mwanza, Tanzania

The Buganda

The one on the Buganda was rather interesting as the boat (which was well docked and tied up so it didn’t move) was sort of tilted.  Also, my window to the water wasn’t really sealed so I wondered what creatures would come in during the night…  Actually, both rooms were well fumigated so I actually saw no critter in either one (a key success factor for me even if the spray they use daily in the rooms is toxic to ANY living creature!).

The best feature of this hotel was being on Lake Victoria.  There was an outdoor bar and restaurant area by the water which, as long as you had put on some mosquito spray, was quite enjoyable.  Clearly, there are other hotels in Mwanza and I didn’t get to see them so there may be better options but this one worked well for me.

The Tilapia Hotel's bar area right by the shores of Lake Victoria

The Tilapia Hotel’s bar area right by the shores of Lake Victoria

Mwanza

Mwanza is blessed to be located on Lake Victoria and not terribly far from the western entrance to the Serengeti.  It is the second largest city in Tanzania after Dar es Salaam (located on the Indian Ocean coast).  I traveled the Mwanza region visiting projects with work which was a neat way to see the area. Some of the projects I visited had to do with village savings and loans (economic livelihood improvement projects).  Everyone was very friendly to this visitor!!

Village savings and loan group in Tanzania

Village savings and loan group 1

Village savings and loan group in Tanzania

Village savings and loan group 2

Being on the lake, it is a port (other countries bordering the lake include Kenya and Uganda).  One of the natural features of the lake are the rock formations which you also see on land.  The most famous of the rock formations is Bismarck’s Rock right by the shore.

Bismarck Rock in Mwanza (Tanzania), by Lake Victoria

Bismarck’s Rock

The city of Mwanza was very manageable and there seemed to be a  lot of economic activity at the time.  It was a great base to explore the lake area and enter the Serengeti from the west.

Downtown Mwanza, Tanzania

Downtown Mwanza

Downtown Mwanza, Tanzania

Downtown Mwanza

Lodging near the Serengeti

I did overnight in another part of the Mwanza region because I was going into the Serengeti (from the western entrance) the following day and since you want to be there at the crack of dawn, driving from Mwanza was not going to work.  So I stayed at the Speke’s Bay Lodgehttp://www.spekebay.com/ ), run by some Dutch (if memory serves me right).  They built the lodge area (bungalows and tent area) and they cleared the reeds/bushes from the shores of the bay and actually created a beach (which apparently is very difficult to keep clear of reeds so it is a labor of love, I suppose).

Speke Bay Lodge on the shores of Lake Victoria in Tanzania

Speke Bay Lodge – my lodge

Speke Bay Lodge room by Lake Victoria in Tanzania

Speke Bay Lodge room by the shore of the lake

The “beach” looks very nice but not a beach you would walk around at night – the hippos are not far away and may meander through the beach!  I stayed at a bungalow by the lake (the ground where the bungalows are is at a higher level than the beach so I assume the hippos can’t get up there, or so I hoped!).  All night long I could hear the hippos – I could have sworn they were right outside my window!  (They were not.)   The hotel shuts off electricity at some point in the evening so it was an early night which suited me fine because of the early start.  However, it was a very hot night and I didn’t think it wise to open the sliding door…  One good thing was that the bed had a mosquito net and was quite comfortable.

View from Speke Bay Lodge in Tanzania

Lots of wildlife around Speke Bay Lodge

Sunset on the shores of Lake Victoria at Speke Bay Lodge

Sunset on the beach at Speke Bay Lodge

Unfortunately, I did not spend too much time at the lodge because of all the visits on the day on my check-in and because of the very early check-out the next day.  However, I had a great meal at their restaurant where a group of Canadians were nice enough to ask me to join them since I was on my own and the grounds were very beautiful and well kept.

There are likely other options (the lodge was on the more expensive side) that may make more sense but I generally went were I was taken so cannot offer other suggestions.

The area around Lake Victoria is beautiful and the memories of nature and people will last me a lifetime…

Sunset on Lake Victoria in Tanzania

Sunset on Lake Victoria

Does someone else have insights into other hotels in the city of Mwanza and accommodations near the western entrance to the Serengeti? Can anyone comment on traveling by road or train instead of flying there?

%d bloggers like this: