Barranco Wall – A Great Challenge | Kilimanjaro Day 4

The Barranco Wall is one of the most dreaded – if not feared- segments of the climb of Mount Kilimanjaro on the Machame Route.  People often ask how hard is it to do the Barranco Wall.  I was blissfully oblivious to the question before I went on this adventure.  Blessed ignorance!  While I had researched my trek and prepared for it, I had mostly focused on the training, clothing, gear, and altitude sickness more than on the intricacies of the climb or route itself.

Looking back, I am glad I did not know about the Barranco Wall before I met it that morning…  How hard was it to climb the Barranco Wall?  Was it like wall climbing or walking along a steep edge?  How wide was the path along the Barranco Wall?  How high was the Barranco Wall?  What would I feel?  I am sure the questions would have been endless.  And, if you are reading this, perhaps you are asking yourself those questions and seeking answers.  I will get to my answers to those questions, but let me take a step back in the narrative here…

Starting day 4 on the Machame route

There is a morning routine to camp life in Mount Kilimanjaro – at least I concocted one all of my own.  This routine started with getting my “person” ready (dressing, brushing teeth, etc..).  Then it moved to those activities that were about packing up (rolling up the pad, etc.).  And the routine ended with getting ready to go (putting on the layers, filling water bottle, etc.).

While I was a little more leisurely about the first set of tasks (I woke up early enough), I usually felt rushed on the latter.  I worried every day that I would slow down the group’s departure.  Sure enough, I was often the last or second to last person to be ready.  Not really sure why, I got up early enough!  But I didn’t get voted off the mountain so I guess it was all A-OK!

Day 4 on the Machame Route up Kilimanjaro began like every other day:  get out of the zipped-up sleeping bag, figure out where the full pee bottle was to not accidentally crush it, find the camp shoes, put on some warm clothes, have some water, take any of the daily meds required, etc.  I executed the full morning routine as if nothing special was about to happen…

 Hiker, Trekker in front of Mt. Kilimanjaro, Tanzania wearing Arcteryx

Once the morning routine was completed, this trekker looks like a pro!

Meet the Barranco Wall:  A mental and physical wall? 

But on day 4 I did wake up with something else on my mind beyond my routine:  the Barranco Wall.  I had on purpose not read every detail about the Machame Route before I left for the trip as I mentioned earlier because I figured leaving some element of surprise would be good.  I did not want to be anticipating what came next but, instead, enjoy each moment in the present (and not dread the next moment…).

Then, the night before we went on the Barranco Wall, I was told about this well-known feature of the trail we were taking.  I was not sure what what was shared really meant but I had seen the wall on our way in from a distance and I got a little worried about what it would take to get through it for this amateur.  Clearly it was going to be a narrow path with the wall on one side and the “fast” way down on the other…  I tried to not think about it because there was no sense in over-processing it.  But I was hoping it was not wall climbing with a cliff’s edge right by my feet…

It should be called the Barranco Wait, not the Barranco Wall

Of all the things to have worried about, wall climbing was not it.  No mental or physical wall there (that does not mean there were not a couple of tricky moments!).  The real “wall” was the wait to cross the Barranco Wall!  See, normally trails are wide enough to walk two people side-by-side which allows for letting porters pass you without you having to stop or get out of the way.  We appreciated porters because they make the trek possible for the hikers (more on the porters here).  So we always let them pass if we were walking side by side at any point.

However, the trail on the Barranco Wall narrowed to single file for most of it.  The wall did require some times pulling yourself over rocks but always with the trail on either side of it (that is, never floating over empty space below).  So porters would be trapped waiting for hikers to work their way through these points.

Our group stayed off to the side right before the Barranco Wall started to let as many porters pass but it became rather tedious as we ended up sort of waiting for like a good 30 minutes or so.  Other than that the wall should take an hour or two depending on your fitness level and the traffic ahead.

The Barranco Wall on the Machame Route climbing Mt Kilimanjaro

Long line of climbers and porters entering the Barranco Wall. Me?  In the waiting room to enter the Wall, I suppose!

The Barranco Wall on the Machame Route climbing Mt Kilimanjaro

Barranco Wall, here we come! OK, in 2 minutes. No, in 10. No in 20…

Finally, the wall

Wondering what lay ahead of me in the trail for this day, I was quite eager to initiate the hike (instead of pondering what lay ahead).  I sensed others around me were ready to go for whatever reasons of their own.

We finally got started and I found the wall was actually quite doable.  Yes, the trail narrowed at certain points to widths not comfortable for everyone but this actually did not bother me – but I still made sure I was closer to the wall than to the trail’s edge 🙂  The Barranco Wall is between 200-300 m high and, while not trivial, it didn’t hit me as scary from an altitude standpoint though people are very different when it comes to altitudes and ledges so keep that in mind.

Climbing on the Barranco Wall in Kilimanjaro

At the beginning of the Barranco Wall, finally! (Photo courtesy of K. Shuman)

Given we had to go very slowly, I had the time to look back at the direction of the Barranco Camp and the entrance to the Barranco Wall…  And the ever-important photos…

View towards Barranco Camp from the Barranco Wall

Camp was in the direction of the green-roofed hut on the top left. Note that trail of trekkers and porters.

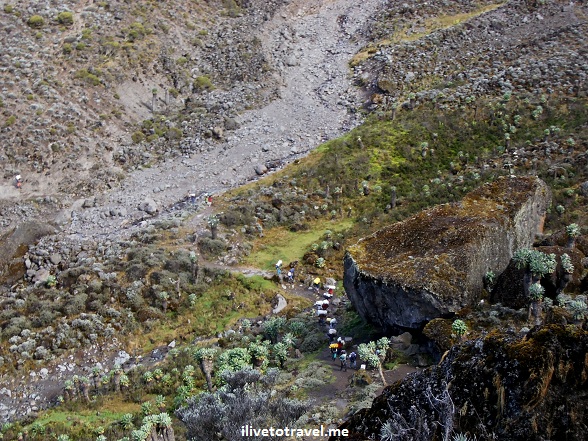
Entrance to the Barranco Wall on the Machame Route

Closeup towards the almost-dry stream we had to cross to enter the Barranco Wall’s “waiting room”

In the end, there were a couple of “tight” spots.  One was a little jump, where help was necessary and useful (from a physical and mental block standpoint).  It was better to have one’s hands free along the path to be able to hold on to things.  So the hiking poles helped me most by being packed away versus in my hands.  The physical exertion was a non-issue for me along the wall and I was glad for that – but there was more ahead, post wall…  The Barranco Wall, for someone not afraid of heights, was not a hard thing to do.  I suspect it is a different story for someone afraid of heights.

The trail after the Barranco Wall:  a trail of doubt for me

With the wall behind us, I felt relief that now we were going to be back on a more “normal” trail – I had this!  Well, we were not quite back to one of those normal trails.  The trail after the Barranco Wall required climbing over a lot of rocks (without a cliff around) and the exertion of climbing over large rocks actually left me quite winded.  I could see myself lagging the group a bit more with every passing section of the trail and I was not happy.  Frustration and doubt started to creep in…

Our Trekking for Kids lead reassured me that the extra exertion of the legs would definitely have this impact (picture, if you will, the difference between walking uphill vs. walking up the same incline using stairs:  it is harder on the latter).  Still I was disappointed,  I wondered if my fitness level was not up to par (I should have hiked more…)  and – furthermore- what did this presage about summit night??

Our lead hiking guide, checking in on me at the next break, told me that an accelerated heart rate is also caused by altitude and may not be necessarily a statement about my fitness level.  I appreciated the support of the TFK lead and our lead guide.  It helped me muster enough strength to get me past this stage of the trail – but just barely…

Onwards and upward on Kilimanjaro!

Mercifully, after that stage, the trail become more the normal up and down hills so I was OK on those.  Occasional rocks along the way were further apart from each other so the issue did not re-surface.  I once again believed I could do this!  My first moment of doubt since entering the mountain had lasted maybe less than an hour.  But, mentally, it had been huge.  So this is what people mean when they say climbing Kili is both a physical AND a mental challenge…

Along the way, the weather was seemingly taking a turn for the worse.  So, we made a quick stop to put on our rain gear but it really did not rain much or for long at all – whew!  While it would not have been terrible, it is just not fun…

Rain hits while climbing Mt. Kilimanjaro in Tanzania

Hikers walking into the cloud…

We arrived at the Karanga Camp (13,800 ft; 4,200 m) after a 4 mile (7 km) hike that took us around 5 hours.  We were very pleased that it was another nice camp on a sloping hillside with great views.  The tents were on a little bit of a slope. But after one slightly uncomfortable night on Day 2, I learned the trick to make the sleeping bag as horizontal as possible.  Just put stuff under the sleeping pad to even it out – simple solution!

Karanga Camp at Kilimanjaro's Machame Route

Yet another beautiful camp! (Photo courtesy of K. Shuman)

Getting the best sleep in Kilimanjaro – sleeping pad

It is worth explaining that we used sleeping pads under the sleeping bags for two reasons:

  1. Further insulate you from the cold ground, and
  2. A little more comfort in sleep with the extra padding.

For me, though, it was more about the comfort question as my zero-rated sleeping bag did a great job with the temperature.

My sleeping pad was an inflatable one (but not self-inflatable).  I had not brought a pump with me to avoid the extra weight (the pump and then all the batteries).  Given the altitude and diminished oxygen levels, I was worried this would be an issue.  But it actually was no trouble at all.  I just inflated the pad sometime before dinner so it was ready for bedtime.  Plus it helped me practice my pressure breathing – good exercise for my lungs at altitude!

Folding the sleeping pad in the morning after deflating it to slip back into its tight packing sleeve was actually THE worst moment of my morning routine…  EVERY.  SINGLE.  DAY.  I should have traded sterilizing someone’s water every morning for folding up and packing my sleeping pad…

It’s all in the views…

Like many moments on this climb, neat views delight when they appear.  After the Barranco Wall waiting room, the post-wall stage which slowed me down and brought doubt, and the slight rain we experienced, it was the nice views that really motivated me to continue with every day and every step.  Such motivation was, for me, this view on Day 4…

Mt. Kilimanjaro's summit beckons climbers

The summit beckons!  We are closer!

Back to Day 3

… or on to Day 5!!

————————————————————————————————————————————————–

Pin this image of the Barranco Wall to your board – you will make it OK through it – even if you have to wait!

how hard Barranco Wall, climbing Kilimanjaro

—————————————————————————————————————————————————

Other posts about my Mount Kilimanjaro trek experience:

–  Preparing for the hike is more than training and gear

–  Clothing required for climbing Mount Kilimanjaro

–  The Machame Route:  our way up

–  7 things you will not see me without as I climb Kili

–  Day 1 of the hike:  and away we go!

–  Day 2 of the hike

–  Interview with fellow Kili climber and Ultimate Global Explorer Len Stanmore

Reaching the Lava Tower | Kilimanjaro Day 3

Day 3 would take us pretty high, to the Lava Tower of Kilimanjaro, and leave us at the base of the infamous Barranco Wall.  We were greeted by the day at Shira Camp where we had arrived on day 2 of our climb of Mount Kilimanjaro.  The day’s hike began around 8:45 AM to the famous.  The climax of the day would be arriving at the famous (though, admittedly, I had not heard of it before I signed up to do this trek) Lava Tower.  There, we would stop for lunch before continuing on to descend to the Barranco Camp. Barranco Camp would be out stop for the night before attempting the Barranco Wall on day 4…

Lava Tower, here we come

Excitement combined with anxiety that morning as I got ready to depart the awesome Shira Camp (my favorite of the entire climb).  I was wondering how I would perform at the higher altitude we would get to that day.  Prior to this trek, I had never climbed higher than 12,000+ ft.

Our hike on day 3 started at 12,600 ft (3,840 m) and would peak at the Lava Tower at 15,200 ft (4,630 m).  I had not been that high before (airplanes aside!).  The highest place I had ever gone to (whether climbing or by ski lift) was Pawnee Pass in the Colorado Rockies when I was in college, over twenty years earlier, and that was 50 ft shy of the starting altitude on day 3 on this trek…  Day 3 would not bring the longest climb up to that point (that was on day 1 of the Machame Route) but given the altitude we would reach at the Lava Tower, I expected a challenge.

Climb high – and then come back down?  Seriously?

So, the plan for the day was to go up to 15,200 ft.  I remember reading the itinerary and thinking “wow, only 4,000 ft more to go to the summit!”.  And then I read we would end the day at 12,700 ft, barely above our starting point, once we arrived at the Barranco Camp.  “Say WHAT??!!!,” I asked  myself.  I quickly learned how smart this approach was to acclimatizing to the higher altitudes of Kilimanjaro.

The “climb high, sleep low” approach allows for the body to exert itself at higher altitudes where the air is “lighter” while allowing sleep at a lower altitude where more oxygen in the air would help the body recover from the day’s exertion.  As I mentioned,  this would help the body acclimatize to altitude better.  I am not sure one fully adjusts to the altitude in the mountain but you are closer to that with this approach.  That is, perhaps one reduces a little bit the probability that altitude will cause problems later on, especially summit night when one really does not want to suffer any serious condition (e.g., edema) from the body’s reaction to low oxygen levels…

Mt. Kilimanjaro with a beautiful blue sky and clouds

This view early on Day 3 certainly motivated us to tackle Day 3’s challenge

The way to the Lava Tower

So off we went, walking in semi-desert terrain, along an inclined or sloped trail that did not present any serious challenges, increasing altitude aside which did require a little slowing down (nothing extreme).

It is amazing how the terrain is so different every day of this climb.  It keeps it interesting and me distracted!  I had heard the Machame Route is the best in terms of seeing a diversity of landscapes and views and, as far as I could tell, it was definitely true of the route (though I cannot personally attest to the other routes).  (I had also heard the initial part of this route would be a little less crowded than other options.)

Alpine desert in Mt. Kilimanjaro near the Lava Tower

Some little vegetation…

Alpine desert in Mt. Kilimanjaro near the Lava Tower

… gives way to no vegetation in no time!

Reaching the tower – and lunch!

As the day went on, the skies darkened and, at different times, fog or clouds passed us, like right after we arrived at the Lava Tower (around 1 PM).  The Lava Tower, one can safely assume, is made from the rocks that the mountain spewed during its volcanic heyday.  But for me, what was more important when we got there was the fact I had managed things OK to get to this altitude. “OK” does not mean piece of cake.  But it does not mean “barely made it” either.  I felt victorious enough to not mind the fog or the darkness it brought with it.

Lava Tower shrouded in clouds

Clouds coming in to the Lava Tower camp area

At the Lava Tower in Mt. Kilimanjaro

Celebrating arriving at the Lava Tower with my hiking buddy for the day, Melanie

Making it to 15,200 ft is a celebration-worthy moment.  For us, that meant a warm lunch in our dining tent.  Just one word:  awesome.

DIning tent while hiking Mt. Kilimanjaro

Our dining room on the mountain

Every day, our porters would set up the tent at camp and serve our dinners there.  However, normally, lunch was taken on the trail during a break so seeing our dining tent set up for lunch at the Lava Tower was a nice tough and a welcome one to stay warm.  I don’t know if the food was as good as I thought it was or if we were just starving from the exertion??  I think it was a little bit of both – and that’s OK by me!


Descending from the Lava Tower to the Barranco Camp – piece of cake

After having succeeded in climbing to over 15,000 ft and surviving the thinner air during the one-hour lunch break, it was time to go down to our camp for the night (and more oxygen density!).  We felt at this point we had this covered.  Everyone was in great spirits: talking and laughing as we left the Lava Tower.  We exited the Lava Tower Camp area by going between two very large rock formations and proceeded to descend.

Exiting the Lava Tower Camp area in Mt. Kilimanjaro

Exiting the Lava Tower Camp area

Well, Mother Nature had a new experience in store for these hikers.  Just after we cleared the rock formations and had proceeded down the rocky terrain some, the weather turned.  A little rain began to come down and we all got geared up (covering our daypacks, putting on the hard shell pants, etc.).  I guess it was a good thing we had all these things handy.  My stuff was the easy-put-on kind which did not require me taking my boots off, for example, to put the rain pants on (more on what I wore and why here).

Daypacks covered during a storm in Mt. Kilimanjaro

Stormy weather in Kilimanjaro

The umbrella person was not one of ours, for the record. They may have just been blown away by the winds after this photo was taken…

Hail, not lava rained down

And then it started to hail.  At first, we actually kind of liked it.  Cool was the word.  Until it started hailing harder.

Our collective recollection days later was that the average hail was the size of a small motorized vehicle.  That day, if you had asked us, we would have said they were the size of mansions.  Upon closer examination of the pictures taken, the hail was the size of small pellets.  However, this group of trekkers had been spoiled -er, blessed- with awesome weather up to that point.  So we can be forgiven for talking about this hailstorm for a day or two as if it had been a preamble to the Apocalypse.  The Apocalypse in the slopes of Kilimanjaro.  Toto just watched the rains down in Africa.  We watched the Hail-calypse down in Africa.

Hail on Mt. Kilimanjaro

See the MONSTROUS pieces of hail?? The humanity!

Camp.  Finally.  And a truth revealed.

We got to camp (still raining some) around 4:45 PM.  Quite a few folks had to make a run for number one or number two since we had not made any stops during the hail/rain to get past it and to camp quickly.  No one will forget our guide’s impression of one of our trekkers who was suffering more from an urgent number two run…  As we discussed the day over dinner, we all kept talking about the storm.  Until our guide, Luis, proceeded to tell us that the storm had lasted exactly 1 hr 47 mins.  He then added that, on a scale of 1 to 10 in terms of bad weather in the mountain, this ranked as a 0.5.  We pondered his point for a brief moment (surely self-pegging ourselves as wimps).  Then, I believe, someone asked for the mango plate to be passed and the topic was nicely changed…

E.T., phone home

The Barranco Camp, where we were going to spend the night, was my second favorite camp after the Shira Camp.  I think it was the sense of proximity to the summit combined with a nice setting (though not the expansive vistas of the Shira Camp).

Barranco Camp in Kilimanjaro

One of our trekkers managed to get mobile network signal at this camp.  She generously offered the phone for quick calls home for anyone interested.  Having a Cuban mother, I decided I had to take advantage of the opportunity to tell her I was eating well and alive. I think those are her priorities for me, in that order!  She was ECSTATIC to hear my voice, that I was eating food, and that I was alive.  Thanks, Annie!!

The Barranco Wall the following day was in a lot of people’s minds for sure.  The wall was expected by many to be super scary, super dangerous.  But I think I speak for all or most in our group that just sitting there and soaking in the views of the summit reigned supreme in our minds that late afternoon / early evening until off to our sleeping bags we went to “sleep low” and give our bodies a good night’s sleep.

More of the scenery

Barring the summit, my favorite vistas were coming to a close.  That does not mean there were not going to be other great views.  But the best views for me had been day 2 and day 3, in that order.  Before you close this browser window, a couple more pictures of the scenery of day 3.   Day 4 will be bringing the Barranco Wall – that story comes next (see below for the link forward!).

If you have not yet, subscribe to this blog so you can get notifications when new posts come out.  Also like ilivetotravel’s page in Facebook where announcements and other items are posted.  Don’t worry, I won’t inundate your wall with posts – one or two at most per week.

Kilimanjaro

Kilimanjaro

Kilimanjaro

Back to Day 2

On to Day 4

Pin one of these beautiful images from day 3!

climbing Kilimanjaro, Barranco Camp climbing Kilimanjaro, Barranco Camp

—————————————————————————————————————————————————

Other posts about the Kilimanjaro trek:

–  Preparing for the hike is more than training and gear

–  The Machame Route:  our way up

–  7 things you will not see me without as I climb Kili

–  Day 1 of the hike

–  Interview with fellow Kili climber and Ultimate Global Explorer

%d bloggers like this: