Top 14 Items for a Kilimanjaro Packing List

I assume that, if you are on this post you must be thinking of your Mount Kilimanjaro packing list.  Well, you came to the right spot!  How to prepare for climbing Kilimanjaro is a crucial step in your planning efforts. 

Via this blog, I share my preparation and packing tips for what to bring on this amazing endeavor (in this post and others; see bottom of post for more inclusive posts).  As I was helped with my planning, I’d like to help others.  In a separate post I cover clothing.  In this post I cover my 14 top items to bring to Kili.  Hopefully, my list and accompanying explanations will be helpful!

A Kilimanjaro packing list is no small thing!

gear, Kilimanjaro, clothing, Olympus, hiking, climbing, Kilimanjaro Packing List

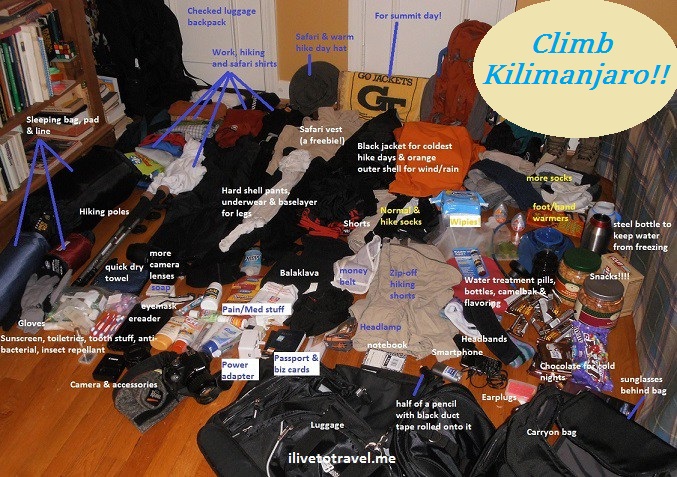
Climbing Kilimanjaro is quite the experience – an achievable one for most people with some training and mental readiness for the effort.  But climbing to the “roof of Africa” is also an operational endeavor!  Lots of planning for the clothing and other items that are needed. This while balancing needs, cost, and weight.  The following picture sort of gives you a visual of the amount of stuff that my Kilimanjaro packing list included.

I have written in another post about what to bring as far as clothing if you are climbing Mt. Kilimanjaro.  That post can help you build the clothing part of your Kilimanjaro packing list.  In no particular order and without further ado, here are the top 14 non-clothing items that were most helpful for me in my hike.

My top 14 items for your Kilimanjaro packing list

1.  Sleeping bag

Get a good one.  One that keeps you warm.  Remember that some of them work best when you wear the least amount of clothing.  I know.  It seems counter-intuitive.  But it is true.  Zero (Fahrenheit) -rated is recommended.  If not, get a liner with extra warmth.  But the best is just a good sleeping bag as the liner would be just one-more-thing to get into and out of…  The mummy style works best.  You want that tapered shape instead of a rectangular one – the rectangular one has more space for air inside that will need to be warmed and that heat comes from you body.  The tapered one is better in that regard.

2.  Wipies

Oh, wipies, thou art so versatile!   Whether it is cleaning yourself after a day of hiking or cleaning yourself after nature calls – or just to wipe your hands after eating, these little suckers are quite helpful.  Take some.  Take a good amount.

3.  Pee bottle

“Huh??,” you may say.  That’s what I said too.  But, stay open-minded…

Picture this:  middle of the night, you zipped into your zero/sub-zero rated sleeping bag, in a tent, with two pairs of zippers in your way to go outside, you with little clothing on, outside freezing cold, you needing to put on clothes, shoes too, stumbling to find the headlamp so you don’t stumble outside OR, middle of the night, you zipped into your zero/sub-zero rated sleeping bag, stumbling to find the bottle (i.e., the pee bottle), then trying to carefully point/aim.  Done.  Yea, I thought so.  Pee bottle.

A tip:  Get a wide mouth bottle (improves the odds of filling it not your tent).

Another tip:  Make sure it seals tight so, when it tips over as you move in your sleep, it will not fill your tent.

Final tip:   Make it big enough.  Do not underestimate how much pee comes out in one “go” plus you may go more than once per night.  Any questions?

4.  Headlamp (with plenty of batteries)

The headlamp will be key on summit night as you start the hike up to the summit at midnight.  You will need to watch your step even if you go with a full moon.  Additionally, at camp at night and in your tent, you will make use of the headlamp.  Make sure you bring extra batteries and save those for summit night.  An extra little light bulb may be good but if the one you have is new, you may not need it (I didn’t).

5.  Pain killer

While my personal preference is to deal with the pain without the need of meds, this approach is suspended when I am trying to climb a 19,340 ft mountain, you know?  I was not sure how my knees would perform nor what other pains may arise during this week long adventure.  I only used them on the descent (not at the start while going down the scree field but after leaving base camp).  It is EXTREMELY rocky in this part of the mountain and I could feel my knees were going to have issues.  I took 2 preventive Advils and repeated once later during the descent and then with dinner that night.  Whether because of my preventive measures or not, I had only very slight soreness on my knees.

6.  Ambien

I was leery of using Ambien at altitude not knowing what effects, if any, it could have on me (other than making me fall asleep).  I had them more for the flight and my first night in-country not for the hike.  But our lead guide said it was OK and maybe even a good idea to take half an Ambien to take the edge off and be able to fall asleep in the evenings since rest was so important during the hike.  So I did and it all worked great.

7.   Hiking poles (two of them!)

Yes, this hike will be a lot easier with two, not one, poles.  Poles give you impulse as you climb over a big step and also you can push off with them as you move forward.  However, they shine in the descent:  my knees would have been pulp (more than they were) if I had not had these poles to soften the impact when stepping down over rocks.  Can’t recommend using them enough (even if you are “tough” – everyone has them) – and if you can score the ones with shock absorbers, even better!

Do try them out somewhere as the grip will be important.  I liked the foam grip and cork handle as it would feel better if my hands got sweaty either way I held it.  I could unscrew the handle to use it as a camera mount (though I did not use that feature during this hike).  Also, make sure they are adjustable:  when you go up, you may want them shorter than when you are going down when you may want them longer!  There are hiking poles at every price point so just check them out in person, ask questions, and then pick!  Or even better, borrow them from someone you know 🙂

8.  Duct tape

You never know what you will need this for and therein the beauty of duct tape:  it fixes anything.  OK, I exaggerate.  Most anything.  I roll it on a pencil as taking the roll itself is bulky.  You can use it to fix a broken backpack or to nip a budding blister before it becomes a nightmare.  You choose the color!

9.  A camera!

OK, this may be obvious.  I was trying to keep the weight down in my “carry-on” during the hike but I clearly needed a camera.  How would I otherwise take magnificent pictures??  I did make a good decision to get a high quality pocket camera instead of my regular bulky camera.  Good call – I got plenty of great photos but without too much bulk/weight.  The views and the moments are worth the camera weight!

 10.  Quick dry towel

While you are not showering for the duration of the hike, you will be brushing your teeth and, likely, your porters will have warm water ready for you when arrive at camp to wash your hands, face, etc.  The quick dry part is likely self-explanatory (when you leave a camp, you don’t return to not a lot of time for the towel to dry out).

 11.  Pad for the sleeping bag

The ground you will be sleeping on is often hard and cold.  In fact, at a couple of places it was even rocky.  The little pad the hike organizers provide for you to lay your sleeping bag on is rather thin and will not do a good enough job to add cushion or protection from the soil.  I took with me an inflatable pad that made my sleep more comfortable – and that is priceless.  A fellow hiker was going to let me use her pump but I ended up having no problem blowing up the pad even at higher altitudes (good job, my lungs).  I got to practice my forced breathing by blowing up the pad so it was good all-around!  (I did HATE every morning deflating it and folding it up…)

12.  Notepad

You may want to bring something to write on as you will have a lot of time at camp after a day’s hike and you may have things from the day to jot down so you don’t forget.  I wrote down start/end times, hours walked, and even what I ate.  I also took notes on funny things or things I experienced – not quite a diary, just quick notes.  On the topic of a lot of time at night, you may want to bring anything else that may amuse you (cards, Sudoku sheets, etc.) but don’t add too much weight to your bag!

13.  Water purification method

Water is boiled at camp but that is only for cooking.  It takes too long to boil water at altitude.  And your porters will not be able to boil water for you to drink.  You will need to bring your own purification solution of which there are several options (purification tablets, ultraviolet radiation, etc.).  The tablets, such as iodine tablets, are lighter to carry.  However, you have to wait for the water to be ready to drink and the iodine causes an odd taste.

SteriPENs are a portable ultraviolet radiation option that is quick and easy.  I had brought the tablets but others had SteriPENs in the group and I quickly realized how much better the SteriPEN approach was.  They all offered the rest of the group their SteriPENs so I traded using one of the hiker’s SteriPEN for sterilizing her water bottles in return – a win win!  Just know they can be temperamental and be sure to bring enough batteries!

14.  But the most important item…

Hopefully, this list has been helpful so far – if you have any questions on the above items or any other, feel free to leave a comment and I will get back to you.  While the list is not all-inclusive, it is the list of the items I most appreciated having with me.  However, the most important item I brought along was… a photo of my family.  This photo went with me to the summit which meant they went up Kilimanjaro too, with me…

Uhuru Peak, Kilimanjaro, Tanzania, hiking, climbing, Kilimanjaro Packing List

Want to read how the hike went?  Start on Day 1

Other posts on climbing Kilimanjaro:

The items recommended above are mentioned for their key features, not because I have an opinion on whether they are the best in their class.   While this is not my entire Kilimanjaro packing list, I am happy to share my full list if you need one as a starting point for creating yours.  It is not an easy thing to plan for, but quite doable.

————————————————————————-

Pin the image below to your Pinterest hiking board as you build your own Kilimanjaro packing list!

packing list kilimanjaro, packing tips kilimanjaro, what to bring kilimanjaro, climb kilimanjaro, hiking, trekking,  Kilimanjaro Packing List
Kilimanjaro, planning, gear, packing, climb, hiking, trekking, Tanzania, mountaineering, Kilimanjaro Packing List
Pin my visual Kilimanjaro packing list – and visualize the day you summit Kili!

7 Items You Won’t See Me without while Hiking Kilimanjaro

If things go well, I will be trekking in Tanzania soon – hiking up Mount Kilimanjaro, the tallest mountain in Africa.  I am excited about the upcoming hike as I am doing it with Trekking for Kids, with whom I hiked in Romania in the summer of 2012.  Our hike will help a local orphanage with capital improvements to the infrastructure and, therefore, improve the standard of living for the children who live in the orphanage.  I do have anxiety about how well prepared I will be in terms of level of fitness and about how altitude may affect me.  But for everything else, research and planning has helped me ensure I have everything else I need for the hike!  Here are the seven items you will not see me without (should you see me!) while I hike “Kili”…

The things that will keep me warm

One of the most important things to know about Mount Kilimanjaro is that you go through five (5) distinct climate zones as you pursue this mountain.  This means you need to be prepared for the range of climate conditions across these 5 zones.  Pack for cold and pack for warm.  Of course, as the hike goes higher, I am told to expect VERY cold temperatures.  The challenge with this, for me, will be getting out of the sleeping bags in the cold mornings!!

Of course, using layers is how I will handle the variations in temperatures that I will go through during the hike.  Let me share my three most important items to pack to stay warm during the climb to the summit of Kilimanjaro:

#1 – Hardshell Exterior

My outermost layer is a hardshell exterior (see below for picture) to provide me protection from the wind and from water.  The Arcteryx piece I chose is of top quality and its design is perfect for the conditions of the hike, especially its versatility as it can serve in warmer and colder temperatures as a barrier to water.  It uses Gore-Tex and delivers a very lightweight piece – important as I will want to go as light as possible!  Some features that I liked about this model were the under-arm zippers in case extra ventilation is needed, and the hoodie.  Mine is orange, for the record.

Sample Outer ShellArcteryx Alpha SL Jacket

#2 – Jacket

For the second layer from the outside, I needed to choose something to keep me warm and, again, be light enough (begin to see a pattern?!).  I chose an REI Revelcloud jacket which can also serve as a barrier to water for times when I may not want to wear the outer layer.  At higher altitude, I will use both.  It can help withstand winds of up to 50 mph!   This particular jacket uses Primaloft, a synthetic material that emulates down but is not bulky and able to be compacted into the little bag it comes with.   Also, its design eliminates shoulder seams which will help with range of motion, especially good since I will likely be wearing multiple layers and too many seams can become an annoyance.   (I cannot find the item any more in the REI website; likely a new model is being rolled out – I bought mine at a great discount sale!  Below I share a link to what seems to be a similar item for this layer.)  I have to admit that I have been wearing this jacket when the weather has gotten cold as the material is very soft and it just feels good.  🙂

After trying several layers on, it became clear the outer ones described above should be a size larger than I would normally wear if not putting on several layers.  At colder times, I will be wearing two under layers:  a smart wool one and then perhaps a thinner one next to my skin (helping withdraw moisture from my skin).   I will likely not wear as many layers on my legs as I do on my torso.  Hiking pants with a thin layer (like long johns) under them should suffice.  Says he…

#3 – Sleeping bag

After discussing clothing, let me share how everyone stays warm at night.  <Sleeping bag enters the stage left of center>  Instead of buying a sub-zero-rated sleeping bag that I may not use too often, I chose to go for one rated for zero degree (that I may get to re-use in other hikes that do not go as high and cold) and get a liner with something akin to thermonuclear for its rating.  (Do some reading on the ratings ahead of time so you know how to read the sleeping bag specs.)  I also wanted to make sure I used something that would pack relatively light.

The shape of the sleeping bag matters a good bit – something that had not occurred to me prior to researching the matter.  But it makes perfect sense that at very cold settings, you want to maximize heat retention.  Models whose width tapers down as it moves from head to feet are the best – they are called “mummy”-shaped as that is what they look like.  The less air inside, the less cold inside when you get it in that will need your body heat to warm up.  Therefore, more heat stays with you.  (That thermodynamics course in college is paying off – finally!)  This sleeping bag’s 2-way zippers will also make the job of closing and opening it up easier – nice feature!

Coleman Silverton 0 Degree Adult Mummy Sleeping Bag

#4 – My knee’s best friends – hiking poles

I have learned that hiking poles are my knees’ BFFs through my hiking experiences.  Hiking poles help with stability but, more importantly, they have a mission of protecting my knees from too much wear-and-tear, especially while descending when the knees get a pounding – especially if it is a few hours worth of going down like we will do in Kilimanjaro when we descend.  I decided to take advantage of a sale to get a great pair that have anti-shock features.  I am sure people will have different opinions but hikers that I know well (and trust) said they would be worth the extra expense.  The weight of the poles is also something to consider so an aluminum shaft was perfect.

After deciding on the anti-shock and the weight, the next consideration was the grip or handle.  This is a matter of personal preference.  I chose a round cork top (that unscrews to also serve as a camera mount!) with a long foam cover under the top for the different grip I will want.  The locking mechanism can matter – some are easier to lock.  The ones I got use twist-lock for ease of adjusting since I will be wearing gloves a good bit.  Oh, and I bought rubber tips to use.  I share both the one I ended up getting and another I considered.   The one I got from REI.  What sold me on the REI one was the handle.

Black Diamond Trail Pro Shock Trekking Pole

#5 Big priority – stay hydrated:  Camelbak and Steripen to the rescue!

Hydration will be key to my well-being during this hike (pretty much true of any hike).  Carrying a bottle and dealing with pulling it out when I want to drink is a little bit of a nuisance.  This will especially be true on this hike when I may be wearing gloves a lot.  A camelbak is perfect as it allows easy access to water at any point without having to stop or slow down.  Additionally, I have learned that I drink water on a more frequent basis by sipping because it is easy with a camelbak tube versus gulping water more spaced out whenever I decide to pull a water bottle out.  Sipping has another added benefit:  because I don’t take in water in bigger gulps, I need fewer nature stops – who’s with me?? 🙂

My camelbak bag is inserted into my backpack (designed for this).  I may be buy something to protect the tube coming out of the backpack to prevent it from freezing when it is very cold.   Of course, making sure I have safe-to-drink water is a big priority.  Steripen or something similar will be crucial so consider it item #5.5!

SteriPEN Adventurer, Handheld UV Water Purifier
Oh, and someone suggested a hot water bottle that you fill in with hot water before zipping up the sleeping bag to help keep you warm AND to have non-freezing cold water when you wake up to drink!  Now, does that go in this section or on the first section about keeping warm??

#6 Finally, show me the way…  My headlamp

No, my final item is not my boots but that’s not because they are not important – they are supremely so!  Please be sure to find comfortable boots, that are water resistant, and then be very sure to break them in through practice hikes before you embark on the big hike.  Blisters are your worst enemy and proper footwear is key.  Back to #6… my headlight.  The ascent to Kili’s summit starts around midnight so this will be an essential item to go up.  Why does it start at this weird hour?  Because you want to be up there to see the first morning light!!  However, this headlamp will also be important so I can see at nighttime before I head to “bed” and in case I wake up in the middle of the night and need to relieve myself, something I hope I don’t have to do often!

Petzl – ACTIK Headlamp, 300 Lumens, Active Lighting
 

#7 OK, one more thing (I did say 7 in the title…)

Duct tape!  Duct tape can serve MANY purposes.  If anything breaks, you can likely fix it with some duct tape.  But also, should you start developing blisters, apply some small strips of duct tape to protect the spot as soon as you feel the heat coming on and prevent a full-blown blister.  Blisters are THE last thing a hiker needs!  In any case, duct tape can help repair things that are important to you during the hike.  Sure, you may toss the things later but not while on the mountain!  So, duct tape can keep things going until you can properly fix or dispose of them.  I recommend rolling duct tape along the hiking poles for easy access without looking through a backpack’s worth of contents or having to remember to put it in the backpack to begin with!  I will let you pick the color of duct tape – bright orange could be useful if you get lost – ha!  (Mine was white, for what that’s worth.  No reason for it!)

Well, a few more things to bring along… bonus round!

I hope this has been a helpful list – would love to hear your own suggestions or get your questions.  There are many other things to consider as you prep for a hike like this and I would be remiss if I don’t list some of them here just to be sure you don’t miss some key items:  a backpack that feels comfortable (and that has both waist and chest front straps to prevent back issues), sunblock (and wear it!), chapstick (with sunblock – the sun’s rays are much more powerful at altitude), snacks, wipies, underwear that wicks moisture away from your skin (prevent chaffing), sunglasses, a nice warm hat, very warm gloves (OK, you may want two types:  one for extreme cold and a regular pair), ear plugs (because you never know who may be sleeping next to you…), a hot water bottle (will feel nice inside that sleeping bag!), and finally:  a camera for all the great shots you will want to take!

Bottom line:  do your research and be prepared – it will make the experience much more memorable!  Stay tuned for my updates from my hike of Kilimanjaro!

I did write more in two other posts AFTER the hike so check them out for more insights after the specific Kilimanjaro experience:


Pin this to your hiking board so you can refer back to this post and a visual of all the things you will pack!

Kilimanjaro, planning, gear, packing, climb, hiking, trekking, Tanzania, mountaineering

Pin it and dream of Kili!

%d bloggers like this: