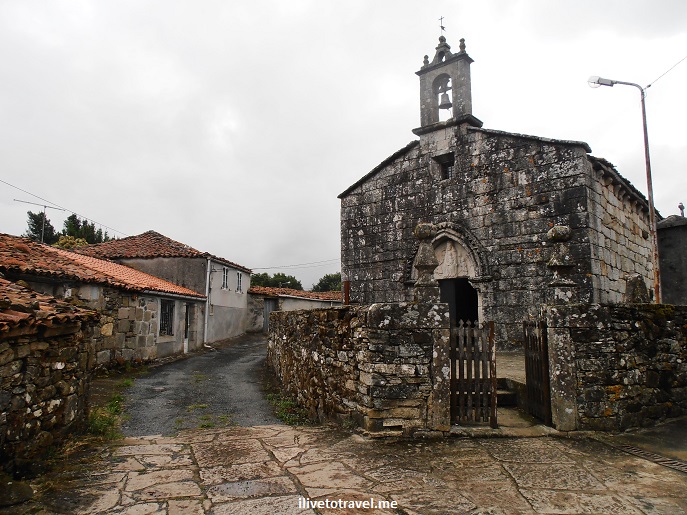
On the Camino de Santiago: Day 4 from Palas del Rei to Boente

After a great dinner in Palas del Rei and a nice comfortable stay overnight, we left the town on Day 4 to head to Boente, a tiny town and our next overnight.  On this day, I would walk 21 km (about 13 miles) in around 5 hours to get to my destination.  But we would first make a stop in Mélide to try its famous “pulpo” (octopus).  Now, I am not a fan of octopus and similar ugly sea creatures but I had heard about how good the pulpo was in this part of Spain so we took off from Palas del Rei knowing lunch would be in the town of Mélide – I had to try it, I mean, I didn’t come this far to not try the local specialty!

But let’s not get ahead of ourselves, we had to have a mid-morning snack (even though the breakfast at the hotel in Palas del Rei was pretty darn good!).

food, Camino, Spain, pain au chocolat, croissant, Samsung Galaxy, photo, delicious

The pain au chocolat (chocolate croissant) along the Camino is huge!

After eating that monster (OK, I shared…), I had too much energy as my trek roommate, Emory, could attest…Camino, Santiago, Spain, trekkers, blue, travel, hiking, photo, Samsung Galaxy

As usual, the path is well marked and consists of a wide range of trail types, some more natural than others.

Camino, Santiago, Spain, trekking, hiking, Olympus, photo, trails Camino, Santiago, Spain, trekking, hiking, Olympus, photo, trails Camino, Santiago, Spain, trekking, hiking, Olympus, photo, trails Camino, Santiago, Spain, trekking, hiking, Olympus, photo, trailsCamino, Santiago, Spain, trekking, hiking, Olympus, photo, trails It is always amazing how there is a symbiosis between the age-old trails and the farms or villages the trails go through.  Sometimes you feel bad you are walking right by people’s homes but, it is likely that the trail was there first…

Camino, Santiago, Spain, trekking, hiking, Olympus, photo, bridge, trails

The scenery can be quite charming!

One of my favorite parts of the walk is running into the old churches in the small towns along the way.  I am not sure how active these churches are (I am sure they don’t all have their own priest) but they serve as witnesses to the needs of the pilgrims back when the Camino was truly a journey of faith, not just a modern-day trek.

Camino, Santiago, Spain, church, small town, village, Olympus, photo, travel, The Way, facade

One of several churches we passed this day

Camino, Santiago, Spain, church, small town, village, Olympus, photo, travel, The Way

Another church on our way

One of the good things about the Camino is the availability of clean, safe water to drink so you don’t have to be buying bottled water or treating water.  I filled my bottles at the places I stayed but you can also do refills along the way in any of the public fountains available to the trekkers.

Camino, Santiago, Spain, trekking, hiking, Olympus, photo, water fountain

Water fountain along the trail

Now before I get to the “pulpo”, I have to say I enjoyed the chorizo small plate more than the pulpo.  The place we ate at was across a small church along the main street in Mélide.  It had long picnic-like tables and a nice mix of locals and pilgrims!

chorizo, Melide, Camino, Santiago, Spain, food, foodie, trek, hiking, photo, bread, foodporn, Samsung Galaxy

Chorizo al vino in Mélide

food, foodie, foodporn, Camino, Santiago, Spain, pulpo, octopus, travel, photo, Olympus, cooking

The guy at the “kitchen” (right by the front door) preparing the pulpo!

Oh, and I have not told you about one of my favorite discoveries along the Camino:  the delicious tarta de Santiago (a dense almond cake, sort of)!!  Yum.  #period

food, foodie, foodporn, tarta, Camino, Santiago, postre, dessert, sweets, cake, photo, travel, Samsung Galaxy

Tarta de Santiago

Camino, Santiago, Spain, Melide, walk, hiking, trekking, Olympus, photo, travel

Leaving Mélide after a nice lunch of chorizo, pulpo, bread – and some wine…

The walk that day was long and, as we approached Boente, we could not wait to arrive at our “albergue”.  You could say this was the day we stayed at the “least” of our accommodations (not being a hotel or house) but it was perfect.  We had reserved two private rooms to share across the 8 of us and it was perfect as we did not have to fight with individual trekkers to get a bunk bed, etc.  The albergue was more than adequate and clean, and the dinner they served was delicious.  At this point in my life, I don’t want to do a trek where I have to wonder if I will find a spot to sleep on a given town, or whether the one I will find will be not right by the toilet so booking ahead is the way I trek.

Spain, Camino, Santiago, Boente, albergue, lodging, trek, hiking, photo, Olympus,

The awesome Albergue Boente!

church, igrexa, iglesia, Camino, Santiago, Spain, Olympus, travel, photo, Boente, pilgrimage, trek, hiking

The Igrexa Santiago de Boente (right across the albergue)

After a stroll around town and dinner, it was time to end Day 4 and rest for Day 5!

———————————————————————————————————————-

Read more about my Camino:

Day 1

Day 2

Day 3

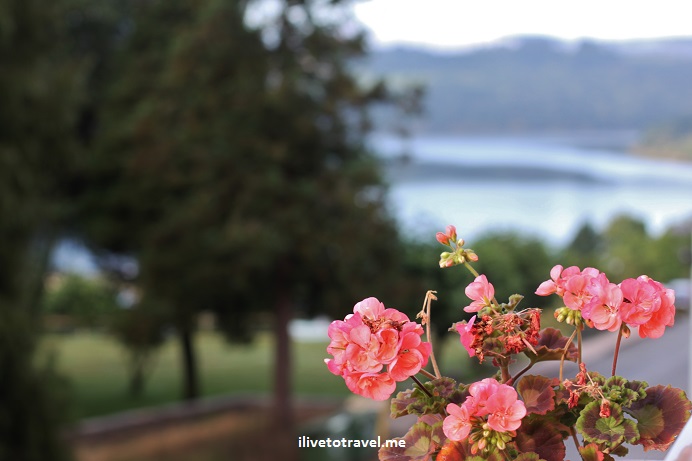
On the Camino de Santiago: Day 3 from Portomarín to Palas del Rei

I enjoyed our night in Portomarín as the town had a nice location along the Miño River – and we enjoyed sitting at a bar the night before with a nice wine enjoying the awesome weather.  So I was rested and ready for Day 3.

We left the hotel (and our luggage, which was picked up by a service that dropped it off at our next hotel)around 9 AM and went towards the river where we had just a little confusion as to which way to go.  We crossed the river and returned to the path that would take us to Palas del Rei.

As usual, we stopped for lunch at a place past Hospital but before Ligonde.  It has a very nice outdoor seating area with plenty of shade.  The menu was typical of the pilgrim’s menu.

pilgrim's menu, Camino de Santiago, Camino, Spain, food, trekking, hiking, Canon EOS Rebel

Menu board with the offerings for the day

In this case, for example, 9 euros would get you a nice burger or lomo (pork) with real French fries accompanied with fried eggs!

lomo, pork, food, Spain, Camino, pilgrim's menu, fried eggs

Delicious!!!

I also have to highlight one of my favorite dishes:  ensalada mixta which has tomatoes, lettuce, tuna, onions, olives and just goodness!

mixed salad, ensalada mixta, tomatoes, tuna,food, Spain, Camino, pilgrim's menu, fried eggs, Canon EOS Rebel, foodporn

Not only colorful and diverse but mighty tasty!

Palas del Rei is a small town of over 3,000 people.  We arrived around 4:30 PM after a beautiful, but long walk, with some good climbs.

Camino de Santiago, Spain, trekking, hiking, path, Palas del Rei, wildlife, farm

Wildlife along the way!

Camino de Santiago, Spain, trekking, hiking, path, Palas del Rei, Samsung

Dirt path going between farms

Camino de Santiago, Spain, trekking, hiking, path, Palas del Rei, Olympus

Sometimes the Camino overlaps with a modern road

Camino de Santiago, Spain, trekking, hiking, path, Palas del Rei, Olympus

Continuing to walk in rural parts of the Camino

We walked into it and past a church where a funeral service was being held.  We approached it from the back and then saw the steps leading down from the church to the street below – a steep walk down.

San Tirso, Palas del Rei, Spain, Camino, church, charming, Santiago, trekking, photo, España, Spain

San Tirso Church

Our hotel, Hotel Casa Benilde was not far from that point (maybe 50 meters?).

We arrived at the hotel and the manager and his assistant were at the front desk, likely expecting us.  They were the nicest folks, so ready to make us feel at home, walking us through every detail – including how they could accommodate our celiac and vegetarians in the group.  The hotel lobby was small and, we found out, that was the reason they “scored” low on the star rating system in Spain.  We were shocked at the low star rating as this place had excellent customer service, incredible breakfast catering to the dietary needs (all items were labeled gluten-free or not, etc.), the rooms were clean (if small), and the wifi was great in the rooms.

—————————————————————————————————–

More about the Camino before Day 3:

–  Day 1

–  Day 2

And after Day 3:

–  Day 4


On the Camino de Santiago: Day 2 from Barbadelo to Portomarín

Finally, the first long day of our Camino started on Day 2 in Barbadelo.  Day 1, as I wrote about, was really a “baby” hiking day.  All good; ’twas for a good reason (like getting to see O Cebreiro).  But I (along with my fellow trekkers) were really ready to tackle the ‘mino.

I enjoyed breakfast with jamón serrano (Spanish ham), cheese, fresh bread, OJ, and my café con leche.  I was well-fueled for the day!

As luck would have it, it was raining that morning.  And with my cheap rain poncho, I was looking like a Camino fool on a tear!

Camino, Santiago, Spain, rain, poncho, Olympus, travel, trekking, hiking, photo

Yep, this is me in my rain gear…

Once again, the trails are well-marked with yellow arrows (or the kilometer markers with the seashell).  Rarely did these markers fail us!

yellow arrow, Camino, Santiago, Spain, travel, photo, trekking, Samsung Galaxy

The ever-present yellow arrow!

Camino, Santiago, fountain, fuente, art, Olympus, travel, photo, water

Art mixed in with function after leaving Barbadelo

The trail is so varied all along the Camino.  I loved that because it kept me looking forward to what else we would see.  And it kept me paying attention to my surroundings – which made me not take the scenery for granted.

Camino frances, trail, Camino, Santiago, Spain, travel, photo, trekking, Olympus

The Camino’s paths are very diverse.

Camino frances, trail, Camino, Santiago, Spain, travel, photo, trekking, Olympus Camino frances, trail, Camino, Santiago, Spain, travel, photo, trekking, Olympus

As lunch time was nearing, we passed Ferreiros, a small hamlet with a cute little church with an accompanying cemetery.

Ferrieros, Santa Maria church, Camino, French Way, Camino Frances, Santiago, trekking, architecture, cemetery, Olympus, photo, travel

The Church of Santa Maria in Ferreiros

But all wasn’t pretty landscape and charming little churches.  Lunch time was a time for rest, and a time for good food.  And, occasionally, a glass of local table wine or a glass of beer (I normally did not drink but a couple of times did have a glass of wine).

Camino, French Way, Camino Frances, Santiago, trekking, architecture, cemetery, Olympus, photo, travel, wine

Lunch on the Camino: wine is always near!

After what felt like a very long day, we finally spotted the Miño River, which meant we had arrived at our destination for the day:  the town of Portomarín, one of the largest we went through at over 2,00o or so inhabitants.  The original town (with a long history with the Camino) is now under water as it was flooded when a dam was built downstream – so the town we stayed in is fairly young.  However, it is worth noting that key buildings, like the main church, were moved before the old town was flooded to a new spot in the town.

Portomarin, Rio Miño, Minho, river, Spain, Camino, Santiago, French Way, Camino frances, trekking, hiking, travel, bridge, photo, Olympus

The Río Miño – and our destination on other side!

Portomarin, Camino, Santiago, street scene, photo, travel, Samsung Galaxy, brudge

About to enter Portomarín!

Portomarin, Camino, Santiago, street scene, photo, travel, Samsung Galaxy, brudge

A choice of stairs OR a riverside road to get to our hotel…

Portomarin, Camino, Santiago, street scene, photo, travel, Samsung Galaxy, bridge

Not that I was tired and trying to hitch a ride to Santiago!

Portomarin, Camino, Santiago, street scene, photo, travel, Canon EOS Rebel

The charming streets of Portomarin

A festival had just taken place and there were some types of branches strewn about the main square and down the main pedestrian street.  The main street was cute and colorful and clearly well-lived by the locals.

main plaza, Portomarin, Gallicia, Camino, Santiago, street scene, photo, travel, Olympus

The main plaza after a festival

Portomarin, Galicia, Camino, Santiago, street scene, photo, travel, Canon EOS Rebel

Colorful balconies and one seemingly bored local

Portomarin, Galicia, Camino, Santiago, street scene, photo, travel, Canon EOS Rebel

The reminders of the festival make for a beautiful carpet on the main street

The Church of San Juan (San Xoán) was moved, as I said, from the old town to a new spot.  It is late Romanesque and feels like a church and a castle at the same time.  We went in as we found out it was open to stamp pilgrims’ Camino passports but, unfortunately, there was no Mass scheduled for that evening.

Church San Juan, Portomarin, Galicia, Camino, Santiago, architecture, photo, travel, Olympus

The moved Church of San Juan

The interior was simple without being plain.  I found it very peaceful.

altar, Church San Juan, Portomarin, Galicia, Camino, Santiago, architecture, photo, travel, Olympus

Main altar of the Church of San Juan – modest

After our first full day of hiking, I was glad to enjoy a nice meal, some vino, and a nice peaceful view from our room at the hotel.

Portomarin, Camino, Santiago, view, rose, rio Miño, Spain, Miño river,scene, photo, travel, Canon EOS Rebel

The end of the day offered this reward from the balcony of my room.

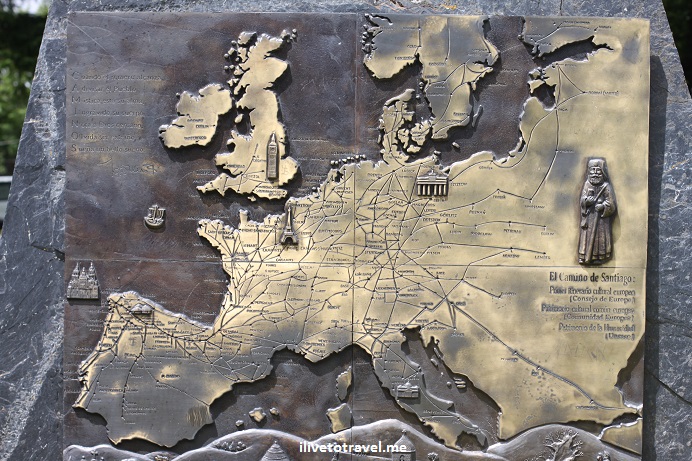
Another Pilgrim on the Camino de Santiago

The Camino de Santiago, or the Way of St. James, is an ancient pilgrimage indeed with a timeline of over 1,000 years.  Pilgrims from all over Europe would come from far and near to visit the place where St. James (or Santiago) is buried:  under the Cathedral of Santiago de Compostela in northwestern Spain (Galicia, to be more precise). I became another pilgrim on the Camino….

Camino, Santiago, St. James, The Way, pilgrimage, Europe, routes, travel, trekking, journey
A map in O Cebreiro showing the many routes pilgrims took from all over Europe to get to NW Spain

In modern days, though, not all who “do” the Camino are necessarily doing it for spiritual reasons but I would find hard to believe that most don’t get something spiritual out of the sacrifice and effort doing the Camino requires.

The Camino is a joy not only for the experience of trekking these ancient “ways”.  I have to admit that the social and culinary were also part of my Camino.

croqueta, food, Spain, Camino, foodporn, foodie, delicious, travel, photo
One of my favorites from my childhood re-encountered in the Camino: croquetas!

I will aim to share about the experience in a couple of different ways in this and upcoming posts:

  • The first way will be to simply share what everyday was like using photographs and other thoughts – whether you ever plan to or want to do it.
  • The second will be by sharing what I did to prepare and do the Camino, in case you are yourself hoping to, or actually planning to, do the Camino.

Why I went

I first learned more about the Camino when I met a co-worker back in 2003 who had just done the Camino from St. Jean Pied de Port – so about 30 days’ worth of trekking (close to 800km or 500 miles).  It all sounded hard and just too much time.  Over the years, as we became good friends, I enjoyed hearing stories about what the Camino was like and the friendships he struck along the way.  It made me curious about the Camino though I never thought I would want to “walk” for 30 days.

Years later, as I got more into trekking/hiking, I started thinking that I -some day- would want to do it (or part of it, to be more precise).  Watching the movie “The Way” helped inspire me but not tons more.  The coup de grace was when an organization I do treks with, Trekking for Kids, announced they would do a trek to do the Camino in the summer of 2014.  That sealed the deal.  Combining both my desire to do the Camino with the mission of Trekking for Kids (to improve the lives of orphaned and at-risk children around the world) was the perfect reason to go.

Trekking for Kids, trek, Bayti Centre, voluntourism, Essaouira, Morocco, travel, photo
The group of trekkers and the children and staff of the Bayti Centre in Essaouira

How we did the Camino de Santiago

The Trekking for Kids trek mixed a few days at a center for at-risk children in Essaouira, Morocco, called Bayti Centre, followed by seven days on the Camino (read more about our time at the Bayti Centre here).  Because the overall trek had to be kept to less than two weeks, the starting point of the Camino had to be picked such that we could do the minimum required distance (100km for those walking; 200km for those cycling) to be able to get the “compostela” (or the certificate issued in Santiago de Compostela that validates that you did the Camino) yet stay within the desired overall trip duration.  In addition, it had to allow for the travel day or two between Morocco and the start of the hike.

The preferred route was the traditional Camino Francés which is sort of parallel to the northern coast of Spain but further inland.  It is likely the most popular route of all though I wonder how the other routes are (and secretly hope I can check out some day!).

This meant we would need to start the hike at the last possible point we could and still meet the minimum walking requirements:  the town of Sarria, which meant we would do more than the 100km minimum (at least, 110km).  There were, however, a couple of important towns right before Sarria that were worth seeing (O Cebreiro and Samos), yet we did not have time to hike through them (would have required one or two more hiking days) – so the itinerary included driving through these towns before being dropped off on the trailhead from which our hike would start.

Our Camino route

Our hiking itinerary was as follows (click on the Day to read the post for that day!):

  • Day 1:  Begin at Sarria.  After a very short (“warm-up”) hike, we would overnight at Barbadelo.
  • Day 2:  From Barbadelo to Portomarín
  • Day 3:  From Portomarín to Palas del Rei
  • Day 4:  From Palas del Rei to Boente
  • Day 5:  From Boente to Salceda
  • Day 6:  From Salceda to Lavacolla
  • Day 7:  From Lavacolla to Santiago.
Galicia, Camino, Santiago, Compostela, camino frances, Frenc route, Sarria, map, pilgrimage

The map that follows highlights in a blue oval the town of Sarria, our starting point (immediately to the right, you will see Samos; further to the right, you will notice O Cebreiro).  The purple line that connects the blue oval to Santiago de Compostela to the west (left, on the map) is the route of our itinerary.

On to Day 1!

(You may want to subscribe to this blog so you receive an email when each article is posted.  Don’t worry, this is no more than three times a week so it is only three emails from ilivetotravel on a given week!)

Summer Vacation Is Almost Here!

This summer, I finally get to take a real vacation, not just a couple of days of here or there.  Actually, I get to take TWO real vacations!  The two vacations came about differently and it was certainly hard to plan them as I did not control when one of them took place and the other had to be coordinated with other people’s schedule.

The great cold and outworldly:  Iceland

The first vacation will be to Iceland, my first time visiting this unique land sitting astride an incredibly active piece of Earth (who remembers the volcano-whose-name-cannot-be-said-because-it-is-too-hard?).  Friends of mine were planning to go and invited me to come along with them and their two young daughters.  One of the parents has an Icelandic ancestor and has been doing research so part of the trip will be to visit the rural areas of her ancestors.  This is likely unlike what the normal tourist goes to do in Iceland and that is precisely what I think makes it a great opportunity for me to travel.  Of course, we will try to hit the major unique features of the island that make a visit there so neat (waterfalls, volcanoes, hot springs, fjords).

Upon landing, we plan to hit the Blue Lagoon hoping it will help some with jetlag (we have a 6-hr layover in JFK… remember, with two young girls aged 4 and 7…).  We will then spend some days anchored in Reykjavik but hopefully doing the Golden Circle and perhaps a day trip to the south part of the island.

After those three days we will drive clockwise on the ring road to the town of Akureyri.  We have rented a house across the “bay” from it with spectacular views.  We already see ourselves in the hot tub with a bottle of wine soaking in the late Icelandic summer day…  We will use this as a base to explore the northern part of the island and the area where my friend’s ancestors lived in.map, Iceland, Reykjavik, Akureyri, travel

Trekking with a purpose:  the Camino de Santiago and Morocco

Right after returning from Iceland, I will go on the second vacation of my summer.  This one is a special one as I will be doing 7 days of the Camino de Santiago with Trekking for Kids in order to help street and at-risk children in Morocco (I went with this organization to hike in Romania and climb Mt. Kilimanjaro).

The trip will begin by going to Morocco and spending a few days at the center that we will fundraise for (each trekker raises money that will go 100% to the projects we will fund at the center).  I have never been to Morocco and though I will not be officially “touristing,” I like that I will experience some of Morocco in such a unique way.  We will then fly to Madrid and train it to León from which we will begin our trek in the Camino.  I have wanted to do the Camino ever since a friend did it many years ago (though I am not sure I would want to do the route starting at the Pyrenees). So this trek is perfect as it will be about 7 days’ worth of walking.  A good bit of that walking will be in the area of Galicia where some of my ancestors come from so walking through it will be special in that way for me.

I have been to Santiago de Compostela before but look forward to the experience of arriving there by foot, as many have done since the Middle Ages, and getting my “Compostela.”

——————————————————————————————————

I am very much looking forward to my vacations, long overdue.  One thing I will say before I conclude here is to urge you to consider doing a trek with Trekking for Kids – it will be a unique experience as the fact that many trekkers (like me) keep returning for other treks!  Check out the upcoming treks to Kilimanjaro, Jordan, and Patagonia here.

Photo of the Week – The Alps of Transylvania

This scene was what we were rewarded with after arriving at the Cabana Curmatura in the Transylvanian Alps in Romania and hiking on for another hour.  I dream of returning to amazing Transylvania.  Too bad people’s only notion of it is the legend of Dracula:  there is SO much to enjoy and explore there!

Romania, Transylvania, Transylvanian Alps, hiking, nature, outdoors, travel, photo, Canon EOS Rebel

Of Kids, Water, a Fence, and Chicks – the Kili Centre Orphanage

Going to Tanzania was not just about climbing Mt. Kilimanjaro though that consumed most of my energy pre-trip (and, heck DURING the trip!).  I had done a hike in the Transylvanian Alps in Romania last summer with Trekking for Kids (TFK)  and I was so impressed, not only with the excellent logistics planning for the hike, but also with the great care with which the orphanage had been selected and the projects chosen.  So going to Kilimanjaro was also about having another opportunity to help improve the lives of orphaned children via TFK.  Tanzania is far and doing this trek was a not-trivial use of my time and money (though TFK is much cheaper than many outfits who organize Kili hikes).  But I understood that my efforts would really make a difference on these kids’ lives and that my hike would be safe and well-planned.

I have written a few posts about the planning of my trip and the hike itself (see links at the end of this post).  So I wanted to focus this post on the orphanage we worked with in Moshi:  the Kili Centre.

Kili Centre orphanage in Moshi, Tanzania

Kili Centre welcomes its visitors!

The Kili Centre orphanage

I posted in LinkedIn that I was going to hike Kili and work with this orphanage as part of the fundraising all trekkers commit to do (raise a minimum of $1,000).  One of my connections replied that she had been there and that the Centre’s leader, Michael, was doing a great job with the orphanage and the kids.  Though I know TFK does a thorough job vetting orphanages, it was still good to hear this.  After finally meeting and spending time with Michael in Moshi, I have to agree with the assessment my connection had made.  He had a great vision for the orphanage and the projects he had proposed were very well thought through in terms of sustainability, impact to the children and the future of the orphanage, and ability to demonstrate to the donors their money had been well spent.

The projects funded at the Kili Centre

The future site of the Kili Centre

The Kili Centre rents its current location but it is not adequate anymore for the needs of the orphanage or meeting its future plans to accept more children.  Some of the changes that would make it more adequate may not be acceptable to the landlord so the Kili Centre needed to find, not only a new location, but a place where it can be owner of its domain, so to speak.

New Kili Centre location in Moshi, Tanzania

New Kili Centre location with Kilimanjaro covered by clouds (showing the new fence)

What’s in a fence?

So Michael was able to raise funds to buy a new lot (with a GREAT view of Kilimanjaro!!  though maybe this is not hard in the area given its proximity to the mountain and the height of the mountain).  But this lot sat empty and ran the risk of being taken over by others.  In many places in Africa, having title to land is not enough.  If people squat on it, or neighboring folks start farming it, at some point one runs the risk of losing it.  In addition, I heard there are rules that a purchased lot has to have something built on it in a certain amount of or, otherwise, the government can take it back.  So here came an opportunity for the first and main project funded by the trekkers’ fundraising and their generous donors:  building a perimeter fence around the lot.

New fence on the Kili Centre's future home

TFK Executive Director Cindy Steuart and trekker Dave Hughart at the fence on our first visit

Guardhouse at the site of the new Kili Centre

Progress while we were there! The finished guardhouse (shown without a roof in the prior pic)

H20 – Water – A basic necessity we take for granted

Though not an immediate impact to the kids’ lives, it will clearly help the children eventually have a new place that will better serve their needs.  For example the current location of the orphanage does not have running water.  So water must be trucked in (at great expense due to the cost of the vehicle and gas).  In the new location, not only did the project build the perimeter fence (and the gate/guardhouse) but it also connected the lot to the town’s water system!!

I was very excited to see the running water during my visit of the new site.  Water is fundamental to progress in less developed locations as it is essential for good health.  Without good health, the education of the children suffers.  So having running water in their new location will be a real improvement in the quality of life at the Kili Centre.

Running water at the Kili Centre

One of the faucets installed connected to the water system – water, the stuff of life!

Clearly, just having a fence and running water will not be enough to give the Kili Centre its new home.  However, the evidence that other donors saw the Kili Centre’s plan as solid will help it in fundraising to have the wherewithal to build the different structures that will be needed.

Chicks (not for free, contrary to what Dire Straits may say)

One of the Centre’s activities that provide both a food source and income is its chicken coop.  However, the Centre had been forced to sell its chickens in order to pay for the schooling of the children.  The chickens had been towards the end of their productive years so the decision to sell them for meat was a good one however, it set the chicken coop back.  So, some of the budget TFK had for projects went to buy chicks to “replenish” the chicken coop and assure some income and food for the Centre.

Trekkers and kids given the thirsty chicks some water upon their arrival at the Kili Centre

Trekkers and kids given the thirsty chicks some water upon their arrival at the KC

The kids well-being

Another item on the project list was repairing the furniture in the kids’ rooms and getting them new mattresses with new mattress covers (to make them last longer) along with new blankets.  Their rooms looked great!

Refinished bunk beds and cabinets at the Kili Centre

Refinished bunk beds and cabinets

Focus on education

As alluded to, the Centre is focused on the children getting a good education.  (I wonder if the children of the Centre are more “lucky” than the children outside the orphanage given the attention paid to their studies by the Centre’s staff.)  The Centre had a computer lab with learning software but the PCs were ancient and they no longer were going to be good for supporting new/additional software.  TFK’s funds supported the wholesale replacement of the computer lab!

Computer lab being set up at the Kili Centre

Computers being set up!

The focus on education does not stop at school and academics.  The Centre had identified developing a sewing “program” to teach a potential income-earning skill to the girls at the orphanage.  Once kids leave an orphanage, it is important to have given them education and skills to make it in life in terms of livelihood.  So the Centre had proposed TFK fund a sewing room:  from setting up the power outlets to the scissors and materials, and everything in between.  With the funds provided, used sewing machines were acquired, brought up to par and installed in the new sewing room!

New sewing room at the Kili Centre in Moshi, Tanzania

New sewing room

While these are not all the projects, I hope you can see why I was so pleased that my efforts to fundraise and my “investment” of my own time and money were well worth it.  But enough about the projects and on to the great kids of the Kili Centre!!!

The children

The first time we got to the Kili Centre, the children were right there waiting for us.  They surrounded our bus as we arrived for the first of 4 days we would spend with them (2 before and 2 after climbing Kilimanjaro).

Welcoming the visitors at the Kili Centre

Cheerful welcome!

That day, they had prepared a dance show for us.  You could tell they loved dancing and putting on a show and, in us, they had an audience wanting to see all they had prepared.  The kids who danced were definitely high energy and not shy!

Children dancing at the Kili Centre

Part of the welcome show put on for us!

Kili Centre kids show us traditional Masai dance at the Kili Centre in Moshi, Tanzania

Kids doing traditional Masai dance

Our time at the Centre was mostly spent with the kids.  We had brought gifts for them (they are kids after all!) and it was a lot of fun giving each of them a backpack full of goodies and also distributing items like soccer balls, frisbees, and volleyballs.  Of course, we then got to use many of those things in an afternoon of just “being.”  I worked along with two kids and another trekker on a challenging jigsaw puzzle that, to this day, I hate not having had time to finishing!

Kids of the Kili Centre in Moshi,. Tanzania

One night, we ate at the orphanage during a party where again the children danced and neighbors of the orphanage were invited to come.  I was so proud watching the kids’ manners.  They lined up by section to go get the food, took everything back when they were done, etc.  Just like I noticed in Romania, the children of this orphanage were very well taught by their staff.  The staff was very much engaged with the kids and I do not recall any instance of the staff just bossing the kids around.  All the engagement I noticed was warm and, at times, playful.  It made me feel good this was the right orphanage to have invested myself in.

Trekking for Kids trekkers, Kili Centre staff and kids in Moshi, Tanzania

TFK photo of the entire group: Kili Centre kids and staff along with the trekkers!

One of the hardest moments in these trips is saying goodbye.  You have developed, usually, a connection with some of the kids and you hate to leave.  Unfortunately, the fourth day of being with the orphanage, I was bedridden with a nasty cold/infection that hit me once we came down from Kilimanjaro.  I had forced myself on the third day to come along with the group but on the fourth day, I just slept all day.  So I missed saying my goodbyes and I am saddened by that.  However, I know the children now have a better home and are set up for an even better one in the future thanks to having been part of this trek.

To Michael and the staff at the Kili Centre:  thank you for the great job you do with the kids and the Centre.

To TFK:  thanks for another great opportunity to push myself (up a mountain) and to make a clear difference in childrens’ lives.

To my donors and supporters:  thank you for your financial generosity and moral support to make this happen for the kids!

To the Kili Centre kids:  keep studying hard, be good and stay cool!

Kili Centre children in Moshi, Tanzania

Kids showing off their new backpacks and sunglasses!

——————————————————————————————————-

–  Preparing for the hike is more than training and gear

–  The Machame Route:  our way up

–  7 things you will not see me without as I climb Kili

–  Day 1 of the hike (starting the climb!)

–  Day 2 of the hike (getting to Shira Camp)

–  Day 3 of the hike (the Lava Tower and hail)

–  Day 4 of the hike (Barranco Wall)

–  Day 5 of the hike (getting to summit base camp, Barafu)

–  Day 6 of the hike (the ascent to the summit – Uhuru Peak)

–  Interview with fellow Kili climber and Ultimate Global Explorer


Preparing to Hike Kilimanjaro: More than Training & Gear

I sit here, two weeks before my departure for Tanzania, asking myself “Oh my, what did I get into??”.  As you may have read, I am headed to Tanzania to hike Mt. Kilimanjaro, something that 5 months I would have told you was the furthest thing from my bucket list.  Seriously.  As I contemplate the process so far, I have learned a few things and I wanted to share those with folks who may be thinking of hiking Kilimanjaro.  Conditioning and gear are two important elements,  But there is a less immediately obvious element in being prepared…

How did I decide to climb Kilimanjaro?

I already knew I wanted to do more treks with Trekking for Kids (with whom I trekked the Transylvanian Alps) because of the great work they do with orphanages but I was not expecting Kili would be the trek for me.  I attended a TFK event last September where I heard Len Stanmore speak about his incredible journey of extreme outdoor adventure.  His story is quite inspirational and others started talking about TFK’s upcoming trek to Kilimanjaro in February 2013 at the reception afterwards.  I was hooked.  Somehow.  Not really sure what had just happened but I was in.  ALL IN.

Besides the orphanage work (fundraising for it and actually spending a few days there), there are three key aspects for me about the hike itself:  training, gear/packing preparations, and a third that I have yet to name at this point in this writing…

Kids, uniform, Tanzania

The kids at the Kili Centre orphanage sporting the new uniforms paid by funds raised by this trek

Training for climbing Kilimanjaro

Fortunately, when I decided to go on this trek, I was still relatively fresh from my Romania hike and had continued exercising in general.  It makes for a good starting point!

I started more serious training by getting on the treadmill and increasing the incline over a few weeks to 15%, ending up doing this for a couple of hours.  I also used a backpack whose weight I kept increasing beyond the expected weight we would carry on the hike (about 15 lbs for our day needs; porters would be carrying the rest) .  I was doing great with this and was planning to mix in real hikes by going to small but still helpful Kennesaw Mountain near Marietta, Georgia, where I trained for the hike in Romania.  And that is when a mini disaster struck:  I over-stretched my Achilles tendons (both legs!) likely due to the imperfect simulation of a 15% incline on a treadmill.  It all seems obvious now but I had not contemplated that I could hurt myself that way – you just don’t know what you don’t know!

That set me back about 6 weeks at a point when the intensity of my training was really beginning to pay off.  (I am almost back to normal and training again at this point.)   Not only that but I gained weight due to the double whammy of Thanksgiving and Christmas falling squarely in that 6-week period…  So now I will carry even more weight uphill 🙂

Advice:  If you embark on something like this without that type of starting point – don’t fret!  Just be sure to start gradually.  Aggressive training from cold is more than likely counterproductive if not outright a risk!  That’s the easiest way to get injured.  And also, stretch even of days you are not training.  Stretching is your best ally in physical readiness.

Getting in gear.  The gear to climb Kilimanjaro!

After being in good conditioning for the hike, the next item on the list is all the stuff that I will need on the hike.  That short word “stuff” covers a wide range of things that I will need to make this a successful trip.  After getting the packing list from TFK (VERY thorough!), I did an inventory of what I had and what I needed to research/acquire.  I started staging all my items in a spare bedroom.  It looks like a mess but it does two things for me:  1.  allow me to start gathering in one place all that I will need to pack making packing later a lot easier and 2.  allow me to start enjoying the upcoming trek by seeing it shape up!

packing gear for hiking trip

The “mess” in the spare bedroom!

Advice

  • Get a good packing list for the type of hike
  • Go talk to your local outfitter before you acquire things to learn about what they recommend, what materials are out there, criteria for choosing items, etc.
  • Then proceed with sourcing the items (borrow or buy).

Let me share some more specifics about gear and packing here (for a more detailed description of the clothing I took, go here)…  But do check out this post on what I considered my 7 key items for this hike (written BEFORE the hike) and then the top 14 things I took (written AFTER the hike)!

I am happy to email you a copy of my packing list!

Clothing for your packing list

Mt. Kilimanjaro covers multiple climate zones ranging from forest where one may be trudging through mud to extreme cold and windy terrain towards the top.  Guess what?  That means carrying gear to deal with all the climate zones but, most importantly, to deal with the extreme cold and wind which is far more dangerous to a hiker.  The key to all this is layers.  Not rocket science, I know.  I hear the cold towards the top is brutal!

The list I was provided by TFK was very clear on what was needed.  I went (a few times!) to my favorite outfitter and explores the options available for each category of item needed.  I have learned WAY more than I thought I’d ever learn about gear.  And spent way more than I ever thought I’d spend.  But two things help:  one, I have bought thinking of re-use especially at ski time or in future treks and, second, I have tried to borrow some items (though it has not been as much as I would have hoped for).

Advice My advice to you is to borrow, or buy used if possible, and think of re-use as you make choices on what to get.  For example, instead of buying the absolute best gloves for the extreme temperature, think of using liners, etc. so the gloves themselves can work for you in less extreme weather back at home.

Accessories for the Kili climb

This covers a whole range of items like the hiking poles (with shock absorbers!  see here for more on them), headlamp (not only to read at night or go potty in the middle of the night but also for the night hiking we will do on summit day!), sleeping bag liner (to make it warm enough for the coldest nights), sleeping bag pad (for comfort and further insulation from the very cold ground), cameras (yes, plural:  the big one is not summiting with me – too heavy), even duct tape!

Advice:  Borrow, or buy used if possible.  Buy new if that suits you better.  However, another possibility is renting some of the items on-site.  This helps you in two ways:  not buying stuff if you are not going to be hiking/camping more than this trip and also reducing the amount of stuff you have to lug half way around the world!  However, some potential downsides of this:  you don’t know the condition of the item you will rent (dirty, torn up, etc.) and you may not find the right type for the item you are looking for.  For example, you need to be sure that sleeping bag will be warm enough.

Health/”Medical” items for your Kili climb

For this destination, one does have to be ready with anti-malarial and other items as recommended by the CDC.  I have all the hepatitis stuff from prior travels so the anti-malarial (which is taken for every trip) and the typhoid (which I needed) were on the must-have list.  But the medical category is not just the innoculations/vaccines.  Things like ibuprofen, Cipro (for the potential digestive maladies that could affect a traveler…), and maybe even something to help you sleep get on the list.  Other items, such like the iodine tablets, sunblock with DEET, high-SPF chapstick, etc. are more preventive in nature but just as important.  This list is very important and is sometimes less obvious than the gear and clothing lists.

Advice:  Do your research, ask people who have gone before (feel free to ask here!), and don’t try to save money by skimping on these items!

Finally – Emotional Preparedness

I will have to get back to you on this after the trip for a full report.  However, I had heard that a lot about hiking Kili is the mental strength to power through tough conditions like mud and rain, tiredness, perhaps pain, and other discomforts.  So I am thinking this would fall under emotional preparedness.  I have heard from people who have hiked it before that, in the end, this is the most important elements in preparing for Kili.  You may be fit, you may not.  Altitude sickness could keep you from summiting and that is independent of your fitness level (amazing!).  But if you don’t have some toughness in this realm, you may fall short of your goals.

We are lucky that our lead guide is one of the foremost mountain expedition leaders in the world, Luis Benitez.  He is also a Board Member of TFK!  In an email he sent the trekkers last week, he told us that the best thing to do in this category is to expect discomfort, understand it will happen, understand it starts and it ends.  All that so that when it hits at any point in the trip, you remember it will pass and you don’t let it bring you down (figuratively speaking!).  I think this is a great piece of advice that will serve ME well in these 2 weeks before I leave for this hike.

Advice:  Listen to Luis’ advice!

Final thoughts on climbing Kilimanjaro

I am almost done doing all the things that I need to do to be ready but, in the end, it is the emotional preparedness that I am not sure how to measure.  I cannot check it off a list, like I can do with the other items on my packing list.  Yet it is likely one of the most important success factors in this trek.  I don’t know if altitude sickness will beat me to the summit.  I can’t control that.  But I sure hope I am ready enough to control my willpower and discomforts to summit or get very close to it!  Kili, I shall meet you very soon!

Uhuru peak or Kilimanjaro, Tanzania

P.S. – Thanks for all the words of support, advice, and orphanage donations via Trekking for Kids!

——————————————————————————————————————————

A month after this post went up, I had completed climbing Kilimanjaro and started writing about every day in the trek (7 total days) and about the route we were to take.  Check it out!

–  The Machame Route

–  Gear for climbing Kili:  clothing

–  Day 1 (and links to the subsequent days)

Trekking with a Purpose – the Best of Both Worlds

My trip to Romania and Moldova was triggered and centered around a hike in Romania organized by Trekking for Kids to support a local orphanage.  If it were not for this organization, I may have waited much longer to get to Romania and, more than likely, never hiked the beautiful trails along the Carpathian Mountains.  And, if it were not for this organization, I would not have met the wonderful kids I met at the orphanage in Romania.

A hike around the Bucegi Mountains in Romania

The Bucegi Mountains

Trekking for Kids

Trekking for Kids (TFK) was created in 2005 to find a way to support orphanages around the world while combining those efforts with treks for those helping fundraise for those orphanages (see their full story).  Over the years, they have conducted treks (some of them they repeat over the years) and helped orphanages in (trek/orphanage):   Everest Base Camp/Nepal, Camino de Santiago/Morocco, Inca Trail/Peru, Kilimanjaro/Tanzania, and others.  In fact, Kilimanjaro is planned for 2013 along with a couple of  other unnamed destinations but including college- and family- oriented treks!  So go check them out and bookmark; you never know what will call to you!

The Romania Trek

In this Romania trek, TFK organized a well-planned and well-run hike whether for newbie trekkers like me or experienced ones as some of my fellow trekkers.  Their choice of the hike guides (Your Guide Romania) was simply outstanding; they do more than hikes and should you desire to explore Romania and mix with adventures like hiking, paragliding, skiing, etc., they ARE your guys and this group of trekkers seriously endorses them!

More importantly, TFK found and carefully vetted a local orphanage that would not just accept funds and other contributions but one that has a philosophy of truly caring for its children, offering them a healthy home environment, and that thought about the children’s long-term needs:  those once a child turns 18 and, normally, gets shown out of an orphanage.

The Foundation for Abandoned Children (Pentru Copii Abondonati) clearly has a vision not only for the immediate care of the children and young adults, but for preparing them to enter life outside of the home.  And that’s what I found so wonderful about the choice TFK made:  I knew my efforts, my donors’ contributions, and my time would be magnified as this foundation’s philosophy and approach was perfect to take the unexpected support they were receiving via TFK and translating it into bigger possibilities for the children and young adults.

Our First Day with the Children

We arrived at one of the three houses in the town of Ghimbav, near Brasov, all eager to meet the children and wondering what specifically the conditions at the orphanage would be.  As we arrived, a couple of children came out as they were clearly all eagerly awaiting us.

We had just made the 2-3 hr drive from Bucharest on a Saturday morning which means it takes longer than normal due to weekend traffic from the big city to the country.  We had stopped at our hotel, the Kolping Hotel, on the outskirts of Brasov by the mountain with the BRASOV sign, to drop of our luggage before meeting the children.

So, we entered the orphanage and immediately started meeting both children and staff.  Lots of names to remember but TFK had brought name tags which would greatly facilitate remembering everyone’s names.  At some point, I traded names with one of the kids named Anton, and I started a mania – all of a sudden, and for most of the rest of the day, a constant flurry of name tag changing began.  The younger kids loved it and it made for part of the fun.

Clearly my name is not Anton but that was my name at the moment. Here with Alex, one of the older teens.

We were shown around the houses (2 owned by the foundation and 1 rented if I remember correctly).  The facilities were pretty good and that made my heart feel good as I have seen orphanages elsewhere where the conditions, while not the worst, still did not feel adequate for children.  Clearly, the foundation has done a good job of establishing a healthy environment for the children to live in.

The largest home houses kids, boys and girls, of all ages.  The second home houses boys.  The third home right now has mostly work space (e.g., a woodworking workshop) but will be prepared to take the older children/young adults after a new roof is installed and the indoor space renovated.  Some of the funds raised will go to the repair of the roof and some of the older boys have contributed to the prep work and will participate, led by the construction crew, in repairing the roof – a good skill to pick up!

House in Romania

The roof and space to be renovated

Old roof in a house in Romania

The upper space to be renovated

After getting a lay of the land and seeing the garden where they grow produce, we proceeded to break up into groups to do different projects.  Some of us stayed at the boys’ house to sand furniture down so they could be restored.  Others went off to help bottle up jam (to sell, along with crafts made by the kids, in local markets).  Others started doing a tie-dye shirt project which they kids and teens greatly enjoyed (and we the saw the end results when we returned after the hike – really good job!).  At some point, we all moved through some of the activities along with the children.  These activities enabled us to get to know the kids and the kids to get to know us.  It was a great afternoon.

Working hard and having fun with tie-dying!

Tie-dying

And lots of concentration!

Post-Hike Time at the Orphanage

Hike concluded, we went back to the orphanage for two days of activities:  on the first day BBQ/dinner and games at the orphanage; and the second day a morning hike followed by lunch.  The kids sported their newly-made tie-dye shirts and they truly were amazing!

The BBQ/dinner was a lot of fun.  These kids know how to fend for themselves and the food was delicious!  We then did several activities:  making smores, playing football (soccer) & basketball, etc.  I played my very first soccer match ever and apparently I am great at defending and goal-keeping!  Who knew!

Amateur soccer player

Yet-another Spanish-blooded Raul who can play football/soccer


The hike and lunch was a fun day too.  Not all the children went up the trail and stayed earlier in the trail.  The rest of us went to the top with a few of us hanging out and the bulk of the group going through a more difficult section of the trail.  I hung out with a couple of adults and a few of the kids who didn’t want to go on.  Afterwards, we treated the kids to a lunch out which was a great way to hang out before our departure for Bucharest, and back home.

Zoli and I killing time as we waited for the rest of the group

In the end, it’s never enough time to spend with the children and teens, especially once you make the connections.  While I do not know what the future brings, I sure hope I can remain in touch with the foundation and hear about the children – and, who knows, perhaps seeing them again some day!  And I also hope I am blessed with another opportunity to go on a trek with TFK.

Group picture

The entire group – thanks to the wonderful staff and the great children!

How to Plan a Trip – and then Increase Scope: The Desire to Travel!

When I decided earlier this year on doing the trek in Romania, little did I know how a one week trek was going to become a 16-day trip – but I am talented that way:  plan a vacation and then add more than originally intended to practically double its duration and scope!  Let me share with you how that happens to me using this trip as an example.  I will also use this post to lay out the overall trip to Moldova and Romania so that, as I write about it, readers can see how it all comes together…

Note:  I hope you subscribe to the blog (if you have not already done so) so you can keep up with the writings and read as you have the time.  The trip was incredibly different for me and I hope what I share helps give a better glimpse into these countries!!

First Things First:  What Led Me to Take a Trip Now and to Romania?

Fine questions!  As I announced in a prior post, the main purpose of this trip was to go on trek with Trekking for Kids to help an orphanage in Romania by raising funds for projects to improve the orphanage and also to just be with the kids and bring them something different from their day to day.  More about the orphanage part of the trip later but I will say now that if you want to help children around the world and tackle some great mountains (Everest base camp, Kilimanjaro, Machu Picchu, etc.), you should look into Trekking for Kids.

Trekking for Kids

An Itinerary Takes Shape, with Some Randomness

On to how I planned my itinerary….  The trek was about a week so I knew I had to take advantage of getting to that part of Europe to see something more.  Can’t waste a good and dear trans-Atlantic crossing…

Among the choices was a return trip to the Greek islands (for R&R after the hike; something I would have really enjoyed), or visiting any of the countries that surround Romania.  Of those countries, I had already gone to Bulgaria so that left the Ukraine, Moldova, Hungary and Serbia – none of which I had visited.  I eliminated the last 2 as I felt those are easier to get to from places like Austria, Croatia, etc. so I w0uld be more likely to see them in the future.  That left the Ukraine and Moldova. Moldova started peeking my curiosity as it is so much less known to me and, likely, to my compatriots.  As I researched the country, it sounded like it had some interesting things so that became the destination.

My plans then were to land in Bucharest and go to Moldova ahead of the hike part of the trip.  I proceeded to research hotels in Chisinau, the capital of Moldova (pronounced KISH-now).  I had not yet figured out how I was going to see the country and what it had to offer.  As I read reviews in Trip Advisor for hotels, I ran into a comment that a reviewer from the UK had made about a guide he hired for a one-on-one tour of Moldova.  I sent the reviewer a few questions and with his strong endorsement of this guide, I proceeded to contact the guide, Dumitru, to see what itinerary he would recommend for a 2-3 day visit and what the costs would be.  Dumitru offered several options and mentioned, in passing, that he could pick me up in Iasi, Romania if I wanted.  Immediately curiosity kicked in as I wondered why he would think I would go to Iasi.  There had to be a reason…

So off I went to research Iasi.  Turns out it is considered to be the cultural capital of Romania and that it had a hotel designed by Monsieur Eiffel himself.  That was all I needed to hear but now I had more logistics to research and more time on my vacation calendar to slice off.  (I will say here and likely repeat in a future blog how great Dumitru was!  Should you need a guide in eastern Romania or Moldova, hit me up for his email.)

Researching Trips Rocks

If you are thinking to yourself “this guy must love researching stuff”, you would be correct.  Doing research for me is the beginning of the trip:  I started learning the moment I started studying the maps of Moldova and Romania, or when I read some bloggers’ writings about these places, or when I chatted with a fellow Twitter friend about his trip through the Transniestra…

Figuring out the Logistics…

In any case, I decided due to my arrival date in Romania and the start of the hike that I could not afford taking the train from Bucharest to Iasi.  While distances are not long some times in Eastern Europe, what I consistently found out or heard was how artificially long the train rides are; case in point, a 6-7 hour drive from Chisinau to Bucharest could take twice that by train!  So I decided to fly to Iasi the morning after arriving in Bucharest foregoing looking at the landscape as I traveled.  Once in Iasi, I would have that afternoon and evening to explore it (almost enough time).  The next morning, I would be picked by my Moldovan guide, and then fly back to Bucharest from Chisinau, Moldova 2 days later.

My 3 days in Moldova would mostly be centered in the middle region of the country given where most of the key sites are but a trip north was planned to visit an important fortress in the town of Soroca on the Ukrainian border.

Romania

Once in back in Romania, the situation required less planning as most of it was handled by the trek organizers.  I only needed to take care of my hotel after returning from Moldova and plan my sightseeing the day after.  The trekkers would spend one night together in Bucharest before heading to Transylvania (the town of Brasov – prounounced BRAH-shov) where our trek and orphanage work would be “headquartered” for the next week.

The Travels I Did – A Map

I find a map helps visualize things so I quickly marked on this Romania/Moldova map the key travel routes and the method of transport I ended up using.  Clearly, I did not see all that Romania has to offer.  I hear Sibiu, Timisoara and Cluj-Napoca are well worth seeing too.

By the way, as a footnote, there is some kinship between Romania and Moldova.  In fact, the languages are practically the same and there are many cross-border family ties as, at some point in history, they were both one country.  Apparently, it is still a topic today (reunification or not), but I do not know enough to explain the situation here… Suffice it to say that Moldova has, itself, a region in the east that wants to separate from Moldova (it’s called the Transniestra and it was in the news in the 1990s due to civil war-like clashes with the Moldovan government)!

Romania Moldova Map

Final Itinerary and Key Activities in Romania and Moldova

To sum it all up and serve as a guide to writings I will create (I will add links here as the writings are published), here is a detailed itinerary of the trip…

Day 1 – Depart Atlanta, connect in Amsterdam, and land in Bucharest at midnight local time.

Day 2 – Depart Bucharest in the morning and land in Iasi in the morning.

Day 3 – Be picked up by my Moldova tour guide in Iasi and cross the border into Moldova.  Visit the Frumoasa and Curchi monasteries.  Brief stop in Orhei.  Visit Chateau Vartely, have lunch, and sample the wines.

Day 4 – Tour Chisinau, and travel to Soroca.

Day 5 – Visit the Milestii Mici winery and the Capriana Monastery.  Fly to Bucharest.

Day 6 – Sightsee in Bucharest, including its Palace of Parliament, and meet the hike group.

Day 7 – Travel by road to Brasov (3-4 hrs).  Explore Brasov and visit the orphanage.

Day 8 – Begin the hike on the Wallachian side of the Carpathian Mountains.

Day 9 – Second day of the hike into Transylvania via the Strunga Pass.

Day 10 – Third day of the hike.

Day 11 – Final day of the hike and night out in Brasov.

Day 12 – Explore more of Brasov.  Afternoon and evening at the orphanage with football (soccer) match included.

Day 13 – Hike with the kids.  Return to Bucharest.

Day 14 – Depart for Paris.

Day 15 – Hang out with nothing seriously planned in Paris.

Day 16 – Fly back home!

—————————————————————————————————

If you can relate to this approach to trip planning and/or have stories of your own, I’d love to hear them!

%d bloggers like this: