Reaching Kilimanjaro’s Summit | Kilimanjaro Day 6

Here we go, the BIG day.  Day 6 of the Mount Kilimanjaro climb!  The day we hope to reach and pass Stella Point on the rim of Mount Kilimanjaro to get to Uhuru Peak, the highest point of the mountain – the highest point in Africa!!!  Or, I should say, the day we attempt to reach and pass Stella Point to get to Uhuru Peak.  I will do my best to convey how reaching Kilimanjaro’s summit climb feels like on day 6 but the physical and mental efforts are hard to put into words that do it justice and help anyone comprehend the experience well.  But I will do my best as it is worth reading about it whether you are planning to do summit Kili or are just curious about it…

Why there are not a lot of photos from the summit attempt

You will notice how the middle of this post is devoid of photos.  First, do not worry, there are pictures towards the last third of the post!  Secondly, that matches what happened for me in the ascent.  Much of what happened in the middle of summit night was not captured by a camera because I was too focused on going up and, for part of it, even my mind did not capture any images.

 Uhuru Peak in Kilimanjaro

The goal: Uhuru Peak

Breaking down summit night

I will break down this most important of days during our climb of Mount Kilimanjaro to -hopefully- make it easier for me to organize myself and make sense.  Day 6 consisted of four parts – it was to be one LONG day in chronological time and mental time.  The four key parts are:

  1. Going from Barafu Camp (base camp) to Stella Point (at the rim of the volcano that is Mount Kilimanjaro) – expected to be about 7 hours of trekking
  2. Going from Stella Point to Uhuru Peak (the actual summit point of Kilimanjaro) – expected to be a short 45 mins to one hour fairly “flattish” walk
  3. Coming down from Uhuru Peak back to our base camp (Barafu) for a brief rest, removing inner layers, and having lunch – about 3 hours
  4. Arriving to Mweka Camp where we were to spend our last night on the mountain – about 4.5 hours of a downhill, easy walk.

I will cover in this post only the ascent on day 6 (#1 and 2 above) and not the descent that happened later that day.  I will cover the descent on day 6 (#3 and 4) with the final descent of day 7…

Leaving Barafu Camp to reach Stella Point

Barafu Camp at 15,100 ft (4,600 m) was a hard camp to like.  I write about it in my narrative for day 5.  Yet, I could have stayed there a few more hours sleeping that night…  Four of our group left at 11 PM to have an extra hour to reach the summit.  The rest of us saw them leave camp, and then we finished prepping and ate a snack prior to heading out for our attempt at the summit.  At midnight, we left the relative comfort of this camp to do what we came here to do:  tame Uhuru Peak!

I was pumped even while wondering (and perhaps feeling a little nervous about) what would happen, how it would end 8 hours later.  Ah, the fool… I was to learn the end was NOT reaching the summit, but reaching our camp for the night.  More on that later…

What did I wear on the way to Kili’s summit?

I wrote about the particular items to wear for this climb here but a quick recap here.  Though it was very cold at base camp given the altitude and the time of day we were leaving the camp, we were instructed to dress such that we were slightly cold upon setting out since we would warm up as we exercised during the climb – great tip as I would not have thought of it in that state of sleep-deprivation…

So, I wore my two tight woolen tops, then my merino wool light jacket, and my hard shell jacket (which protected me against wind and water though, mercifully, we did not have precipitation).  The synthetic down jacket would wait until we took breaks (when, since you are at rest, you do not want to lose the heat your body has generated) or until it finally got too cold even while walking (which it did at some point).  In terms of my legs, I wore my long wool underwear (all the wool layers by the skin helped wick moisture away from the skin) under my convertible hiking pants and then my hard shell pants.

Still, it was VERY cold on summit night in Kili!

The only place on my body where I felt really, really cold was my toes though I was wearing sock liners and the thickest wool socks I could find.  It is amazing to think that it actually can be much colder than I experienced.  We had milder temperatures than normal up there per what our guide told us.  Ahead of the trek, I had been told I would be exceedingly cold and it did not quite feel that way (feet aside).  Boy, am I glad that was the case on this particular night!

Time is a funny thing

During the climb up to Stella Point, it is amazing how time flowed – or how I felt it flowed…  The hourly five to ten minute breaks we took (a lot shorter than the breaks we got to take on prior days) provided a little bit of rest from the effort and allowed for drinking some water, eating a little something, and handling nature calls.  During one of those breaks, probably as we were beginning to zone out and wear out, they surprised us with hot tea – one of the happiest moments in those seven hours!

Handling nature calls was a little more of a pain than it had been other days of the climb because it was dark.  But when nature calls, it calls.  And no pee bottle here.  In any case, I worked my way up by focusing on each hour’s walk, not on the totality of what was ahead of me.  I was not looking at my watch at all but when the break came, I knew an hour had passed and that was an hour off the seven-hour count…  Keep the focus on the next sixty minutes…

And who said it would be a piece of cake?  No one.  They were right.

After the first hour of the climb, my heart rate starting racing and I was out of breath a lot like on day 4 after we had passed the Barranco Wall.  We had been climbing bigger rocks (requiring big steps) which was exactly what had caused my troubles on day 4 – except now I was four or five thousand feet higher…

That issue was going to slow me down and, tonight, falling behind could mean being turned around.  The guides had been clear with the first subgroup that if we got to Stella Point at the same time as them, they would have to turn back at Stella Point and head back to basecamp.  It meant they would take a lot more than an hour reaching Uhuru and, having already been at that altitude an extra hour than us, it would have been too much time up there.  So, I knew that if I fell behind too much in my own group, that I could miss getting to UhuruThat realization really hit me hard.

Guide wisdom.  Trust it.  Don’t fight it.

One of guides, Said, told me to give him my daypack.  My heart sank.  Was that an early indicator that I would not make it to the top?  As soon as the path became less “pronouncedly” rocky, I told Said I could take my daypack back because I was back to “normal.”  He shook his head and said he would keep it.  At first, with pride stepping in, I said no, I could take it.  And then I realized that it may be the worst thing I could do.  I needed to save every last drop of my energy for the big rocks ahead.  I resumed my climb, “daypackless.”  Boy, am I glad I did…

I believe I was the second or third person to lose their daypack in our group.  I felt this would take away from the feat should I reach the summit.  I had nothing to fear.  Within a few hours, more than half (including the four guys in this subgroup) had lost their daypacks too, including our star athlete who had run across deserts and had been carrying a daypack every day of this climb loaded at 30-40 lbs.  I have to digress and mention that this guy, a dentist from northwestern Canada, would carry all sorts of candy in his daypack and, all throughout the week’s hike, would pull out a DIFFERENT bag of candy (gummy bears, sour patches, etc.) to pass around at breaks.  Needless to say, he became everyone’s friend fast!

It is worth pointing out how carefully our guides were watching each one of us even after we surrendered our daypacks.  Clearly, ensuring no one exhibited dangerous signs of altitude sickness (the ones that represent life-threatening danger like cerebral edema).  But they REALLY wanted us to make it to Uhuru Peak as long as we were not exhibiting any serious symptoms and did everything they could to assist us in reaching our objective.  I felt very safe among these great men.

The lights are not always at the end of the tunnel…

Though we had a full moon, we still needed to illuminate the path ahead by wearing headlamps.  I remember that I would look up ahead on the trail and see what was becoming a downer for me:  a long trail of headlamps ahead of us zigzagging the slope of the mountain.  And then you didn’t see any.  That point would get closer and closer, and it felt good to know we were reaching a “milestone” of sorts.  But once we reached the milestone, I would look up and see, yet again, another LONG trail of headlamps going all the way up to a point far up the mountain.  After this, I decided not to look up anymore…  It was disheartening!

Sleep and memory loss – all in a Kili climber’s night!

Maybe halfway up to Stella Point, I was dozing off.  No, not during breaks.  This was as I moved my feet up that mountain and as my arms moved the hiking poles.  The lack of oxygen and being tired had everything to do with that.  (Through chats post-facto, I learned others were also dozing off as they walked up.)  It was insane.

I decided that I needed to occupy my mind but I was too tired to alphabetize countries or come up with some other mental activity.  I was that exhausted and my brain was likely not able to function well.  I want to say that the thought that I was reaching Kilimanjaro’s summit was very clearly driving me.  I was so tired, I may have half forgotten why I was there.

Keeping my mind occupied

Looking at the Southern Cross, which someone pointed out, gave me something think about (or try to look at without tripping).  Some folks had music in their portable devices but I had not brought mine.  That was on purpose.  I actually wanted to listen to the folks stepping on the mountain, focus on the quietness of the surroundings, not being cluttered with noise.  I like not feeling “trapped” within myself when it comes to sounds and that felt more important to me that night.

Give it up, baby give it up

Towards the end of the third hour, our lead guide, Luis, told us that we needed to be sure we were not spending our every last drop of energy in the remaining part of the climb.  I thought to myself  “huh?”.  He said that coming down would be very hard too.  Therefore, it was crucial we managed our exertion level.  I was not sure how we would do that.  But then I started thinking maybe he was trying to subtly tell some people to give up their daypack…

A “happy” place.  Say what?

Then, he said, “guys, the next few hours are going to be very hard; find your happy place because you are going to need it”.  I remember thinking, in my tiredness, “my happy place?  my happy place?  what IS that??  a beach?  no.  wine?  no, wine is not a place.”  I had no energy to conjure a happy spot I didn’t have previously.  And then, all of a sudden, the faces of my sister’s, cousins’ and friends’ kids came to mind.  Their smiley, happy faces.  So I started calling roster on all of them seeing those smiley faces.  I had found my happy place.  And it kept me distracted easily for another hour.  I say “easily” because I think it is after an hour of that that my memory goes blank…

Yes, what happened in the last 2-3 hours prior to Stella Point are a big blank.  I have no idea what happened, when we stopped, what was I thinking, nothing, nada, nil.  Comparing notes with others later, I am not the only one to whom that happened.  We had been told the last bit before reaching Stella Point would be scree (small pebbles).  So for every step forward, there would be a step back.  I have no recollection of scree, of steps forward, or steps back.

And then it happened… Steeeeeeeellllllaaaaa!

So I was in some zone when all of a sudden, to my right, I see a glimmer of light on the horizon.  Sunrise is beginning!  It was like an injection of adrenaline straight to my heart – and mind.  Watching the sun rise and trying to take good pictures became the priority as we continued walking up.  I was awake!

Sunrise from Kilimanjaro as we neared Stella Point

Glorious!

The sun finally broke through the horizon and we could see that Stella Point was just like 20 minutes away.  It was one of THE most incredible moments in my life.  You see, at that moment, I had no doubt I would make it. Though, how could I really tell how the higher altitude and serious lack of oxygen would hit me 20 mins later?  It didn’t matter, I just knew I was A-OK!

We hit Stella Point and I couldn’t believe how quickly it came upon us.  I don’t think I could see it from the final approach.  This was unbelievable.  I was at over 18,000 ft and would only have one more hour up to Uhuru Peak after a short break at Stella Point.  We laughed, hugged, and even teared up some.

Some of the trekkers and guides at Stella Point on Kilimanjaro

Some of the trekkers and guides at Stella Point (I am on the far left)

The view around Kilimanjaro’s crater

My eyes couldn’t believe the view outside of the mountain and INTO the mountain.  Remember the top of Mount Kilimanjaro is a crater from a long-extinct volcano.

Kilimanjaro crater

Looking around the top of Kili

Immediately the picture-taking began in front of the brand-spanking-new green sign with yellow letters.  TERRIBLE design… you had to be RIGHT IN FRONT OF IT for the letters to show well in a photo.  Thankfully, they changed the sign since I summitted per the photos I see now.

In any case, pictures were taken and then we proceeded to get to Uhuru Peak…  Time was of the essence.  At that altitude, you do not want to linger despite the fact that we noticed tents in the crater.  In any case, we had to mosey to the peak and we couldn’t dilly daddle.  We had to move.

Reaching Kilimanjaro’s summit:  Uhuru Peak

Mt. Kilimanjaro used to be covered in glaciers.  Today, the glaciers are there but they are not as dominant as they must have been.  Sadly, they are expected to disappear completely in a few decades.  Still, seeing them from a distance was impressive with the African horizon behind them.  Yes, a glacier in Africa.  So mind-boggling.  We knew we were close to meeting our objective of reaching Kilimanjaro’s summit !

Glaciers atop Kilimanjaro

Glaciers atop Kilimanjaro

The hour walk (or maybe 45 mins?) up to Uhuru was much easier and less steep than the prior few hours though we still went up 660 feet (200 m) or so to reach it.

Trekker and guide walking up to Uhuru Peak in Kilimanjaro

Said and I headed to Uhuru Peak

Everyone was in great spirits as we attempted reaching Kilimanjaro’s summit.  And then, we saw it, the big green sign marking Uhuru Peak!!!  WE WERE THERE!  Laughter, smiles, even some jumping-for-joy all around.  We caught up with the first group. It was so awesome to see all of us together at the peak.  The probabilities were that they would be already on their way down when we got to Uhuru or that they wouldn’t reach it.  Consequently, the fact that we all were there together, this group that had been together for about 10 days, was truly priceless.

At Uhuru Peak

One of the many celebratory photos taken: here with Liz and Len Stanmore

Immediately we got close to the sign to wait our turn to stand in front of it and capture the moment in a photo.  Phenomenal moment of joy for all of us.  And just as happy as we were, our guides were beaming that we had all make it – asante sana, guys!

And so reaching the summit of Kilimanjaro comes to an end

The story of the descent is for another post – and the descent was painful.  However, I will share one reflection here about having reached the summit.

Even if I had surrendered my daypack no one moved my legs forward and upward for me, as Luis our lead guide told us once at base camp.  Every step I took on that blessed mountain was my own.  That is the real achievement here for each trekker:  the strength of will and of body to push forward and upward. The strength when you think you don’t have it all together.  When you feel the next big rock may be the one that tips the climb over for you and sends you back to camp.  When you don’t know what is your “happy place”.  I will treasure what I learned that early morning the rest of my life.

At Uhuru Peak, the summit of Kilimanjaro

A very happy trekker at Uhuru Peak!

Back to Day 5

… On to the descent


Pin this image of us reaching Kilimanjaro’s summit to your own Pinterest board!

Kilimanjaro summit, climbing, Uhuru Peak

View from the top of Kilimanjaro on the way from Stella Pt. to Uhuru Peak

—————————————————————————————————————————

Other posts about the Kilimanjaro trek:

–  Preparing for the hike is more than training and gear

–  The Machame Route:  our way up

–  7 things you will not see me without as I climb Kili

–  Day 1 of the hike (starting the climb!)

–  Day 2 of the hike (getting to Shira Camp)

–  Day 3 of the hike (the Lava Tower and hail)

–  Day 4 of the hike (Barranco Wall)

–  Interview with fellow Kili climber and Ultimate Global Explorer

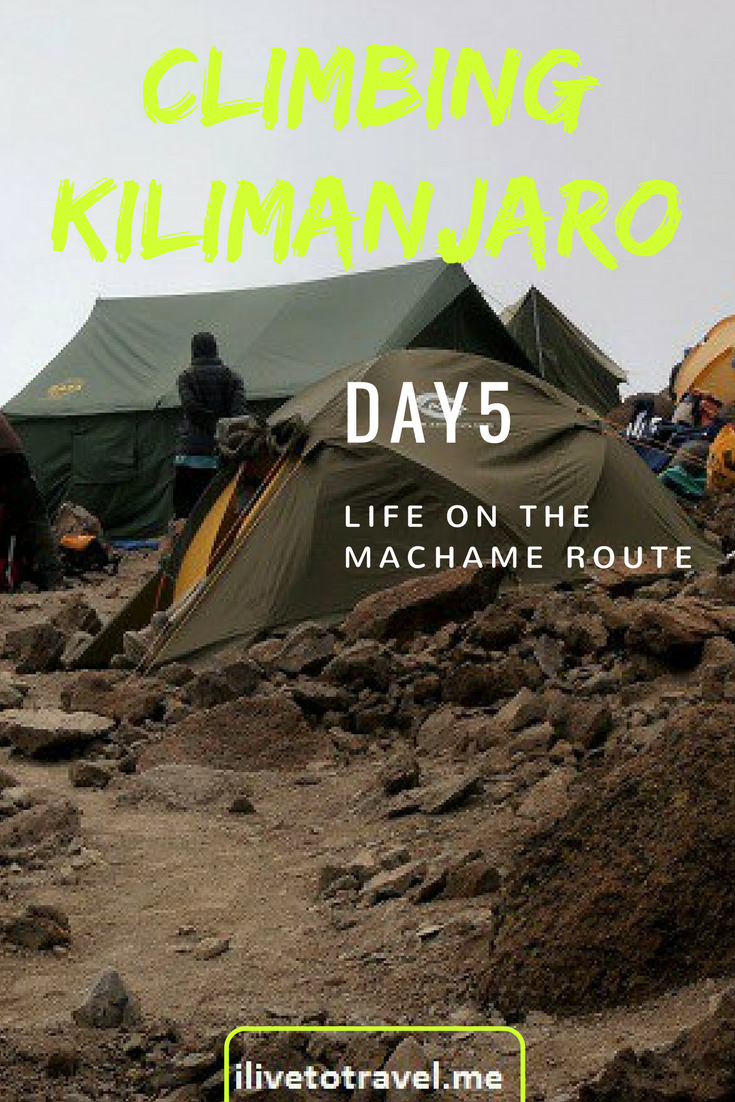
Hike to Kilimanjaro Summit Base Camp | Kilimanjaro Day 5

Ah, the final day before summit, day 5.  Very important, the day that would take us to the promised land:  Kilimanjaro summit base camp on the Machame Route.  And, not a day too soon.  Sure, one more day of acclimatization would have only helped.  But, after four spectacular days, now I was beginning to crave reaching the summit.

Day 5 begins at Karanga Camp

As usual, the day began as every day with the morning routines that set us up for the day’s hike.  I took care of all the tedious, the necessary, and the helpful.  Sidebar.  Did I mention that after all these days of sleeping bags, tents, daypack, large backpack, jackets, zippable hiking pants, rain gear, etc. one gets REALLY tired of zippers?  Velcro all the way, bay-bee!!!  (Thanks, Sarah, for your help fixing zippers!)

Then, I was ready to leave Karanga Camp at 13,800 ft (4,200 m) with the group.  The distance we were going to cover seemed to be just a short 3.7 miles (6 km) hike up to the Barafu Camp at 15,100 ft (4,600 m).  But, remember, at that altitude, short walks are challenging.

Rocky terrain on the Machame Route headed to Barafu Camp on Day 5 of the Kilimanjaro climb

Me helpfully pointing the way, like a modern Columbus. Rock on trekkers, so to speak  (Photo courtesy of K. Shuman)

Day 5 Headed to Barafu Camp on the Machame Route over rocky terrain in Mt. Kilimanjaro

Happy that I showed them the way (lol!), I trail with the stylish plastic bag over my daypack. Not sure why. Not a cloud on the sky.  (Photo courtesy of K. Shuman)

On the Machame Route from Karanga Camp

Finally, on our way.  At this altitude, the route was devoid of vegetation.  Rocks everywhere.  Small rocks though.  Like debris almost.  Like that helps, huh?  However, there were some really neat views, as usual, on this mountain.

Great view of Mt. Meru, close to Mt. Kilimanjaro in Tanzania

Great view of Mt. Meru as the group treks on.  (Photo courtesy of K. Shuman)

Mt. Mawenzi, one of the 3 peaks on Kilimanjaro

Mt. Mawenzi, one of the 3 peaks on Kilimanjaro; it peaks at over 16,000 ft.

Our time at the Barafu Camp

The Barafu Camp was a camp of sorts for us.  OK, it is officially a camp.  Though we were setting up as usual, we were NOT going to spend the full night at this camp.  You see, at night, midnight specifically, we would be leaving this camp to head to summit.  But that, my friends, is the story of day 6.  And, guess what?  Day 6 in Kili is out of scope for this post!

Approach to Barafu Camp in Mt. Kilimanjaro

Our final approach to Barafu Camp (Photo courtesy of K. Shuman)

Signing in at Barafu Camp

At the camp hut to sign in. The stylish looking guy with a plastic bag, an orange jacket, a buff sipping water through a hose… That’s not me…

A painful camp

I so did not like this camp.  You see, this camp was VERY rocky.  I had to mind almost every single step to not trip or step on a rock that would give way from under me.  To walk around our tent to reach the vestibule on the back (vestibule is a generous term; it was a place to put our bags zipped away and protected from any rain), we had to be extremely careful.

Believe me, no distance was too short for an accident.  And, at this stage of the game, I was NOT going to twist my ankle.  I walked very carefully even if it seemed like overdoing it to be so careful.

Barafu Camp in Mt. Kilimanjaro

Me trying to make my way around all the darned rocks! (Photo courtesy of K. Shuman)

The latter part of the stay at Barafu Camp

Once it was dark, I woke up in the middle of one of my afternoon naps to go to the toilet-tent.  It was a beautiful night.  Though there was a full moon, while minding the rocks, I missed noticing the cable holding another tent down.  Consequently, my face almost met a rock that would have likely broken my nose or jaw.  And that would have ended my attempt of reaching the summit.  Luckily, as I started falling, I caught my balance and didn’t hit the ground.  BIG whew.  And, added respect for the camp…  A few hours were left before departed Kilimanjaro summit base camp and I was hoping I’d survive…

In any case, this camp was a little bit surreal because of the landscape.  We were also on a steeper slope than we had been at any other camp (which also meant the tent’s “floor” was not flat (not that it was flat at most of the camps).  However, and always looking for the bright side, some of us concluded that at least we were towards the “exit” of the camp on the way to the summit so we would save, oh, about 4 minutes once we started heading up to the summit…  Gotta find happiness somehow!

Barafu Camp in Mt. Kilimanjaro's Machame Route

Barafu Camp – see what I mean about the slope??!!

Though we were not staying overnight, this camp was very important.  We were to have a nice late lunch and then do two very important things:

1.  Pack/Prepare for departing for the summit at midnight.

2.  Resting/Sleeping whatever we could to have more energy for the climb that night and to also allow our bodies to get as used as possible to the higher altitude.

Trekkers happy in Mt. Kilimanjaro

Three very happy -if tired- trekkers at Barafu. Myself with the awesome Laura and Kristin!

Spending time at Kilimanjaro summit base camp

While exercising at altitude helped get acclimatized to altitude, being active after getting to this camp was not the best thing to do.  The reason?  The body would not get to recover and it would be energy we would need in a few hours for summit night.  So, our leads suggested that, whether we actually napped or not, that at least we lay down for as long as possible to conserve energy and rest.  Not being one to ignore advice from experts, after lunch I did all I could do to prep for that night’s departure (we were stopping at this camp after coming down from the summit) and then proceeded to get comfy (or as comfy as I could) and lay down.

I was VERY pleased that I napped.  Frankly, I can’t recall how long a nap but it was long.  Not once, but twice.  Fortunately, the final nap took me all the way to waking time around 10:30 PM – which was great.  I was able to say bye to the first group of four from our group to depart.  That is because they were leaving an hour early to be sure they had ample time to make it to the summit by sunrise.  Afterwards, I took care of a few things before sitting back down at the same mess tent where I had just said goodbye to our first group, an hour before to wait for our own departure around midnight.

To be honest, I was beginning to get a little anxious.  I couldn’t wait to get going and leave Kilimanjaro summit base camp.  But, wait, that’s midnight so that story is part of day 6!

Mt. Kilimanjaro in Tanzania

The summit beckons…

———————————————————————————–

If you enjoyed reading about what it was to be in Kilimanjaro summit base camp, you can go back or forward in my narrative of this wonderful experience!

Back to Day 4

…  on to Day 6 – summit night !

———————————————————————————–

Other posts about the Kilimanjaro trek:

–  Preparing for the hike is more than training and gear

–  The Machame Route:  our way up

–  7 things you will not see me without as I climb Kili

–  Day 1 of the hike

–  Day 2 of the hike

–  Day 3 of the hike

–  Interview with fellow Kili climber and Ultimate Global Explorer

Pin this image to your board for your future climb and to remember Kilimanjaro summit base camp!

Barafu Camp, Kilimanjaro, basecamp to summit

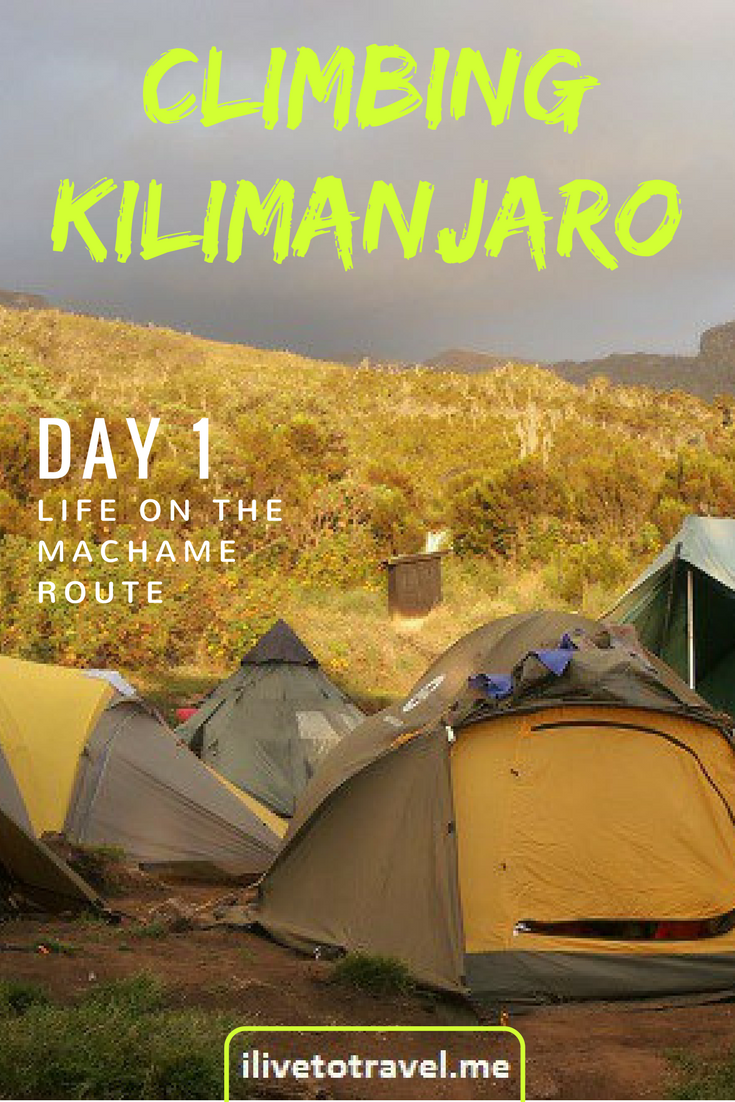
On the Machame Route | Kilimanjaro Day 1

Writing about my hike to the top of Mount Kilimanjaro along the Machame Route is no easy task.  What to share?  Clearly the “facts” of the route, camps, durations, altitude, acclimatization, weather, gear, the day-to-day routine, etc. are all important elements of the story.  But the more I thought about how to write about this experience, the more I realized I wanted to share how it felt first and foremost.  And also covering some of the elements listed earlier as they fit into the overall story, instead of making those the focus of each story, making this more a log of the climb.  As I mentioned in another post, preparing for Kili is more than training and gear.  I hope that you will see, over the series of writeups, that an emotional element also applies to actually doing the climb.  Let’s get going with day 1!

The Machame Route and the climb

One second… before getting into the hike itself, a quick word about the route that we took for this climb.  Our group went up the Machame Route, known for its vistas and for not being as crowded as other routes.  Also, the Machame Route is a route with a higher likelihood of success than the so-called “Coca-Cola Route” (the Marangu Route).  That is because it offers better altitude adjustment or acclimatization to the ever higher elevations the trek would face (climb high, sleep low; 6 days of ascent; etc.).

The climb itself is to Uhuru Peak.  Mt. Kilimanjaro actually refers to the entire mountain, the tallest free-standing mountain in the world.  Uhuru Peak is the highest point on the mountain and, therefore, in Africa!  Whereas Uhuru Peak is the goal, the entry point to the goal on the Machame Route is called Stella Point.  Once you get to Stella Point, there is about one more hour before reaching the actual summit.  Making to Stella Point, though, is no guarantee that one will reach Uhuru Peak though… More on summit night in another post.  Let’s go back to day 1 itself.

Starting day 1:  waiting at the Machame Gate

Day 1 starts full of anticipation.  The trekkers finish prepping the daypack they will carry on their backs.  And packing the other piece of luggage that will be taken from camp to camp by the porters accompanying our group.

Backpacks ready to go up Mt. Kilimanjaro

Daypacks waiting for their trekkers!

We got up at the crack of dawn to head from our hotel (the awesome Honey Badger Lodge) to the hotel from which the mountain trek would leave, the Springlands Hotel, home base of Zara Tours who Trekking for Kids had hired to do our trek.  So add 20-30 minutes to the lead time… (I would have rather stayed at Springlands the night before but I imagine it was booked since there were a few buses loading that morning to go to the mountain.)

The ride to the Machame Gate, entry point to the Machame Route, could not start quickly enough.  As with many things, one gets ready and then one waits.  After we finished leaving some of our non-trek stuff in storage at the Springlands, our bus arrived and the process of loading up our trek bags began.  Finally -and not soon enough- we were on our way to the Machame Gate.  It seemed to take forever but it couldn’t have been more than 1 hour or hour-and-a-half.  We were just so ready to get the climb going!

At the Machame Gate

Once we arrived at the Machame Gate, we proceeded to, you guessed it perhaps, sit and wait for about an hour.  The reason, though, was quite simple:  the permits had to be purchased by the lead guides.  This process takes time as we were not the only ones there (fancy that!).  This would be a reality throughout the trek:  others are there with you.  Not that we expected to be alone, mind you.  Just that one never stops to consider that fact until one gets to this departure gate.  While it could have been chaotic, it really was not; everything was fairly orderly.  We proceeded to eat our boxed lunches while we waited and took a few pictures to commemorate the start of our climb.

At the Machame Gate at the base of Mt. Kilimanjaro

ilivetotravel doing the obligatory photo at the Machame Gate, looking ready and clean!

Another thing you can do while you wait is read the few signs posted with instructions and warnings for those starting to climb Kili.  Good reading.

Sign on Machame Gate at Kilimanjaro

We cheered when we saw our guide come over with paperwork – it meant we were ready to go.  The funny thing is that we saw other guides come out around the same moment with their papers.  You would think the first-come, first-serve approach would have led to guides coming out gradually and sequentially.  Nope.  It seems all permits were issued almost at the same time for all the groups waiting!  That meant, everyone got going at the same time creating a little bottleneck at the entrance gate.  We got to pass quickly through without waiting long so we were FINALLY on our way!!

The hike on day 1

Day 1 was mainly going through a forest habitat starting at 6,000 ft (1,830 m) and ending at the Machame Camp at 10,200 ft (3,100 m).

Day 1 of the Machame Route of Kilimanjaro

Typical of the day 1 Machame Route. Notice the porters on the trail.

It may have been the built-up anticipation but, for the most part, I didn’t feel the altitude wear on me as the day went on.   We were fortunate it did not rain that day.  So, the gaiters were not really needed (those green things I am wearing on my legs in the earlier photo to help prevent mud or pebbles from getting into our boots).  This part of the trail is about the nicest one with some work done to create a good trail for part of the way.

Arrival at the Machame Camp

Our arrival at camp was about 4:30 PM, five hours after we started that day.  We were thrilled at having completed our first day of 6 to get to the summit.  While we knew we still had a lot of challenges ahead, it felt SO good to have one day under our belt!  At this point we did our first book signing to show we were there.  This is a key requirement if we wanted to be issued an official completion certificate at the end of the hike.

Register at camp in Kilimanjaro

The Machame Camp sits in an area with plenty of vegetation.  This means we had more smaller animal life than we would have higher up; read, mice.  Key here is to keep the tent zipped up when not coming and going!   The Machame Camp has a toilet building that is pretty new.  I heard it had both Western toilets and Turkish toilets, if those are the proper names for the fixture types.  We also had a pair of portable toilets-tents and I preferred those… (less smelly).

In any case, getting to camp means setting up the sleeping tents and the mess hall tent.  Normally the porters who carry these items and set them up get there ahead of the trekkers and the guides but on day 1 we got there at the same time.  So this day we got to watch them at work.

Camp being set up in Kilimanjaro

Setting up camp

Wrapping up our first day on the mountain

Once the tents were set up and before dinner was ready, I, like some of the other trekkers, got organized by washing up, taking out the items needed for the night (headlamp, etc.), and preparing the daypack for the next day.  Oh, and the getting drinking water and treating it (Steripen worked wonderfully!) – a staple of the every day life on the mountain!

Trekker at camp in Kilimanjaro

Yours truly getting ready for my first night camping ever!

We enjoyed a beautiful sunset that night before heading to the mess hall tent for dinner.  I took advantage of an early bedtime so I could be well-rested for day 2 – NICE!  Dinner included a hot soup, potatoes, fried fish, vegetables, and small bananas along with tea and hot chocolate.  On to my first night camping ever and day 2!

Tents at Machame Camp during sunset in Kilimanjaro

Our tents with a beautiful backdrop courtesy of the African sunset

On to Day 2 on the Machame Route…

Kilimanjaro hike, climb Kilimanjaro, day 1 on the machame route

—————————————————————————————————————————————————

Other posts about the Kilimanjaro trek:

–  Preparing for the hike is more than training and gear

–  The Machame Route:  our way up

–  Day 3 of the hike

–  Day 4 of the hike

–  Day 5 of the hike

–  Day 6 of the hike (summit night)

–  7 things you will not see me without as I climb Kili

–  Interview with fellow Kili climber and Ultimate Global Explorer

Preparing to Hike Kilimanjaro: More than Training & Gear

I sit here, two weeks before my departure for Tanzania, asking myself “Oh my, what did I get into??”.  As you may have read, I am headed to Tanzania to hike Mt. Kilimanjaro, something that 5 months I would have told you was the furthest thing from my bucket list.  Seriously.  As I contemplate the process so far, I have learned a few things and I wanted to share those with folks who may be thinking of hiking Kilimanjaro.  Conditioning and gear are two important elements,  But there is a less immediately obvious element in being prepared…

How did I decide to climb Kilimanjaro?

I already knew I wanted to do more treks with Trekking for Kids (with whom I trekked the Transylvanian Alps) because of the great work they do with orphanages but I was not expecting Kili would be the trek for me.  I attended a TFK event last September where I heard Len Stanmore speak about his incredible journey of extreme outdoor adventure.  His story is quite inspirational and others started talking about TFK’s upcoming trek to Kilimanjaro in February 2013 at the reception afterwards.  I was hooked.  Somehow.  Not really sure what had just happened but I was in.  ALL IN.

Besides the orphanage work (fundraising for it and actually spending a few days there), there are three key aspects for me about the hike itself:  training, gear/packing preparations, and a third that I have yet to name at this point in this writing…

Kids, uniform, Tanzania

The kids at the Kili Centre orphanage sporting the new uniforms paid by funds raised by this trek

Training for climbing Kilimanjaro

Fortunately, when I decided to go on this trek, I was still relatively fresh from my Romania hike and had continued exercising in general.  It makes for a good starting point!

I started more serious training by getting on the treadmill and increasing the incline over a few weeks to 15%, ending up doing this for a couple of hours.  I also used a backpack whose weight I kept increasing beyond the expected weight we would carry on the hike (about 15 lbs for our day needs; porters would be carrying the rest) .  I was doing great with this and was planning to mix in real hikes by going to small but still helpful Kennesaw Mountain near Marietta, Georgia, where I trained for the hike in Romania.  And that is when a mini disaster struck:  I over-stretched my Achilles tendons (both legs!) likely due to the imperfect simulation of a 15% incline on a treadmill.  It all seems obvious now but I had not contemplated that I could hurt myself that way – you just don’t know what you don’t know!

That set me back about 6 weeks at a point when the intensity of my training was really beginning to pay off.  (I am almost back to normal and training again at this point.)   Not only that but I gained weight due to the double whammy of Thanksgiving and Christmas falling squarely in that 6-week period…  So now I will carry even more weight uphill 🙂

Advice:  If you embark on something like this without that type of starting point – don’t fret!  Just be sure to start gradually.  Aggressive training from cold is more than likely counterproductive if not outright a risk!  That’s the easiest way to get injured.  And also, stretch even of days you are not training.  Stretching is your best ally in physical readiness.

Getting in gear.  The gear to climb Kilimanjaro!

After being in good conditioning for the hike, the next item on the list is all the stuff that I will need on the hike.  That short word “stuff” covers a wide range of things that I will need to make this a successful trip.  After getting the packing list from TFK (VERY thorough!), I did an inventory of what I had and what I needed to research/acquire.  I started staging all my items in a spare bedroom.  It looks like a mess but it does two things for me:  1.  allow me to start gathering in one place all that I will need to pack making packing later a lot easier and 2.  allow me to start enjoying the upcoming trek by seeing it shape up!

packing gear for hiking trip

The “mess” in the spare bedroom!

Advice

  • Get a good packing list for the type of hike
  • Go talk to your local outfitter before you acquire things to learn about what they recommend, what materials are out there, criteria for choosing items, etc.
  • Then proceed with sourcing the items (borrow or buy).

Let me share some more specifics about gear and packing here (for a more detailed description of the clothing I took, go here)…  But do check out this post on what I considered my 7 key items for this hike (written BEFORE the hike) and then the top 14 things I took (written AFTER the hike)!

I am happy to email you a copy of my packing list!

Clothing for your packing list

Mt. Kilimanjaro covers multiple climate zones ranging from forest where one may be trudging through mud to extreme cold and windy terrain towards the top.  Guess what?  That means carrying gear to deal with all the climate zones but, most importantly, to deal with the extreme cold and wind which is far more dangerous to a hiker.  The key to all this is layers.  Not rocket science, I know.  I hear the cold towards the top is brutal!

The list I was provided by TFK was very clear on what was needed.  I went (a few times!) to my favorite outfitter and explores the options available for each category of item needed.  I have learned WAY more than I thought I’d ever learn about gear.  And spent way more than I ever thought I’d spend.  But two things help:  one, I have bought thinking of re-use especially at ski time or in future treks and, second, I have tried to borrow some items (though it has not been as much as I would have hoped for).

Advice My advice to you is to borrow, or buy used if possible, and think of re-use as you make choices on what to get.  For example, instead of buying the absolute best gloves for the extreme temperature, think of using liners, etc. so the gloves themselves can work for you in less extreme weather back at home.

Accessories for the Kili climb

This covers a whole range of items like the hiking poles (with shock absorbers!  see here for more on them), headlamp (not only to read at night or go potty in the middle of the night but also for the night hiking we will do on summit day!), sleeping bag liner (to make it warm enough for the coldest nights), sleeping bag pad (for comfort and further insulation from the very cold ground), cameras (yes, plural:  the big one is not summiting with me – too heavy), even duct tape!

Advice:  Borrow, or buy used if possible.  Buy new if that suits you better.  However, another possibility is renting some of the items on-site.  This helps you in two ways:  not buying stuff if you are not going to be hiking/camping more than this trip and also reducing the amount of stuff you have to lug half way around the world!  However, some potential downsides of this:  you don’t know the condition of the item you will rent (dirty, torn up, etc.) and you may not find the right type for the item you are looking for.  For example, you need to be sure that sleeping bag will be warm enough.

Health/”Medical” items for your Kili climb

For this destination, one does have to be ready with anti-malarial and other items as recommended by the CDC.  I have all the hepatitis stuff from prior travels so the anti-malarial (which is taken for every trip) and the typhoid (which I needed) were on the must-have list.  But the medical category is not just the innoculations/vaccines.  Things like ibuprofen, Cipro (for the potential digestive maladies that could affect a traveler…), and maybe even something to help you sleep get on the list.  Other items, such like the iodine tablets, sunblock with DEET, high-SPF chapstick, etc. are more preventive in nature but just as important.  This list is very important and is sometimes less obvious than the gear and clothing lists.

Advice:  Do your research, ask people who have gone before (feel free to ask here!), and don’t try to save money by skimping on these items!

Finally – Emotional Preparedness

I will have to get back to you on this after the trip for a full report.  However, I had heard that a lot about hiking Kili is the mental strength to power through tough conditions like mud and rain, tiredness, perhaps pain, and other discomforts.  So I am thinking this would fall under emotional preparedness.  I have heard from people who have hiked it before that, in the end, this is the most important elements in preparing for Kili.  You may be fit, you may not.  Altitude sickness could keep you from summiting and that is independent of your fitness level (amazing!).  But if you don’t have some toughness in this realm, you may fall short of your goals.

We are lucky that our lead guide is one of the foremost mountain expedition leaders in the world, Luis Benitez.  He is also a Board Member of TFK!  In an email he sent the trekkers last week, he told us that the best thing to do in this category is to expect discomfort, understand it will happen, understand it starts and it ends.  All that so that when it hits at any point in the trip, you remember it will pass and you don’t let it bring you down (figuratively speaking!).  I think this is a great piece of advice that will serve ME well in these 2 weeks before I leave for this hike.

Advice:  Listen to Luis’ advice!

Final thoughts on climbing Kilimanjaro

I am almost done doing all the things that I need to do to be ready but, in the end, it is the emotional preparedness that I am not sure how to measure.  I cannot check it off a list, like I can do with the other items on my packing list.  Yet it is likely one of the most important success factors in this trek.  I don’t know if altitude sickness will beat me to the summit.  I can’t control that.  But I sure hope I am ready enough to control my willpower and discomforts to summit or get very close to it!  Kili, I shall meet you very soon!

Uhuru peak or Kilimanjaro, Tanzania

P.S. – Thanks for all the words of support, advice, and orphanage donations via Trekking for Kids!

——————————————————————————————————————————

A month after this post went up, I had completed climbing Kilimanjaro and started writing about every day in the trek (7 total days) and about the route we were to take.  Check it out!

–  The Machame Route

–  Gear for climbing Kili:  clothing

–  Day 1 (and links to the subsequent days)

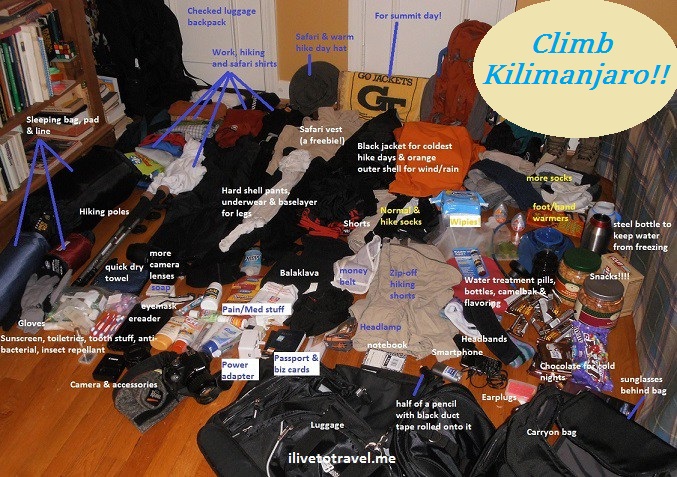
7 Items You Won’t See Me without while Hiking Kilimanjaro

If things go well, I will be trekking in Tanzania soon – hiking up Mount Kilimanjaro, the tallest mountain in Africa.  I am excited about the upcoming hike as I am doing it with Trekking for Kids, with whom I hiked in Romania in the summer of 2012.  Our hike will help a local orphanage with capital improvements to the infrastructure and, therefore, improve the standard of living for the children who live in the orphanage.  I do have anxiety about how well prepared I will be in terms of level of fitness and about how altitude may affect me.  But for everything else, research and planning has helped me ensure I have everything else I need for the hike!  Here are the seven items you will not see me without (should you see me!) while I hike “Kili”…

The things that will keep me warm

One of the most important things to know about Mount Kilimanjaro is that you go through five (5) distinct climate zones as you pursue this mountain.  This means you need to be prepared for the range of climate conditions across these 5 zones.  Pack for cold and pack for warm.  Of course, as the hike goes higher, I am told to expect VERY cold temperatures.  The challenge with this, for me, will be getting out of the sleeping bags in the cold mornings!!

Of course, using layers is how I will handle the variations in temperatures that I will go through during the hike.  Let me share my three most important items to pack to stay warm during the climb to the summit of Kilimanjaro:

#1 – Hardshell Exterior

My outermost layer is a hardshell exterior (see below for picture) to provide me protection from the wind and from water.  The Arcteryx piece I chose is of top quality and its design is perfect for the conditions of the hike, especially its versatility as it can serve in warmer and colder temperatures as a barrier to water.  It uses Gore-Tex and delivers a very lightweight piece – important as I will want to go as light as possible!  Some features that I liked about this model were the under-arm zippers in case extra ventilation is needed, and the hoodie.  Mine is orange, for the record.

Sample Outer ShellArcteryx Alpha SL Jacket

#2 – Jacket

For the second layer from the outside, I needed to choose something to keep me warm and, again, be light enough (begin to see a pattern?!).  I chose an REI Revelcloud jacket which can also serve as a barrier to water for times when I may not want to wear the outer layer.  At higher altitude, I will use both.  It can help withstand winds of up to 50 mph!   This particular jacket uses Primaloft, a synthetic material that emulates down but is not bulky and able to be compacted into the little bag it comes with.   Also, its design eliminates shoulder seams which will help with range of motion, especially good since I will likely be wearing multiple layers and too many seams can become an annoyance.   (I cannot find the item any more in the REI website; likely a new model is being rolled out – I bought mine at a great discount sale!  Below I share a link to what seems to be a similar item for this layer.)  I have to admit that I have been wearing this jacket when the weather has gotten cold as the material is very soft and it just feels good.  🙂

After trying several layers on, it became clear the outer ones described above should be a size larger than I would normally wear if not putting on several layers.  At colder times, I will be wearing two under layers:  a smart wool one and then perhaps a thinner one next to my skin (helping withdraw moisture from my skin).   I will likely not wear as many layers on my legs as I do on my torso.  Hiking pants with a thin layer (like long johns) under them should suffice.  Says he…

#3 – Sleeping bag

After discussing clothing, let me share how everyone stays warm at night.  <Sleeping bag enters the stage left of center>  Instead of buying a sub-zero-rated sleeping bag that I may not use too often, I chose to go for one rated for zero degree (that I may get to re-use in other hikes that do not go as high and cold) and get a liner with something akin to thermonuclear for its rating.  (Do some reading on the ratings ahead of time so you know how to read the sleeping bag specs.)  I also wanted to make sure I used something that would pack relatively light.

The shape of the sleeping bag matters a good bit – something that had not occurred to me prior to researching the matter.  But it makes perfect sense that at very cold settings, you want to maximize heat retention.  Models whose width tapers down as it moves from head to feet are the best – they are called “mummy”-shaped as that is what they look like.  The less air inside, the less cold inside when you get it in that will need your body heat to warm up.  Therefore, more heat stays with you.  (That thermodynamics course in college is paying off – finally!)  This sleeping bag’s 2-way zippers will also make the job of closing and opening it up easier – nice feature!

Coleman Silverton 0 Degree Adult Mummy Sleeping Bag

#4 – My knee’s best friends – hiking poles

I have learned that hiking poles are my knees’ BFFs through my hiking experiences.  Hiking poles help with stability but, more importantly, they have a mission of protecting my knees from too much wear-and-tear, especially while descending when the knees get a pounding – especially if it is a few hours worth of going down like we will do in Kilimanjaro when we descend.  I decided to take advantage of a sale to get a great pair that have anti-shock features.  I am sure people will have different opinions but hikers that I know well (and trust) said they would be worth the extra expense.  The weight of the poles is also something to consider so an aluminum shaft was perfect.

After deciding on the anti-shock and the weight, the next consideration was the grip or handle.  This is a matter of personal preference.  I chose a round cork top (that unscrews to also serve as a camera mount!) with a long foam cover under the top for the different grip I will want.  The locking mechanism can matter – some are easier to lock.  The ones I got use twist-lock for ease of adjusting since I will be wearing gloves a good bit.  Oh, and I bought rubber tips to use.  I share both the one I ended up getting and another I considered.   The one I got from REI.  What sold me on the REI one was the handle.

Black Diamond Trail Pro Shock Trekking Pole

#5 Big priority – stay hydrated:  Camelbak and Steripen to the rescue!

Hydration will be key to my well-being during this hike (pretty much true of any hike).  Carrying a bottle and dealing with pulling it out when I want to drink is a little bit of a nuisance.  This will especially be true on this hike when I may be wearing gloves a lot.  A camelbak is perfect as it allows easy access to water at any point without having to stop or slow down.  Additionally, I have learned that I drink water on a more frequent basis by sipping because it is easy with a camelbak tube versus gulping water more spaced out whenever I decide to pull a water bottle out.  Sipping has another added benefit:  because I don’t take in water in bigger gulps, I need fewer nature stops – who’s with me?? 🙂

My camelbak bag is inserted into my backpack (designed for this).  I may be buy something to protect the tube coming out of the backpack to prevent it from freezing when it is very cold.   Of course, making sure I have safe-to-drink water is a big priority.  Steripen or something similar will be crucial so consider it item #5.5!

SteriPEN Adventurer, Handheld UV Water Purifier
Oh, and someone suggested a hot water bottle that you fill in with hot water before zipping up the sleeping bag to help keep you warm AND to have non-freezing cold water when you wake up to drink!  Now, does that go in this section or on the first section about keeping warm??

#6 Finally, show me the way…  My headlamp

No, my final item is not my boots but that’s not because they are not important – they are supremely so!  Please be sure to find comfortable boots, that are water resistant, and then be very sure to break them in through practice hikes before you embark on the big hike.  Blisters are your worst enemy and proper footwear is key.  Back to #6… my headlight.  The ascent to Kili’s summit starts around midnight so this will be an essential item to go up.  Why does it start at this weird hour?  Because you want to be up there to see the first morning light!!  However, this headlamp will also be important so I can see at nighttime before I head to “bed” and in case I wake up in the middle of the night and need to relieve myself, something I hope I don’t have to do often!

Petzl – ACTIK Headlamp, 300 Lumens, Active Lighting
 

#7 OK, one more thing (I did say 7 in the title…)

Duct tape!  Duct tape can serve MANY purposes.  If anything breaks, you can likely fix it with some duct tape.  But also, should you start developing blisters, apply some small strips of duct tape to protect the spot as soon as you feel the heat coming on and prevent a full-blown blister.  Blisters are THE last thing a hiker needs!  In any case, duct tape can help repair things that are important to you during the hike.  Sure, you may toss the things later but not while on the mountain!  So, duct tape can keep things going until you can properly fix or dispose of them.  I recommend rolling duct tape along the hiking poles for easy access without looking through a backpack’s worth of contents or having to remember to put it in the backpack to begin with!  I will let you pick the color of duct tape – bright orange could be useful if you get lost – ha!  (Mine was white, for what that’s worth.  No reason for it!)

Well, a few more things to bring along… bonus round!

I hope this has been a helpful list – would love to hear your own suggestions or get your questions.  There are many other things to consider as you prep for a hike like this and I would be remiss if I don’t list some of them here just to be sure you don’t miss some key items:  a backpack that feels comfortable (and that has both waist and chest front straps to prevent back issues), sunblock (and wear it!), chapstick (with sunblock – the sun’s rays are much more powerful at altitude), snacks, wipies, underwear that wicks moisture away from your skin (prevent chaffing), sunglasses, a nice warm hat, very warm gloves (OK, you may want two types:  one for extreme cold and a regular pair), ear plugs (because you never know who may be sleeping next to you…), a hot water bottle (will feel nice inside that sleeping bag!), and finally:  a camera for all the great shots you will want to take!

Bottom line:  do your research and be prepared – it will make the experience much more memorable!  Stay tuned for my updates from my hike of Kilimanjaro!

I did write more in two other posts AFTER the hike so check them out for more insights after the specific Kilimanjaro experience:


Pin this to your hiking board so you can refer back to this post and a visual of all the things you will pack!

Kilimanjaro, planning, gear, packing, climb, hiking, trekking, Tanzania, mountaineering

Pin it and dream of Kili!

Interview with the Ultimate Global Explorer: Len Stanmore

Len Stanmore has climbed the highest peak in every continent (the “7 Summits”), skied to both the North Pole AND the South Pole, and run across 3 of the 4 major deserts of the world:  the driest (Atacama), the windiest (Gobi), and the hottest (Sahara).  Impressed?  From November 22 to December 3, 2012, Len will race across the last major desert:  the coldest (Antarctica) with Racing the Planet’s 4 Deserts series.  With this race, Len will be the only (yes, THE only) person to have ever accomplished all these remarkable feats – a true ultimate global explorer (with all due respect to explorers of other eras)!!

Len Stanmore, Ultimate Global Explorer

I had the good fortune of meeting Len last September as he supports a non-profit organization close to my heart, Trekking for Kids (TFK) with whom I trekked in Romania earlier this year.  Len has supported TFK before and is now using his Antarctica race as a fundraiser to help TFK improve the lives of orphaned and at-risk children around the world.  Check out more about Len’s support of TFK via his Trekking for Kids page and support him!

Why I am sharing Len’s story? 

Len’s story has inspired me to go somewhere I have never sought to go before:  the summit of Kilimanjaro.

Uhuru Peak Kilimanjaro in Tanzania

Believe it or not, I was NEVER hoping to or interested in climbing “Kili“.  But Len’s story of how he got going with this incredible journey inspired me to aim for this summit.  See, Len decided at 49 years old he had to do something to improve his health.  He chose a goal that would push him and he chose Kili.  I thought to myself:  gosh, I am younger than he was and in good physical condition – so why am I NOT trying to climb Kili???  That, and talking to Len and a couple of other veteran Kili hikers sealed the deal for me.  So in February 2013, I will be headed to Tanzania for the climb of my life!

Len graciously made some time to talk to me as his training and prep wind down and the big day gets near and I wanted to share that with you…

Now to the interview… Everyone, meet Len Stanmore

–>  Len, the set of races/climbs that you will complete in November with your run across Antarctica sounds like beyond the reach of mere mortals:  Was this part of a grand goal you set for yourself after your first climb or how did it come to happen?

My first and only goal at the time was Kilimanjaro.  It was while doing Kilimanjaro that I first heard the term “7 Summits”.  I decided during that hike that the Vinson Massif, the tallest peak in Antarctica, would be next – for no good reason!  I guess it not being that tall at around 16,000 ft made it seem quite attainable.  Of course, I did not stop to think about how cold it would be!  From then on, I would just hear of the other types of expeditions and then pursue them.

–>  Did you ever feel that one of the goals was be too big of a challenge to accomplish?

I had not done much research on the 7 Summits so I was not sure early on if I would get to summit Everest.   I will say that the scariest of all was McKinley. The climate is quite harsh (not that Everest’s isn’t!).  In fact, I first attempted to summit McKinley but it was too stormy and I decided not to pursue it that time.  Then I did Everest.  Eventually I returned to McKinley and reached the summit.  The other thing about McKinley is that you don’t have porters.  You take ALL your stuff UP the mountain breaking into sweat for real:  carrying a bag weighing about 60 lbs and pulling a sled with another 70-80 lbs (at this point, the interviewer was feeling out of breath and breaking into a sweat just thinking about it!).

–>  You have said that Kilimanjaro was your favorite hike.  Why is it?

Kilimanjaro is the only one of the places I have tackled that I would go back to.  I love Africa.  And I love that climbing Kilimanjaro allows you to experience so many ecosystems.  It, along with Everest, are the better known mountains of the seven and Kili is quite doable (though training is still required!).

–>  Len, I heard you say you were scared of heights… 

I still am!  Going up a ladder to about 20 feet is about it for me!

–>  How did you work through that fear to climb the 7 Summits?   How did you avoid thinking about it?

What makes you think I DIDN’T think about it?!  My stomach tightens up in those situations… Usually it’s the downhill that’s the worse.  I just force myself to focus and keep moving.

Len Stanmore completes the Gobi Desert Race in the 4 Desert Series

After completing the Gobi Desert race in 2011

–>  Of all these expeditions which one was your least favorite?  If you had to do all these again but were allowed to exclude one, which one would it be?

Oh wow. Let me recap all in my mind… (pauses for a moment) I think it would be Aconcagua.  At the time it was the highest altitude I had attempted so I felt the lack of oxygen.  It was really hot in the valley you crossed to get there.  Plus, it was not very scenic, not breathtaking like the others.

–>  Of the day-to-day things on your expeditions, what are the worst things you wish you did not have to deal with?

Oh, the worst part is when you are at altitude or in a very cold place and you wake up and have to get out of your warm sleeping bag!  Then rush to find your things and pack up quickly in very little time.  There is a lot of pressure in the morning.  When you start for a summit, many times you leave at night.  It’s a dash, trying to do everything with the headlamp, and then you realize most people are ready and you are not.  It’s nerve-wracking!

–>  And what do you look forward to in the day-to-day of these expeditions (beyond finishing!)?

Besides the camaraderie of the group hiking together, the best part of the every day is simple.  You have left camp and started the day’s hike, past the hustle of getting ready.  Thirty minutes to an hour after the start of the day’s hike, your body calms down, your heart rate goes down, and you start appreciating where you are and you soak it all in.

–>  You have selected Trekking for Kids and its mission to benefit from your accomplishments – what led you to select this organization?

I was hiking Cotopaxi in Ecuador and my guide, Luis Benitez, asked me if I wanted to go with him to an orphanage he had to make a stop at.  I accompanied him and saw the situation where the girls in the orphanage at a certain age have to leave.  I thought to  myself:  if these girls do not get an education or skills, what will happen to them?  And even before that day comes, at the orphanage it felt it was almost a matter of day-to-day survival.  I have been skeptical of organizations that ask for money for orphanages for a long time.  But it is different with TFK.  The money goes to specific projects that the orphanage identifies and that TFK vets (with receipts being submitted, etc.).  It blew me away the work TFK does with the orphanages – it’s amazing.  I know that the funds I give to and raise on behalf of TFK is going to benefit the kids, not a middleman or an organization.

Trekking for Kids

–>  What would you hope people who learn about your story get from it?

Simple.  My hope would be that they would identify their own quest or challenge, and that they go for it whatever it is!

–>  Finally, and the most important question:  You, your wife Liz, myself, and others will be hiking Kilimanjaro next February with TFK.  I just did my first big hike in the Transylvanian Alps in Romania last July.  On a scale of 1 to 10, how concerned are you that I will beat you to the summit? 🙂

(laughs)  VERY concerned!  Are you kidding me??!!   In all seriousness, we will get to the summit at the same exact time as one group!

What now?  And a more important reason why I share his story with you

Now?  I am now eagerly following Len’s preparations for Antarctica and will follow him during the race via TFK’s Facebook page where daily updates will be posted. It will be exciting to hear about his race!  Best of luck, Len, in this last leg of a great series – and I will see you and Liz in Tanzania in February!!

I find Len’s story to be an amazing one and I hope that sharing it with you may inspire you to your own epic journey (be it of this kind or any other!) as it has inspired me to push myself physically and mentally to do Kili!

Trekking with a Purpose – the Best of Both Worlds

My trip to Romania and Moldova was triggered and centered around a hike in Romania organized by Trekking for Kids to support a local orphanage.  If it were not for this organization, I may have waited much longer to get to Romania and, more than likely, never hiked the beautiful trails along the Carpathian Mountains.  And, if it were not for this organization, I would not have met the wonderful kids I met at the orphanage in Romania.

A hike around the Bucegi Mountains in Romania

The Bucegi Mountains

Trekking for Kids

Trekking for Kids (TFK) was created in 2005 to find a way to support orphanages around the world while combining those efforts with treks for those helping fundraise for those orphanages (see their full story).  Over the years, they have conducted treks (some of them they repeat over the years) and helped orphanages in (trek/orphanage):   Everest Base Camp/Nepal, Camino de Santiago/Morocco, Inca Trail/Peru, Kilimanjaro/Tanzania, and others.  In fact, Kilimanjaro is planned for 2013 along with a couple of  other unnamed destinations but including college- and family- oriented treks!  So go check them out and bookmark; you never know what will call to you!

The Romania Trek

In this Romania trek, TFK organized a well-planned and well-run hike whether for newbie trekkers like me or experienced ones as some of my fellow trekkers.  Their choice of the hike guides (Your Guide Romania) was simply outstanding; they do more than hikes and should you desire to explore Romania and mix with adventures like hiking, paragliding, skiing, etc., they ARE your guys and this group of trekkers seriously endorses them!

More importantly, TFK found and carefully vetted a local orphanage that would not just accept funds and other contributions but one that has a philosophy of truly caring for its children, offering them a healthy home environment, and that thought about the children’s long-term needs:  those once a child turns 18 and, normally, gets shown out of an orphanage.

The Foundation for Abandoned Children (Pentru Copii Abondonati) clearly has a vision not only for the immediate care of the children and young adults, but for preparing them to enter life outside of the home.  And that’s what I found so wonderful about the choice TFK made:  I knew my efforts, my donors’ contributions, and my time would be magnified as this foundation’s philosophy and approach was perfect to take the unexpected support they were receiving via TFK and translating it into bigger possibilities for the children and young adults.

Our First Day with the Children

We arrived at one of the three houses in the town of Ghimbav, near Brasov, all eager to meet the children and wondering what specifically the conditions at the orphanage would be.  As we arrived, a couple of children came out as they were clearly all eagerly awaiting us.

We had just made the 2-3 hr drive from Bucharest on a Saturday morning which means it takes longer than normal due to weekend traffic from the big city to the country.  We had stopped at our hotel, the Kolping Hotel, on the outskirts of Brasov by the mountain with the BRASOV sign, to drop of our luggage before meeting the children.

So, we entered the orphanage and immediately started meeting both children and staff.  Lots of names to remember but TFK had brought name tags which would greatly facilitate remembering everyone’s names.  At some point, I traded names with one of the kids named Anton, and I started a mania – all of a sudden, and for most of the rest of the day, a constant flurry of name tag changing began.  The younger kids loved it and it made for part of the fun.

Clearly my name is not Anton but that was my name at the moment. Here with Alex, one of the older teens.

We were shown around the houses (2 owned by the foundation and 1 rented if I remember correctly).  The facilities were pretty good and that made my heart feel good as I have seen orphanages elsewhere where the conditions, while not the worst, still did not feel adequate for children.  Clearly, the foundation has done a good job of establishing a healthy environment for the children to live in.

The largest home houses kids, boys and girls, of all ages.  The second home houses boys.  The third home right now has mostly work space (e.g., a woodworking workshop) but will be prepared to take the older children/young adults after a new roof is installed and the indoor space renovated.  Some of the funds raised will go to the repair of the roof and some of the older boys have contributed to the prep work and will participate, led by the construction crew, in repairing the roof – a good skill to pick up!

House in Romania

The roof and space to be renovated

Old roof in a house in Romania

The upper space to be renovated

After getting a lay of the land and seeing the garden where they grow produce, we proceeded to break up into groups to do different projects.  Some of us stayed at the boys’ house to sand furniture down so they could be restored.  Others went off to help bottle up jam (to sell, along with crafts made by the kids, in local markets).  Others started doing a tie-dye shirt project which they kids and teens greatly enjoyed (and we the saw the end results when we returned after the hike – really good job!).  At some point, we all moved through some of the activities along with the children.  These activities enabled us to get to know the kids and the kids to get to know us.  It was a great afternoon.

Working hard and having fun with tie-dying!

Tie-dying

And lots of concentration!

Post-Hike Time at the Orphanage

Hike concluded, we went back to the orphanage for two days of activities:  on the first day BBQ/dinner and games at the orphanage; and the second day a morning hike followed by lunch.  The kids sported their newly-made tie-dye shirts and they truly were amazing!

The BBQ/dinner was a lot of fun.  These kids know how to fend for themselves and the food was delicious!  We then did several activities:  making smores, playing football (soccer) & basketball, etc.  I played my very first soccer match ever and apparently I am great at defending and goal-keeping!  Who knew!

Amateur soccer player

Yet-another Spanish-blooded Raul who can play football/soccer


The hike and lunch was a fun day too.  Not all the children went up the trail and stayed earlier in the trail.  The rest of us went to the top with a few of us hanging out and the bulk of the group going through a more difficult section of the trail.  I hung out with a couple of adults and a few of the kids who didn’t want to go on.  Afterwards, we treated the kids to a lunch out which was a great way to hang out before our departure for Bucharest, and back home.

Zoli and I killing time as we waited for the rest of the group

In the end, it’s never enough time to spend with the children and teens, especially once you make the connections.  While I do not know what the future brings, I sure hope I can remain in touch with the foundation and hear about the children – and, who knows, perhaps seeing them again some day!  And I also hope I am blessed with another opportunity to go on a trek with TFK.

Group picture

The entire group – thanks to the wonderful staff and the great children!

Traveling for Good – A Trek in Romania

I have pondered may a-times how lucky I am that I can travel to places around the world mostly for personal reasons and sometimes even for business.  I, like many others, are blessed with the opportunities possible in this day and age to make long distance travel possible.  In 14 hrs I can be in Seoul should I choose.  50 yrs ago, maybe a lot less years ago, that trip would have taken much longer to do.  And on and on I could go about how good we have it.

And then I realized that I can do these trips not only because the world is smaller and technology facilitates many things.  I can travel because where I was born and where I live have afforded me opportunities to be in a good enough situation to travel, something many people in other less developed countries may never have.  But I go further the more I think about it:  even if I didn’t have the wherewithal to be able to travel, I still don’t have to worry about many basic things.  Malaria is not a threat in my country.  Water safety is not a concern (usually, anyway).  There is good medicine accessible within a mile or so from where I live.  Etc.

Many people in this world have to worry about such things.  Forget about whether they would have the wherewithal to travel abroad – they have to worry about the basics that you and I, dear reader, more than likely will never have to worry about.  Yes, we do have issues too but not at the scale of what a good portion of our fellow human beings have to worry about.

It is with that in mind that I decided to do a trek to help some folks who may have a lot less of the basics than most of us.  A friend of mine founded an organization a few years ago that organizes treks in support of orphanages around the world.  They have gone to base camp in Everest, to the top of Kilimanjaro, done the Camino in Spain, hiked to Machu Picchu, etc.  This July they are organizing a “lite” trek in the mountains of Romania – the Transylvanian Alps – and I have decided to join them for the first time!  The organization is called Trekking for Kids.  The trek will begin and end in Brasov in central Romania, an area with well-known beauty and famous (or infamous as the case may be) for Bran’s Castle that inspired the Dracula story (I even hate to mention it but had to!).

Trekkers raise funds that directly fund the projects that will be done for the targeted orphanage (capital improvements, sustainability-oriented projects, etc.).  Not only do we fundraise for the orphanage but we will pitch in with sweat equity while at the orphanage as well as just be with the children.

I am thrilled to be undertaking this challenge.  It is a lite trek but that is 4 days in a row of hiking and I have not done more than one day ever… My longest hike was over 20 yrs ago…  So I will share a little between now and July about preparations for the trek and then share with you the experience once the trek is done.  I am hoping my troublesome knee will cooperate as it has been acting up the last 3 years.  But I hope it all works out for the best first and foremost for the kids in that orphanage in Brasov, Romania!

————————————————————-

If you’d like to support the orphanage projects via Trekking for Kids via my trek, go to their site, click on “Donate” on the top right, go to the “Select Trek or Fund” box and select “Romania 2012”, and then (don’t forget!), select me as the Trekker you are supporting!  (If you prefer to pay by check, please email me so I can get the form to you which will also provide you with your tax receipt.)

%d bloggers like this: